Finding these woven mats at Habitat was both exciting (ooh, fun new thrifted stuff to upcycle!) and confusing (too small to be placemats- what were these for?). Even though I couldn’t figure out their original purpose, I couldn’t wait to get them home. Because I had an idea for creating some botanical prints and they were the perfect medium to work with.
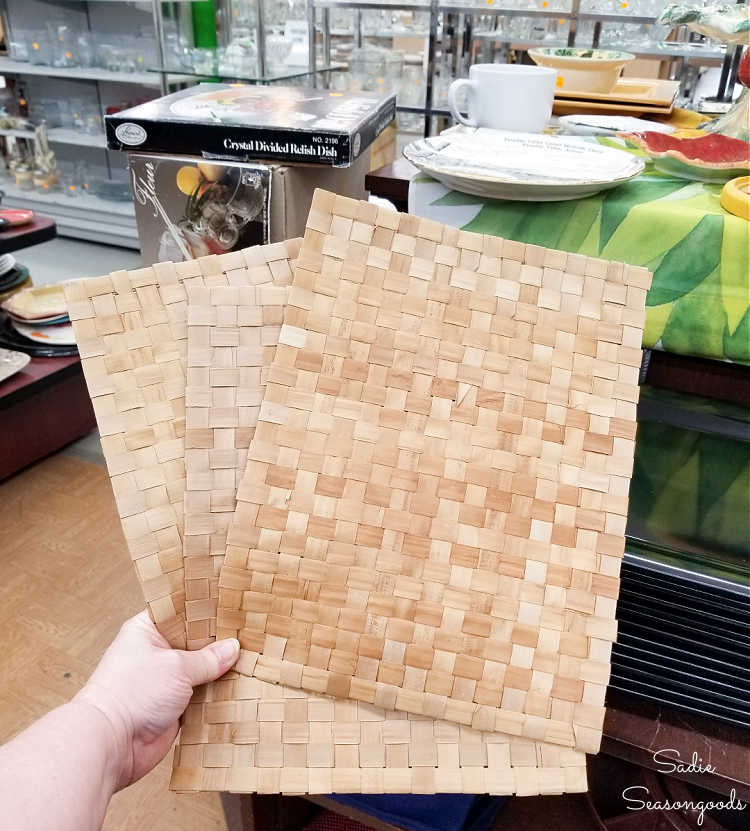
Image credit: Sadie Seasongoods.
Eventually, I was able to add a couple of larger palm mats to my collection that had definitely been used as placemats originally.
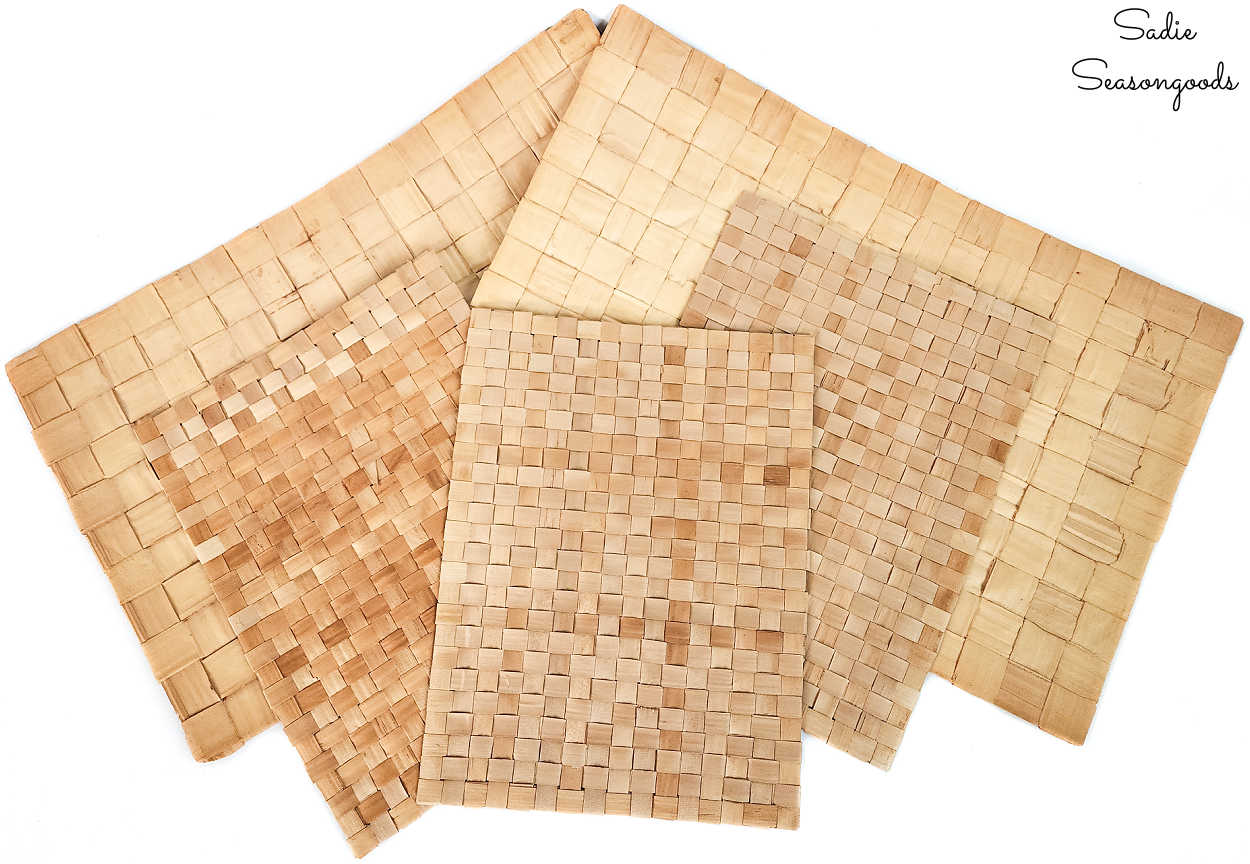
Image credit: Sadie Seasongoods.
NOW I could try out my experimental project. I’d already made a framed collection of vintage botanical prints before. This time, however, I was curious about stenciling ferns directly on the woven mats.
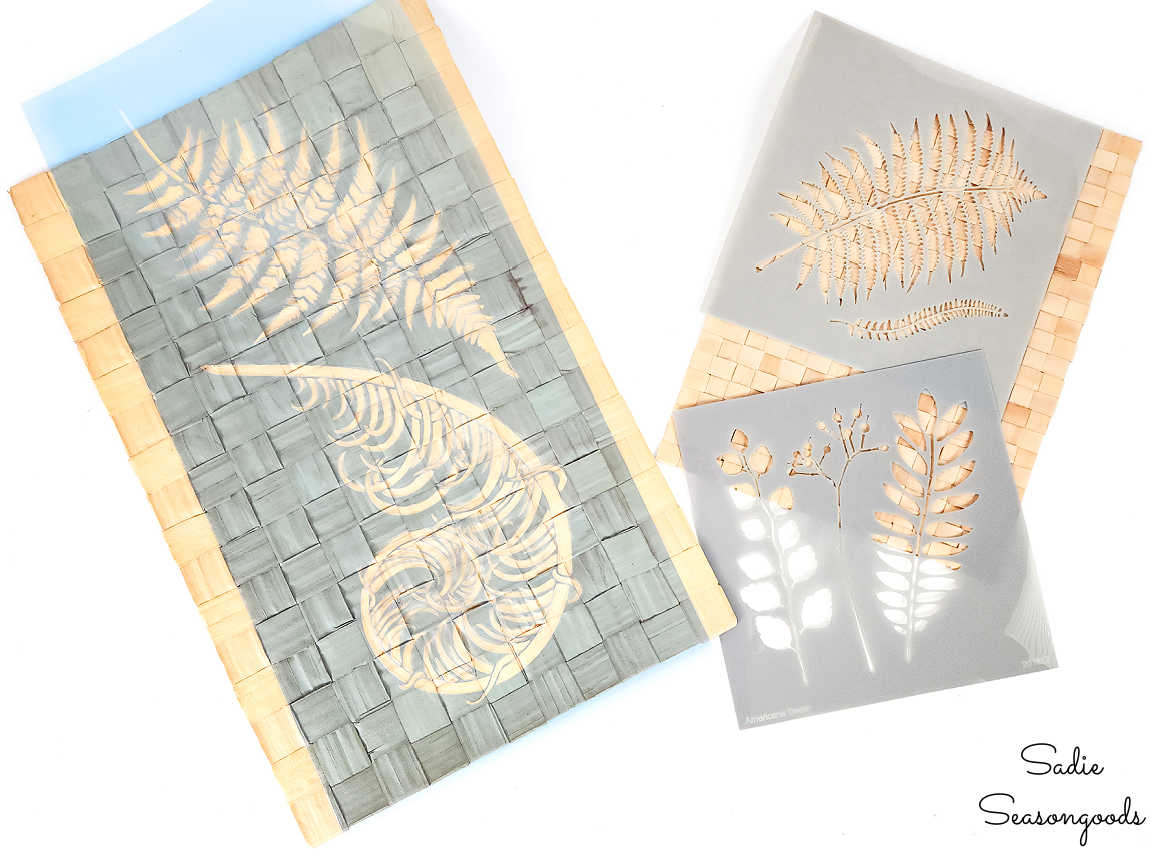
Image credit: Sadie Seasongoods.
I had no idea if stenciling would look crisp and clean on the woven mats. But I figured, if it looked terrible, I’d just turn them over for Project Idea #2 (whatever that would be). Want to see if my idea panned out?
This post contains affiliate links for your crafting convenience. As an Amazon Affiliate, I earn from qualifying purchases. All blue, bold, and underlined text is a clickable link to a product or a related post.
Stenciling the Botanical Prints
My approach to stenciling on the woven mats was going to be pretty standard- and similar to any/all of my previously stenciled pursuits. The only change was that I planned to clip the stencils to the mats instead of using tape.
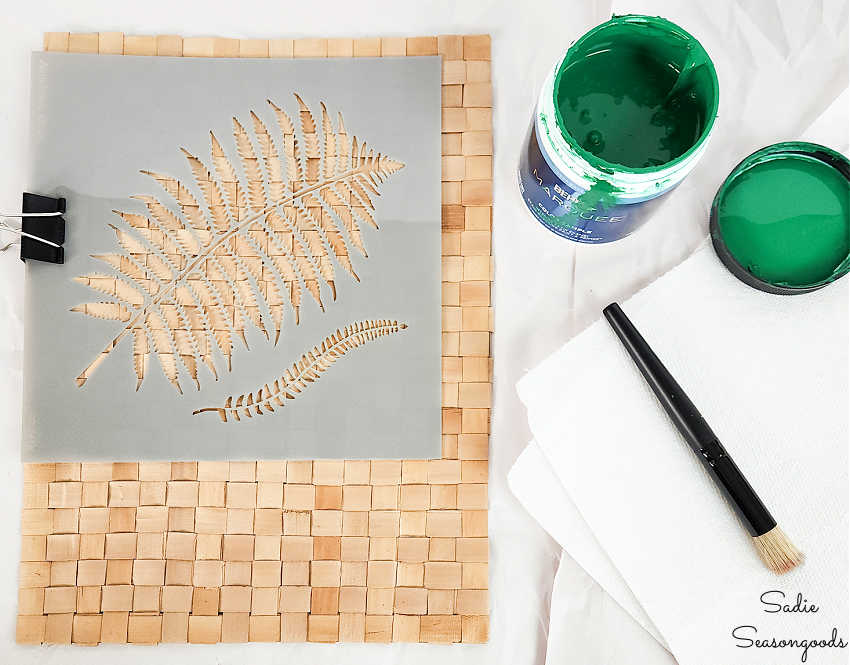
Image credit: Sadie Seasongoods.
Tape might have worked out- I honestly didn’t even try it out. Because I *really* wanted the stencils to stay in place and binder clips seemed like a firmer approach.
From there, I went about my normal stenciling approach: picking up paint (latex, in this case) on my brush, blotting most of it off, and stippling over the stencil.
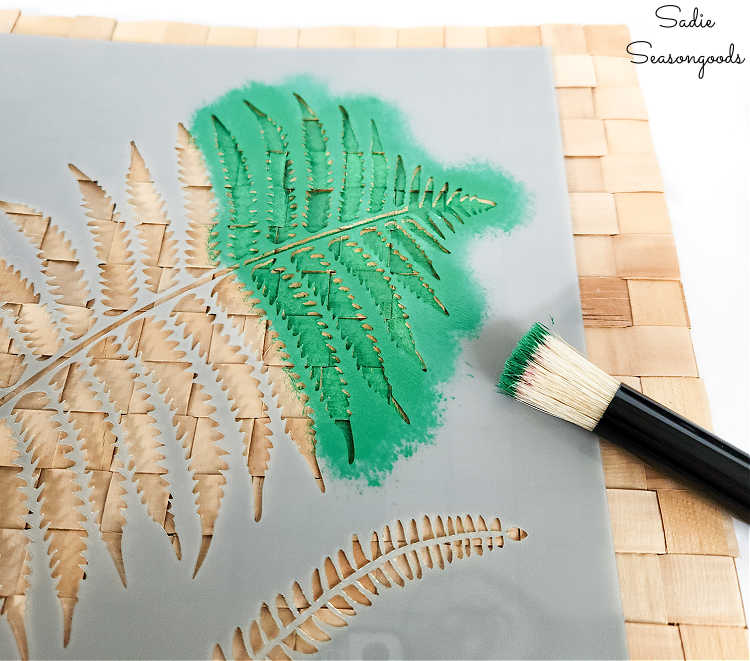
Image credit: Sadie Seasongoods.
Next, the moment of truth- would my first attempt at stenciling botanical prints look nice and crisp? Or smeary and awful?
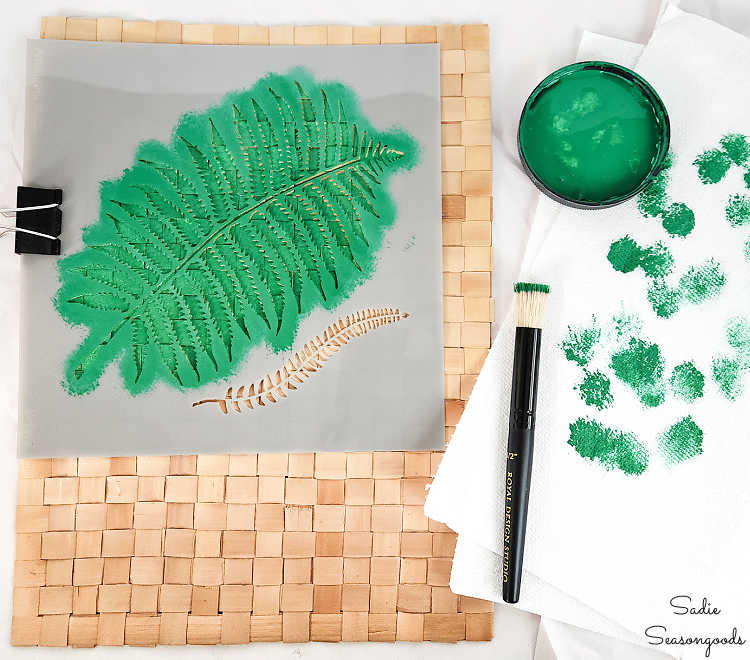
Image credit: Sadie Seasongoods.
‘TWAS RELIEF! It looked fantastic, to be honest- as if it had been laser-printed on the woven palm mat, not stenciled with paint.
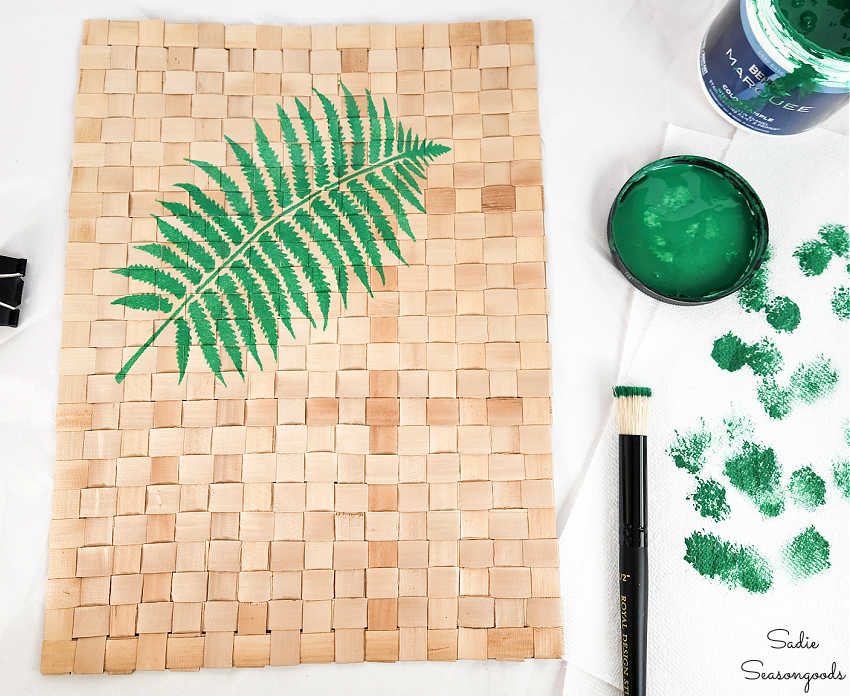
Image credit: Sadie Seasongoods.
After I was certain the first fern was completely dry, I laid the second stencil (from the same pack) over my work, clipped it in place, and went to work.
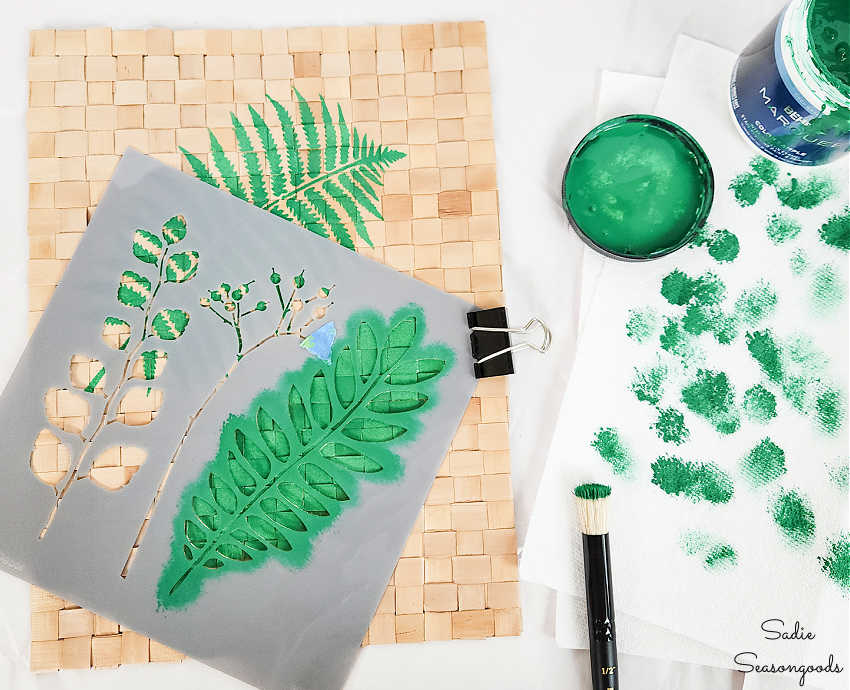
Image credit: Sadie Seasongoods.
Stenciling with Chalk Paint
Now, it was time to repeat the process on the woven placemats with a different, larger stencil. And to mix things up, I planned on using chalk paint instead.
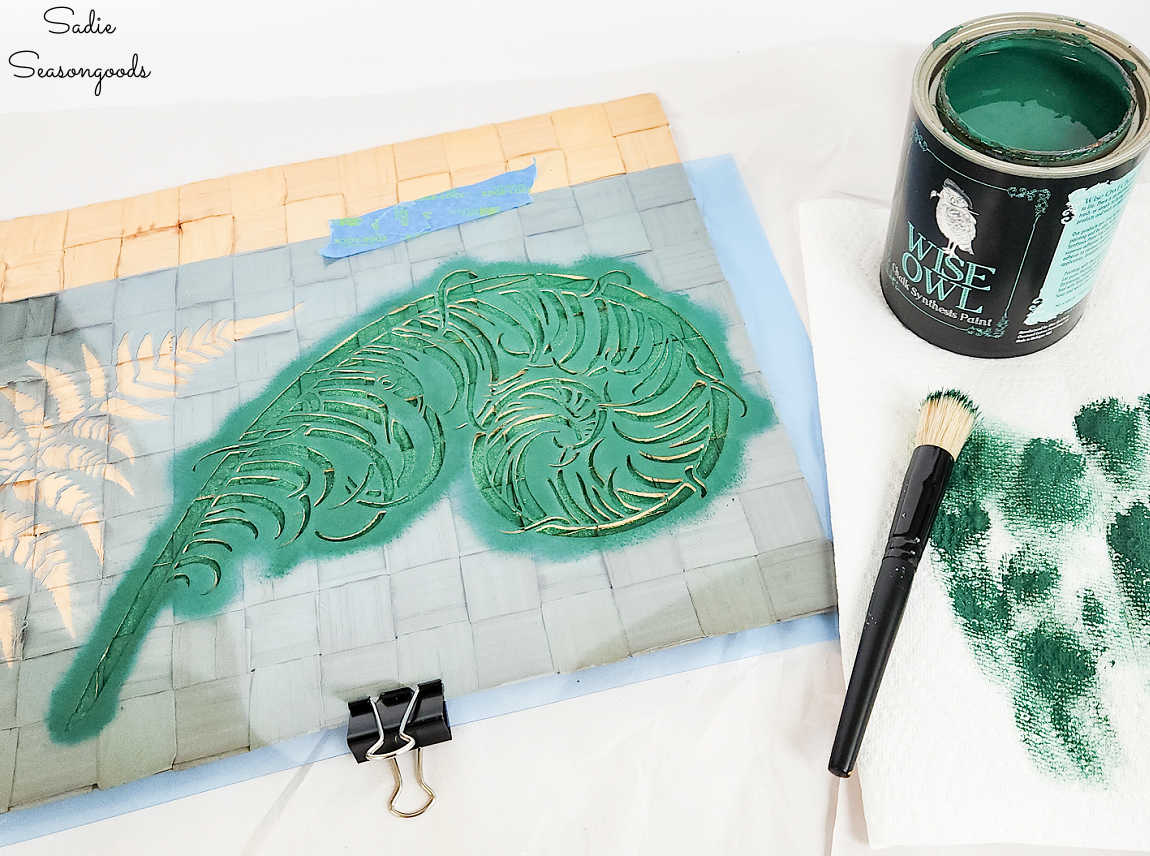
Image credit: Sadie Seasongoods.
The same chalk paint I used on these boho bookends, aptly named “Botanical”.
And hurray, hurray, the first of my larger botanical prints also turned out wonderfully!
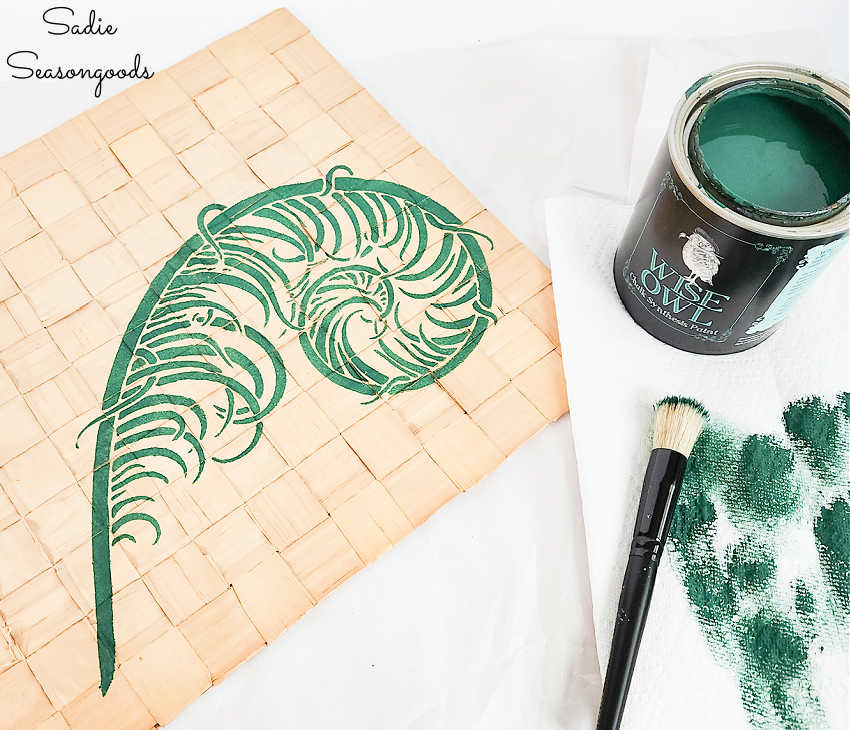
Image credit: Sadie Seasongoods.
Once again, I moved the stencil over the first print once it had fully dried and repeated the process. These ferns had a lot of details, so I took my time to ensure I covered every little peak and valley.
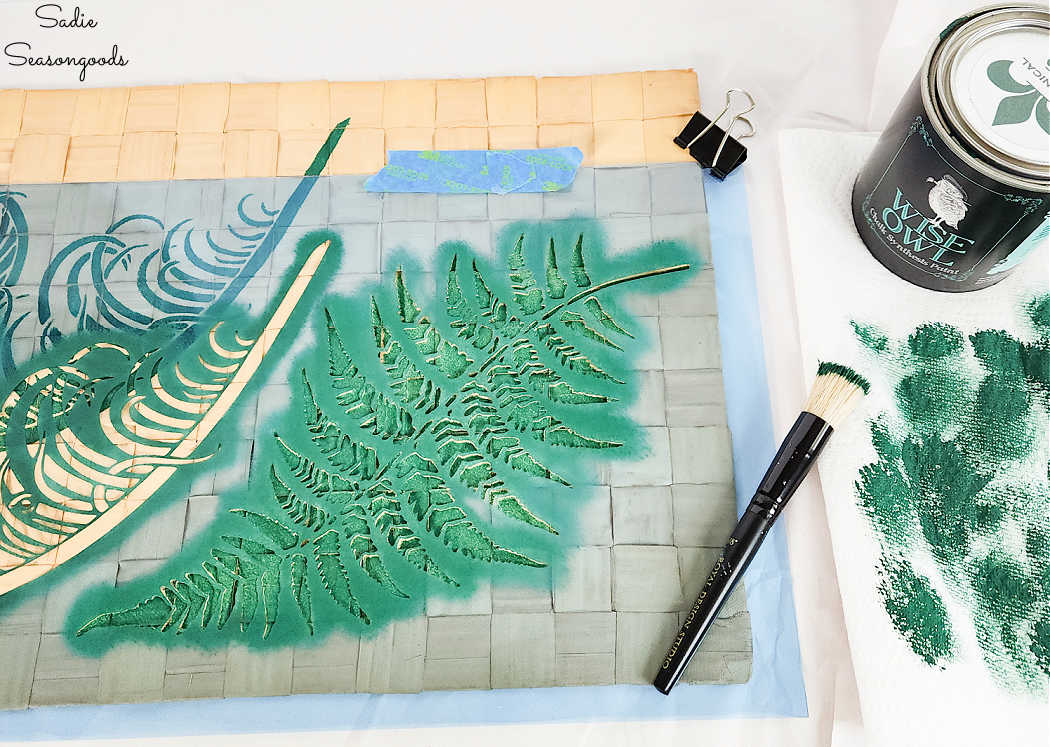
Image credit: Sadie Seasongoods.
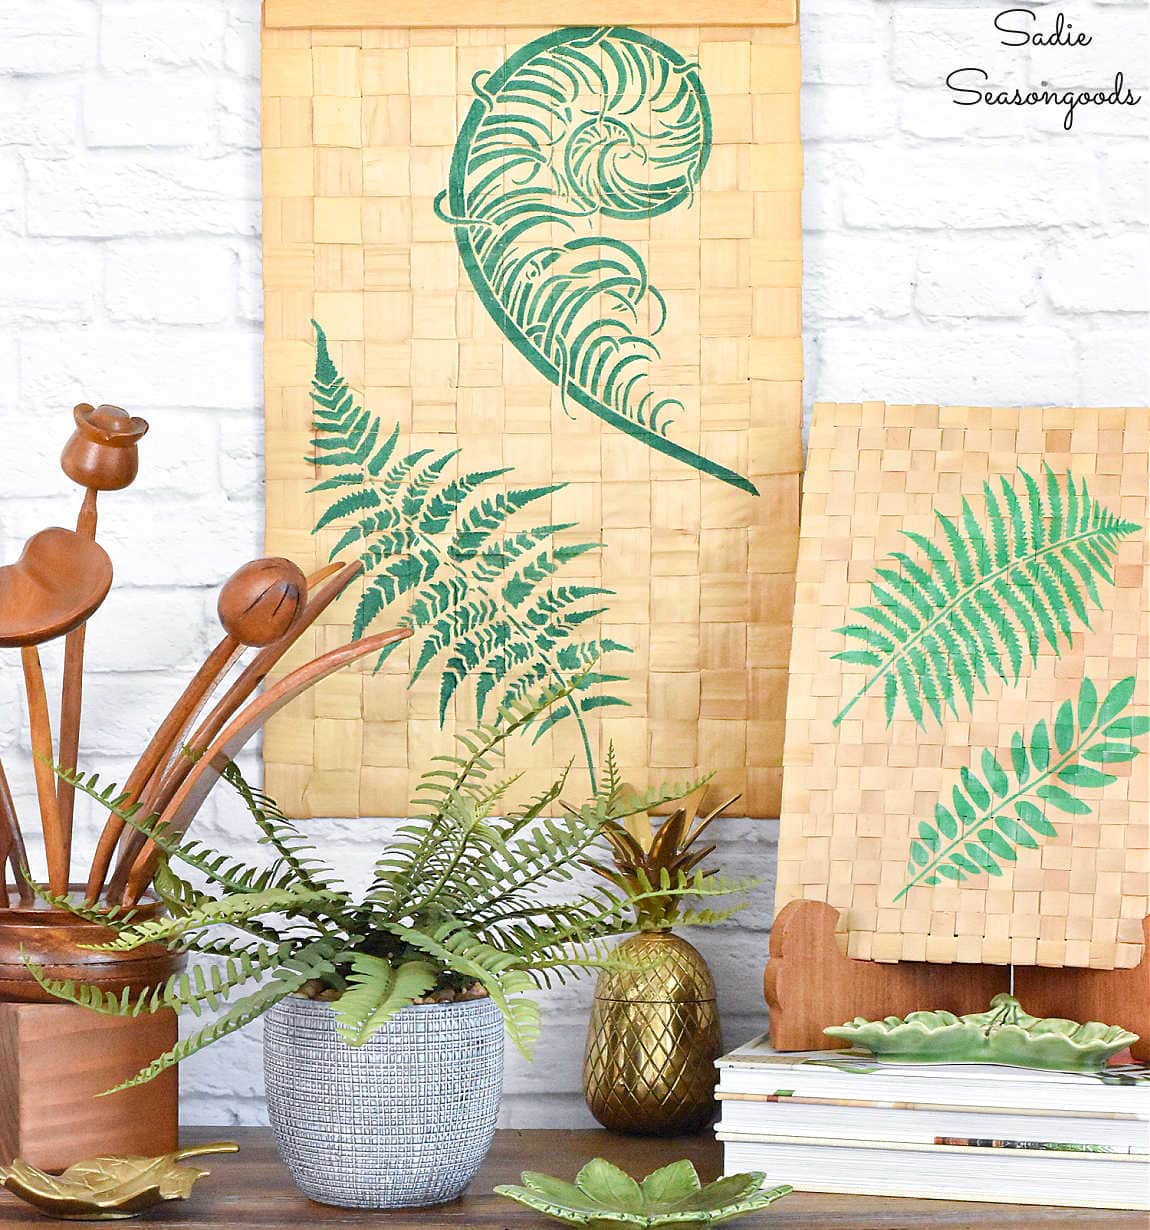
When all was said and done on the woven placemat, this is how it looked! I was thrilled with how the botanical prints looked on the natural mat.
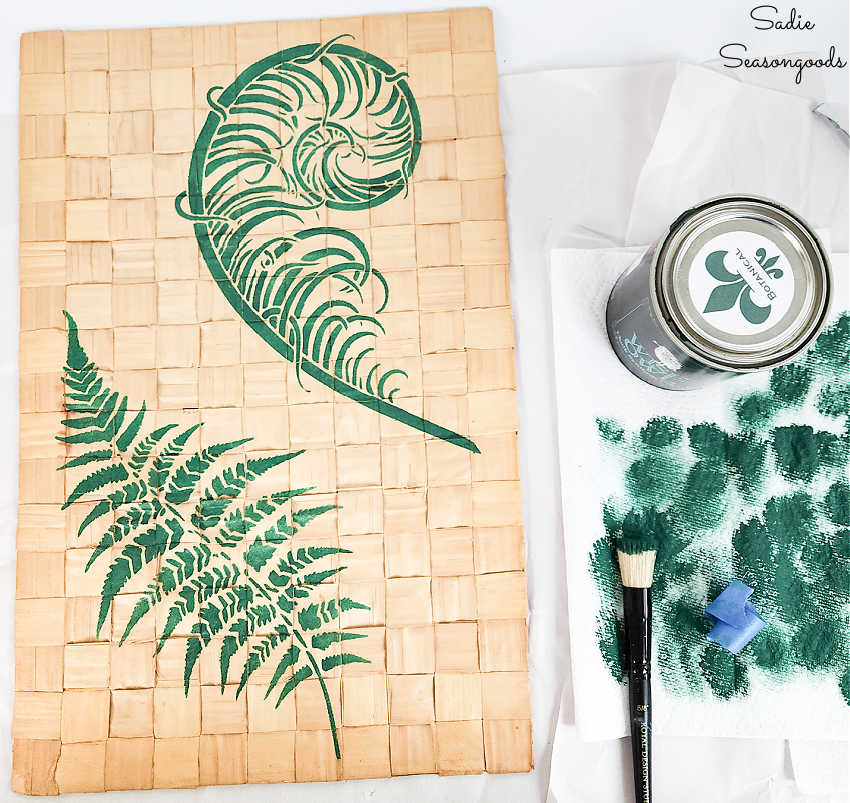
Image credit: Sadie Seasongoods.
In fact, both of them turned out beautifully, if I do say so myself. The smaller botanical prints have a slight sheen (latex paint) whereas the larger ones are completely matte (chalk paint).
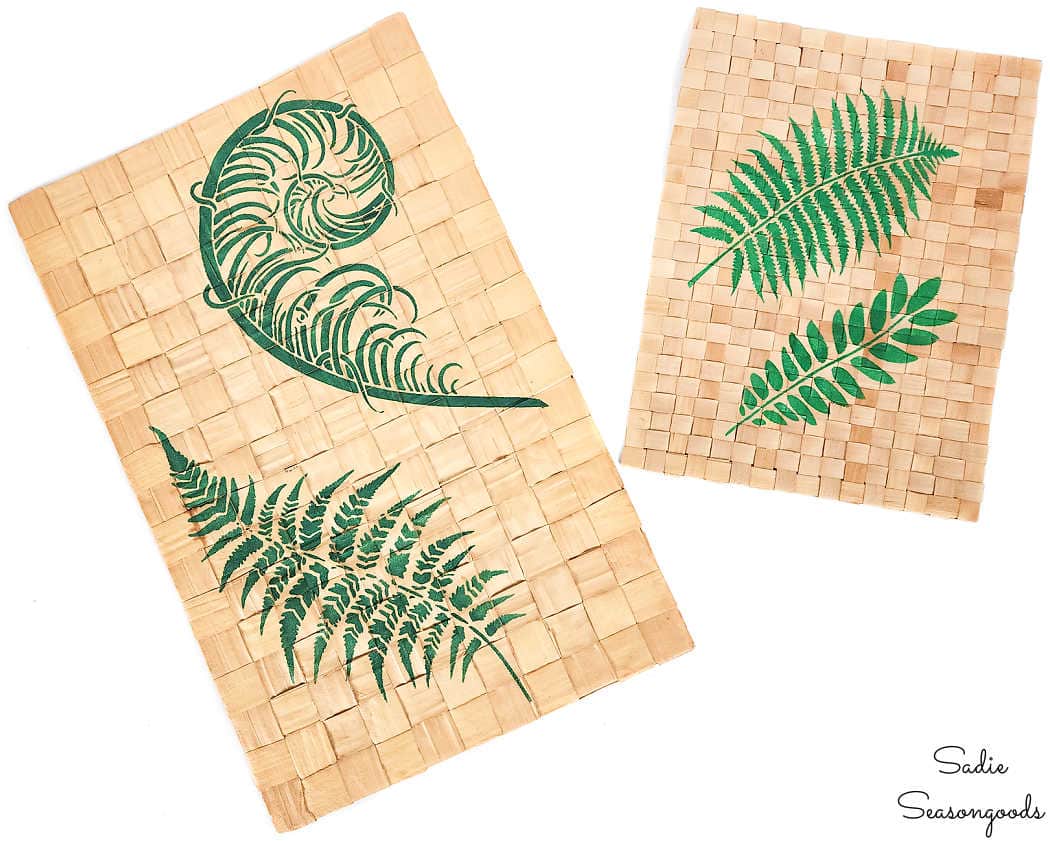
Image credit: Sadie Seasongoods.
In the end, I hemmed and hawed over whether or not to seal them. I made the executive decision not too, because I wasn’t sure how the top coat would interact with the natural palm mats. Maybe someday I’ll experiment if I find a badly stained or otherwise damaged mat.
But not on these botanical prints that I was absolutely swooning over!
Botanical Prints on Woven Mats
At this point, I opted not to frame them- but I may go that route in the future. For now, I used a vintage pants hanger to hang the larger print, and a small thrifted easel to display the smaller one.
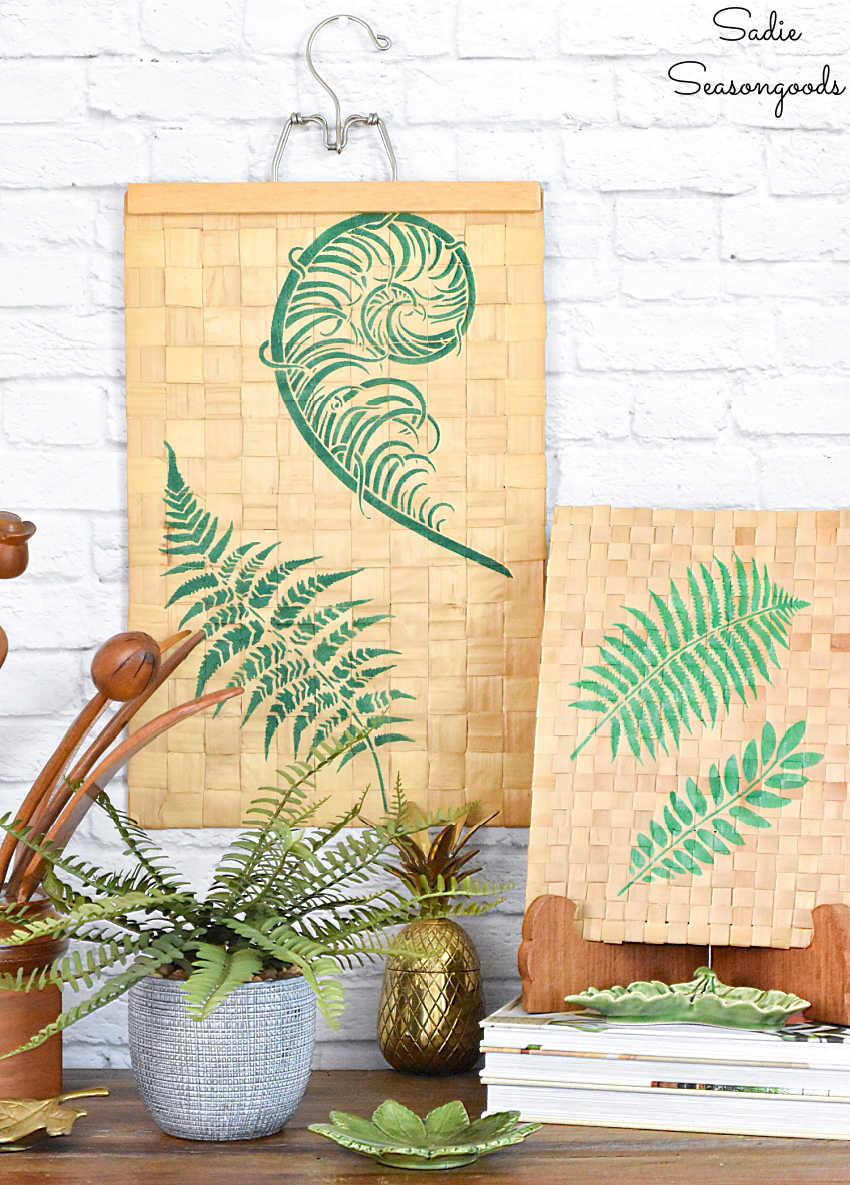
Image credit: Sadie Seasongoods.
I’ve long-admired the botanical prints that have been in vogue in recent years- both the authentically vintage ones and the vintage-looking ones. And I couldn’t be happier with how these versions on the natural mats turned out!
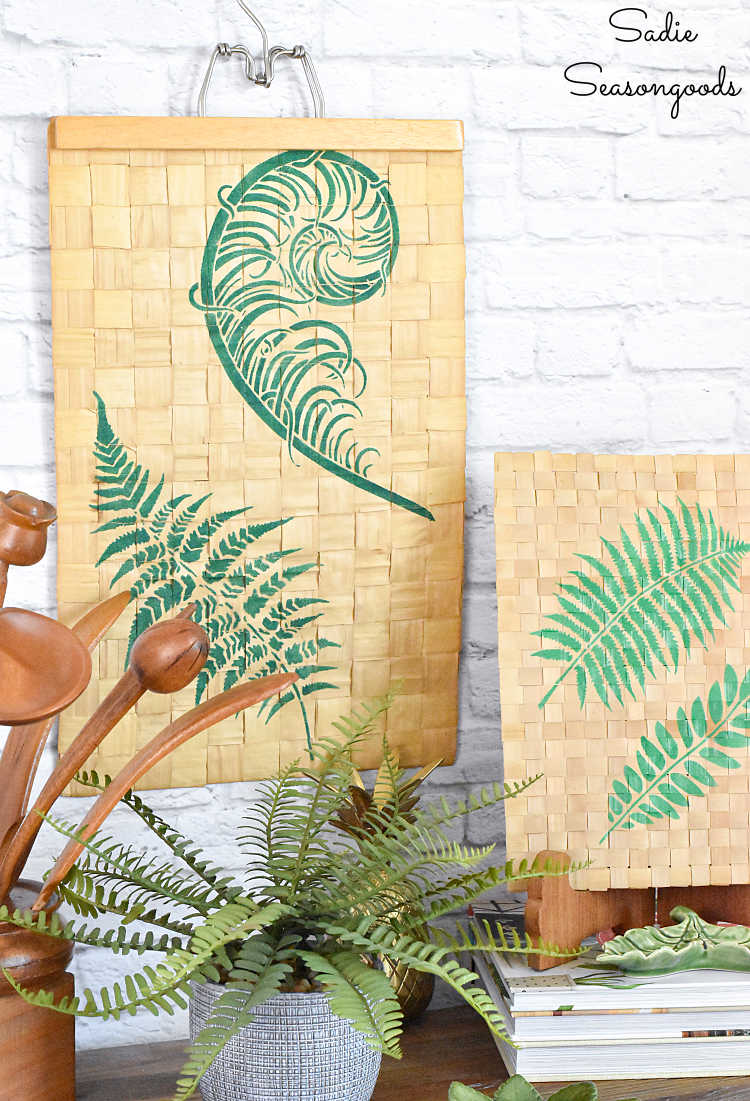
Image credit: Sadie Seasongoods.
The natural texture and look of the woven palm really pairs up nicely with botanical prints, don’t you think?
And, since today is the second Wednesday of the month, it’s Thrift Store Decor Team Day! I hope you’ll check out the projects my blogging galpals have been up to, too.

1. Vintage Scale Repurpose – House of Hawthornes
2. Decoupaged Mannequin Head – Shop at Blu
3. DIY Halloween Art – Our Southern Home
4. Update Wicker Baskets with Paint to Look Like Natural Rattan – My Uncommon Slice of Suburbia
5. Botanical Prints on Woven Mats – Sadie Seasongoods
6. Key Cabinet | Easy Makeover – My Repurposed Life
7. DIY Sea Glass Bottles – Petticoat Junktion
8. Thrifted Coffee Grinder Makeover – Organized Clutter
Craft on!
S
Want to be notified when I publish my next upcycling project tutorial?
Join me on Social Media:


PIN ME!
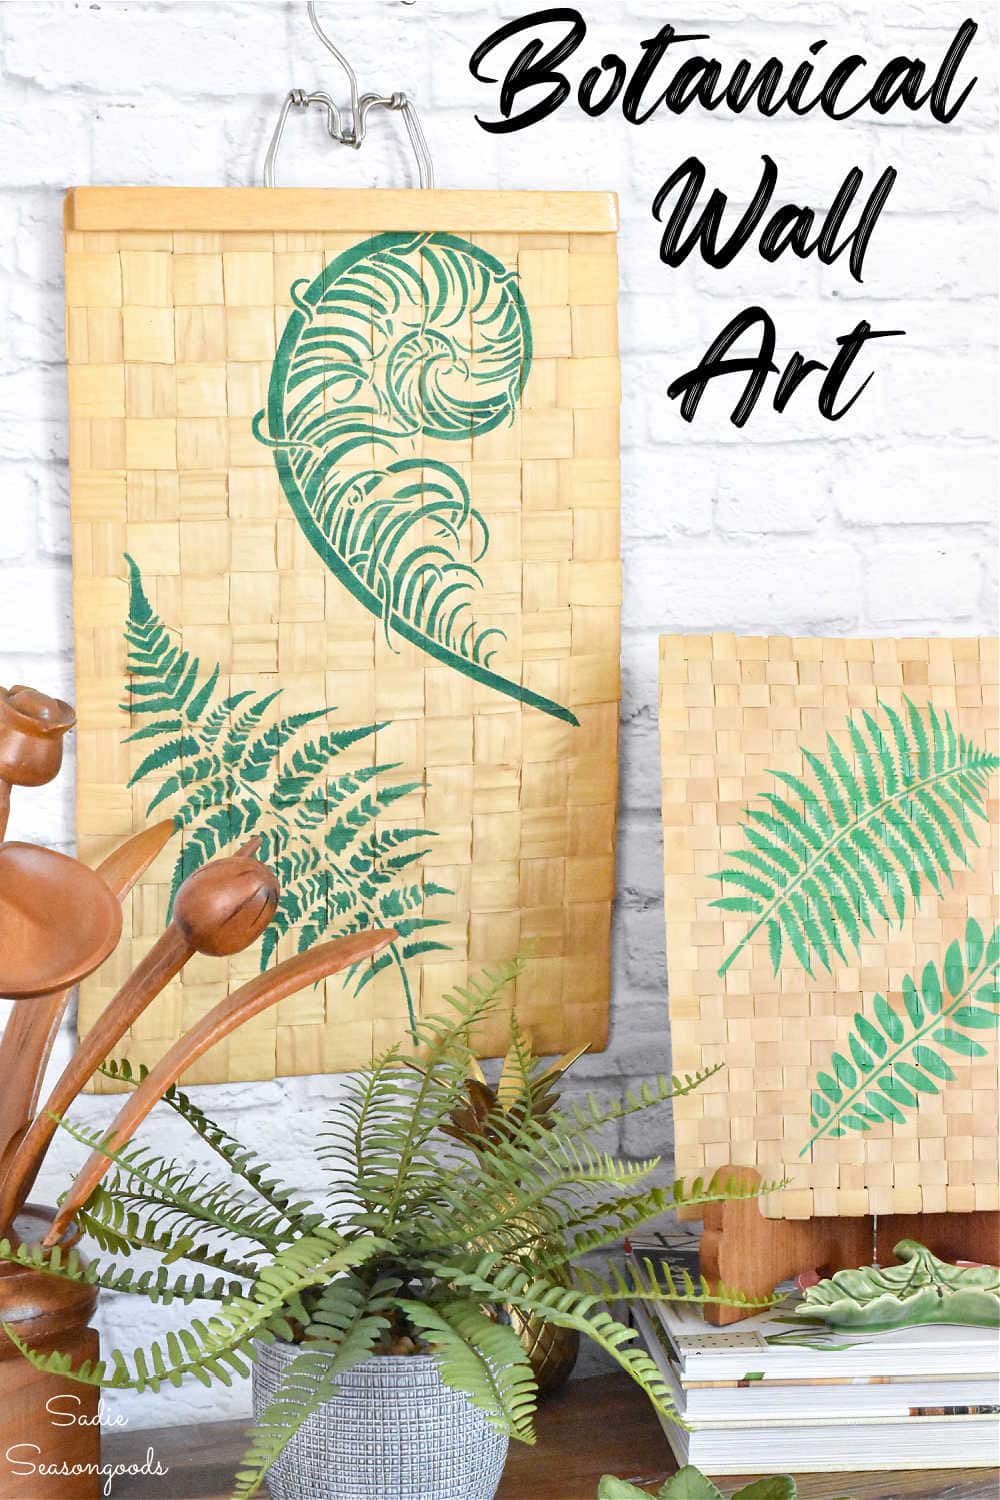
Image credit: Sadie Seasongoods.
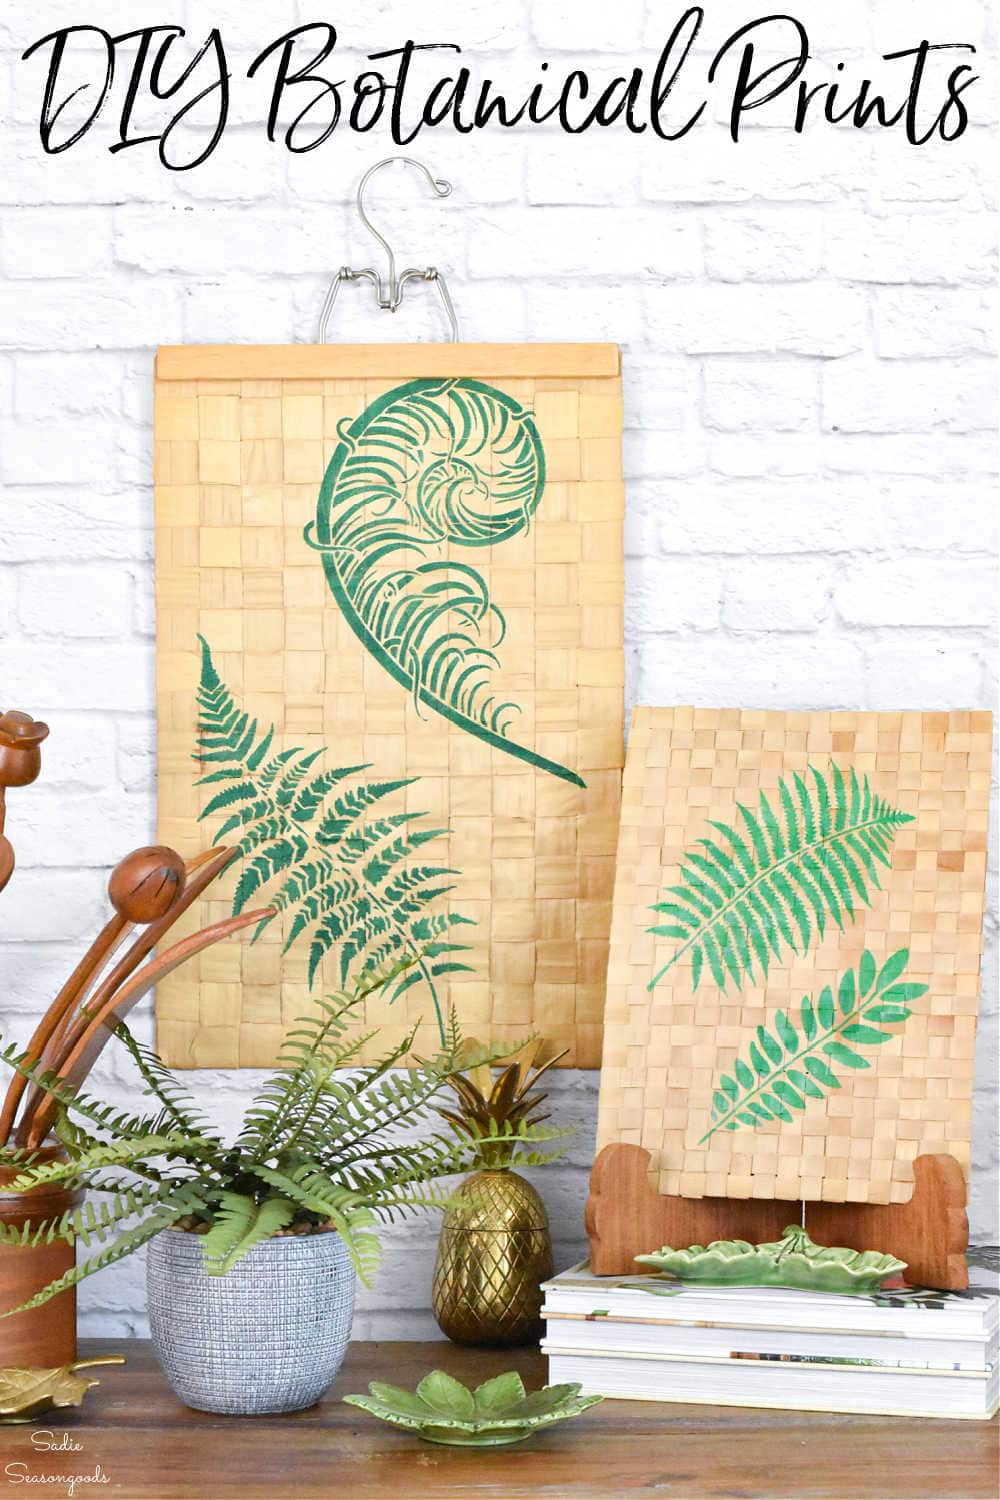
Image credit: Sadie Seasongoods.
Sarah Ramberg is the owner of Sadie Seasongoods, a website that celebrates all things secondhand. From upcycling ideas and thrifted decor to vintage-centric travel itineraries, Sadie Seasongoods is a one-stop shop for anyone who loves thrifting and approachable repurposing ideas. Sarah is also the author of “Crafting with Flannel” and has been featured in numerous media outlets and magazines.
- Sarah Ramberg
- Sarah Ramberg
- Sarah Ramberg
- Sarah Ramberg
- Sarah Ramberg
- Sarah Ramberg
- Sarah Ramberg
- Sarah Ramberg
- Sarah Ramberg
- Sarah Ramberg
- Sarah Ramberg
- Sarah Ramberg
- Sarah Ramberg
- Sarah Ramberg
- Sarah Ramberg
- Sarah Ramberg
- Sarah Ramberg
- Sarah Ramberg
- Sarah Ramberg
- Sarah Ramberg
- Sarah Ramberg
- Sarah Ramberg
- Sarah Ramberg
- Sarah Ramberg
- Sarah Ramberg
- Sarah Ramberg
- Sarah Ramberg
- Sarah Ramberg
- Sarah Ramberg
- Sarah Ramberg
- Sarah Ramberg
- Sarah Ramberg
- Sarah Ramberg
- Sarah Ramberg
- Sarah Ramberg
- Sarah Ramberg
- Sarah Ramberg
- Sarah Ramberg
- Sarah Ramberg
- Sarah Ramberg
- Sarah Ramberg
- Sarah Ramberg
- Sarah Ramberg
- Sarah Ramberg
- Sarah Ramberg
- Sarah Ramberg
- Sarah Ramberg
- Sarah Ramberg
- Sarah Ramberg
- Sarah Ramberg
- Sarah Ramberg
- Sarah Ramberg
- Sarah Ramberg
- Sarah Ramberg
- Sarah Ramberg
- Sarah Ramberg
- Sarah Ramberg
- Sarah Ramberg
- Sarah Ramberg
- Sarah Ramberg
- Sarah Ramberg
- Sarah Ramberg
- Sarah Ramberg
- Sarah Ramberg
- Sarah Ramberg
- Sarah Ramberg
- Sarah Ramberg
- Sarah Ramberg
- Sarah Ramberg
- Sarah Ramberg
- Sarah Ramberg
- Sarah Ramberg
- Sarah Ramberg
- Sarah Ramberg
- Sarah Ramberg
- Sarah Ramberg
- Sarah Ramberg
- Sarah Ramberg
- Sarah Ramberg
- Sarah Ramberg
- Sarah Ramberg
- Sarah Ramberg
- Sarah Ramberg
- Sarah Ramberg
- Sarah Ramberg
- Sarah Ramberg
- Sarah Ramberg
- Sarah Ramberg
- Sarah Ramberg
- Sarah Ramberg
- Sarah Ramberg
- Sarah Ramberg
- Sarah Ramberg
- Sarah Ramberg
- Sarah Ramberg
- Sarah Ramberg
- Sarah Ramberg
- Sarah Ramberg
- Sarah Ramberg
- Sarah Ramberg
- Sarah Ramberg
- Sarah Ramberg
- Sarah Ramberg
- Sarah Ramberg
- Sarah Ramberg
- Sarah Ramberg
- Sarah Ramberg
- Sarah Ramberg
- Sarah Ramberg
- Sarah Ramberg
- Sarah Ramberg
- Sarah Ramberg
- Sarah Ramberg
- Sarah Ramberg
- Sarah Ramberg
- Sarah Ramberg
- Sarah Ramberg
- Sarah Ramberg
- Sarah Ramberg
- Sarah Ramberg
- Sarah Ramberg
- Sarah Ramberg
- Sarah Ramberg
- Sarah Ramberg
- Sarah Ramberg
- Sarah Ramberg
- Sarah Ramberg
- Sarah Ramberg
- Sarah Ramberg
- Sarah Ramberg
- Sarah Ramberg
- Sarah Ramberg
- Sarah Ramberg
- Sarah Ramberg
- Sarah Ramberg
- Sarah Ramberg
- Sarah Ramberg
- Sarah Ramberg
- Sarah Ramberg
- Sarah Ramberg
- Sarah Ramberg
- Sarah Ramberg
- Sarah Ramberg
- Sarah Ramberg
- Sarah Ramberg
- Sarah Ramberg
- Sarah Ramberg
- Sarah Ramberg
- Sarah Ramberg
- Sarah Ramberg
- Sarah Ramberg
- Sarah Ramberg
- Sarah Ramberg
- Sarah Ramberg
- Sarah Ramberg
- Sarah Ramberg
- Sarah Ramberg
- Sarah Ramberg
- Sarah Ramberg
- Sarah Ramberg
- Sarah Ramberg
- Sarah Ramberg
- Sarah Ramberg
- Sarah Ramberg
- Sarah Ramberg
- Sarah Ramberg
- Sarah Ramberg
- Sarah Ramberg
- Sarah Ramberg
- Sarah Ramberg
- Sarah Ramberg
- Sarah Ramberg
- Sarah Ramberg
- Sarah Ramberg
- Sarah Ramberg
- Sarah Ramberg
- Sarah Ramberg
- Sarah Ramberg
- Sarah Ramberg
- Sarah Ramberg
- Sarah Ramberg
- Sarah Ramberg
- Sarah Ramberg
- Sarah Ramberg
- Sarah Ramberg
- Sarah Ramberg
- Sarah Ramberg
- Sarah Ramberg
- Sarah Ramberg
- Sarah Ramberg
- Sarah Ramberg
- Sarah Ramberg
- Sarah Ramberg
- Sarah Ramberg
- Sarah Ramberg
- Sarah Ramberg
- Sarah Ramberg
- Sarah Ramberg
- Sarah Ramberg
- Sarah Ramberg
- Sarah Ramberg
- Sarah Ramberg
- Sarah Ramberg
- Sarah Ramberg
- Sarah Ramberg
- Sarah Ramberg
- Sarah Ramberg
- Sarah Ramberg
- Sarah Ramberg
- Sarah Ramberg
- Sarah Ramberg
- Sarah Ramberg
- Sarah Ramberg
- Sarah Ramberg
- Sarah Ramberg
- Sarah Ramberg
- Sarah Ramberg
- Sarah Ramberg
- Sarah Ramberg
- Sarah Ramberg
- Sarah Ramberg
- Sarah Ramberg
- Sarah Ramberg
- Sarah Ramberg
- Sarah Ramberg
- Sarah Ramberg
- Sarah Ramberg
- Sarah Ramberg
- Sarah Ramberg
- Sarah Ramberg
- Sarah Ramberg
- Sarah Ramberg
- Sarah Ramberg
- Sarah Ramberg
- Sarah Ramberg
- Sarah Ramberg
- Sarah Ramberg
- Sarah Ramberg
- Sarah Ramberg
- Sarah Ramberg
- Sarah Ramberg
- Sarah Ramberg
- Sarah Ramberg
- Sarah Ramberg
- Sarah Ramberg
- Sarah Ramberg
- Sarah Ramberg
- Sarah Ramberg
- Sarah Ramberg
- Sarah Ramberg
- Sarah Ramberg
- Sarah Ramberg
- Sarah Ramberg
- Sarah Ramberg
- Sarah Ramberg
- Sarah Ramberg
- Sarah Ramberg
- Sarah Ramberg
- Sarah Ramberg
- Sarah Ramberg
- Sarah Ramberg
- Sarah Ramberg
- Sarah Ramberg
- Sarah Ramberg
- Sarah Ramberg
- Sarah Ramberg
- Sarah Ramberg
- Sarah Ramberg
- Sarah Ramberg
- Sarah Ramberg
- Sarah Ramberg
- Sarah Ramberg
- Sarah Ramberg
- Sarah Ramberg
- Sarah Ramberg
- Sarah Ramberg
- Sarah Ramberg
- Sarah Ramberg
- Sarah Ramberg
- Sarah Ramberg
- Sarah Ramberg
- Sarah Ramberg
- Sarah Ramberg
- Sarah Ramberg
- Sarah Ramberg
- Sarah Ramberg
- Sarah Ramberg
- Sarah Ramberg
- Sarah Ramberg
- Sarah Ramberg
- Sarah Ramberg
- Sarah Ramberg
- Sarah Ramberg
- Sarah Ramberg
- Sarah Ramberg
- Sarah Ramberg
- Sarah Ramberg
- Sarah Ramberg
- Sarah Ramberg
- Sarah Ramberg
- Sarah Ramberg
- Sarah Ramberg
- Sarah Ramberg
- Sarah Ramberg
- Sarah Ramberg
- Sarah Ramberg
- Sarah Ramberg
- Sarah Ramberg
- Sarah Ramberg
- Sarah Ramberg
- Sarah Ramberg
- Sarah Ramberg
- Sarah Ramberg
- Sarah Ramberg
- Sarah Ramberg
- Sarah Ramberg
- Sarah Ramberg
- Sarah Ramberg
- Sarah Ramberg
- Sarah Ramberg
- Sarah Ramberg
- Sarah Ramberg
- Sarah Ramberg
- Sarah Ramberg
- Sarah Ramberg
- Sarah Ramberg
- Sarah Ramberg
- Sarah Ramberg
- Sarah Ramberg
- Sarah Ramberg
- Sarah Ramberg
- Sarah Ramberg
- Sarah Ramberg
- Sarah Ramberg
- Sarah Ramberg
- Sarah Ramberg
- Sarah Ramberg
- Sarah Ramberg
- Sarah Ramberg
- Sarah Ramberg
- Sarah Ramberg
- Sarah Ramberg
- Sarah Ramberg
- Sarah Ramberg
- Sarah Ramberg
- Sarah Ramberg
- Sarah Ramberg
- Sarah Ramberg
- Sarah Ramberg
- Sarah Ramberg
- Sarah Ramberg
- Sarah Ramberg
- Sarah Ramberg
- Sarah Ramberg
- Sarah Ramberg
- Sarah Ramberg
- Sarah Ramberg
- Sarah Ramberg
- Sarah Ramberg
- Sarah Ramberg
- Sarah Ramberg
- Sarah Ramberg
- Sarah Ramberg
- Sarah Ramberg
- Sarah Ramberg
- Sarah Ramberg
- Sarah Ramberg
- Sarah Ramberg
- Sarah Ramberg
- Sarah Ramberg
- Sarah Ramberg
- Sarah Ramberg
- Sarah Ramberg
- Sarah Ramberg
- Sarah Ramberg
- Sarah Ramberg
- Sarah Ramberg
- Sarah Ramberg
- Sarah Ramberg
- Sarah Ramberg
- Sarah Ramberg
- Sarah Ramberg
- Sarah Ramberg
- Sarah Ramberg
- Sarah Ramberg
- Sarah Ramberg
- Sarah Ramberg
- Sarah Ramberg
- Sarah Ramberg
- Sarah Ramberg
- Sarah Ramberg
- Sarah Ramberg
- Sarah Ramberg
- Sarah Ramberg
- Sarah Ramberg
- Sarah Ramberg
- Sarah Ramberg
- Sarah Ramberg
- Sarah Ramberg
- Sarah Ramberg
- Sarah Ramberg
- Sarah Ramberg
- Sarah Ramberg
- Sarah Ramberg
- Sarah Ramberg
- Sarah Ramberg
- Sarah Ramberg
- Sarah Ramberg
- Sarah Ramberg
- Sarah Ramberg
- Sarah Ramberg
- Sarah Ramberg
- Sarah Ramberg
- Sarah Ramberg
- Sarah Ramberg
- Sarah Ramberg
- Sarah Ramberg
- Sarah Ramberg
- Sarah Ramberg
- Sarah Ramberg
- Sarah Ramberg
- Sarah Ramberg
- Sarah Ramberg
- Sarah Ramberg
- Sarah Ramberg
- Sarah Ramberg
- Sarah Ramberg
- Sarah Ramberg
- Sarah Ramberg
- Sarah Ramberg
- Sarah Ramberg
- Sarah Ramberg
- Sarah Ramberg
- Sarah Ramberg
- Sarah Ramberg
- Sarah Ramberg
- Sarah Ramberg
- Sarah Ramberg
- Sarah Ramberg
- Sarah Ramberg
- Sarah Ramberg
- Sarah Ramberg
- Sarah Ramberg
- Sarah Ramberg
- Sarah Ramberg
- Sarah Ramberg
- Sarah Ramberg
- Sarah Ramberg
- Sarah Ramberg
- Sarah Ramberg
- Sarah Ramberg
- Sarah Ramberg
- Sarah Ramberg
- Sarah Ramberg
- Sarah Ramberg
- Sarah Ramberg
- Sarah Ramberg
- Sarah Ramberg
- Sarah Ramberg
- Sarah Ramberg
- Sarah Ramberg
- Sarah Ramberg
- Sarah Ramberg
- Sarah Ramberg
- Sarah Ramberg
- Sarah Ramberg
- Sarah Ramberg
- Sarah Ramberg
- Sarah Ramberg
- Sarah Ramberg
- Sarah Ramberg
- Sarah Ramberg
- Sarah Ramberg
- Sarah Ramberg
- Sarah Ramberg
- Sarah Ramberg
- Sarah Ramberg
- Sarah Ramberg
- Sarah Ramberg
- Sarah Ramberg
- Sarah Ramberg
- Sarah Ramberg
- Sarah Ramberg
- Sarah Ramberg
- Sarah Ramberg
- Sarah Ramberg
- Sarah Ramberg
- Sarah Ramberg
- Sarah Ramberg
- Sarah Ramberg
- Sarah Ramberg
- Sarah Ramberg
- Sarah Ramberg
- Sarah Ramberg
- Sarah Ramberg
- Sarah Ramberg
- Sarah Ramberg
- Sarah Ramberg
- Sarah Ramberg
- Sarah Ramberg
- Sarah Ramberg
- Sarah Ramberg
- Sarah Ramberg
- Sarah Ramberg
- Sarah Ramberg
- Sarah Ramberg
- Sarah Ramberg
- Sarah Ramberg
- Sarah Ramberg
- Sarah Ramberg
- Sarah Ramberg
- Sarah Ramberg
- Sarah Ramberg
- Sarah Ramberg
- Sarah Ramberg
- Sarah Ramberg
- Sarah Ramberg
- Sarah Ramberg
- Sarah Ramberg
- Sarah Ramberg
- Sarah Ramberg
- Sarah Ramberg
- Sarah Ramberg
- Sarah Ramberg
- Sarah Ramberg
- Sarah Ramberg
- Sarah Ramberg
- Sarah Ramberg
- Sarah Ramberg
- Sarah Ramberg
- Sarah Ramberg
- Sarah Ramberg
- Sarah Ramberg
- Sarah Ramberg
- Sarah Ramberg
- Sarah Ramberg
- Sarah Ramberg
- Sarah Ramberg
- Sarah Ramberg
- Sarah Ramberg
- Sarah Ramberg
- Sarah Ramberg
- Sarah Ramberg
- Sarah Ramberg
- Sarah Ramberg
- Sarah Ramberg
- Sarah Ramberg
- Sarah Ramberg
- Sarah Ramberg
- Sarah Ramberg
- Sarah Ramberg
- Sarah Ramberg
- Sarah Ramberg
- Sarah Ramberg
- Sarah Ramberg
- Sarah Ramberg
- Sarah Ramberg
- Sarah Ramberg
- Sarah Ramberg
- Sarah Ramberg
- Sarah Ramberg
- Sarah Ramberg
- Sarah Ramberg
- Sarah Ramberg
- Sarah Ramberg
- Sarah Ramberg
- Sarah Ramberg
- Sarah Ramberg
- Sarah Ramberg
- Sarah Ramberg
- Sarah Ramberg
- Sarah Ramberg
- Sarah Ramberg
- Sarah Ramberg
- Sarah Ramberg
- Sarah Ramberg
- Sarah Ramberg
- Sarah Ramberg
- Sarah Ramberg
- Sarah Ramberg
- Sarah Ramberg
- Sarah Ramberg
- Sarah Ramberg
- Sarah Ramberg
- Sarah Ramberg
- Sarah Ramberg
- Sarah Ramberg
- Sarah Ramberg
- Sarah Ramberg
- Sarah Ramberg
- Sarah Ramberg
- Sarah Ramberg
- Sarah Ramberg
- Sarah Ramberg
- Sarah Ramberg
- Sarah Ramberg
- Sarah Ramberg
- Sarah Ramberg
- Sarah Ramberg
- Sarah Ramberg
- Sarah Ramberg
- Sarah Ramberg
- Sarah Ramberg
- Sarah Ramberg
- Sarah Ramberg
- Sarah Ramberg
- Sarah Ramberg
- Sarah Ramberg
- Sarah Ramberg
- Sarah Ramberg
- Sarah Ramberg
- Sarah Ramberg
- Sarah Ramberg
- Sarah Ramberg
- Sarah Ramberg
- Sarah Ramberg
- Sarah Ramberg
- Sarah Ramberg
- Sarah Ramberg
- Sarah Ramberg
- Sarah Ramberg
- Sarah Ramberg
- Sarah Ramberg
- Sarah Ramberg
- Sarah Ramberg
- Sarah Ramberg
- Sarah Ramberg
- Sarah Ramberg
- Sarah Ramberg
- Sarah Ramberg
- Sarah Ramberg
- Sarah Ramberg
- Sarah Ramberg
- Sarah Ramberg
- Sarah Ramberg
- Sarah Ramberg
- Sarah Ramberg
- Sarah Ramberg
- Sarah Ramberg
- Sarah Ramberg
- Sarah Ramberg
- Sarah Ramberg
- Sarah Ramberg
- Sarah Ramberg
- Sarah Ramberg
- Sarah Ramberg
- Sarah Ramberg
- Sarah Ramberg
- Sarah Ramberg
- Sarah Ramberg
- Sarah Ramberg
- Sarah Ramberg
- Sarah Ramberg
- Sarah Ramberg
- Sarah Ramberg
- Sarah Ramberg
- Sarah Ramberg
- Sarah Ramberg
- Sarah Ramberg
- Sarah Ramberg
- Sarah Ramberg


Super fun and cute botanicals!
Thanks, Carlene!
Wow, totally agree with you, they look wonderful. Those stencils are really really pretty. I looked up The Stencil Smith and they give you size and material choices which I think is excellent. Well done Sarah!
The Stencil Smith is a go-to favorite of mine. She does lots of sales and will also custom-size something if you email her. For a thrifted like me who finds strangely shaped items to stencil on, asking for custom sizes is a real lifesaver!
We still need art at the lake house rental. I love this ideas! You really have a creative eye!
Thank you, Christy! It’s such a fun way to put those retro placemats to good reuse!
Have you made jewelry’pictures’ with old jewelry?
I’m wondering what glue to use.
, metal to fabric.
Thank you for your consideration.
Sue Verbaan
I’ve not done it before, but blogger friends who have use E6000 glue for those types of projects. You can usually find it with the other glues/adhesives at craft stores.
Really beautiful job on the natural mats!
Thank you so much, Kim!
I love the mats and what you did with the stencil, they turned out so pretty!!! Thanks for sharing the tutorial with us!
Thanks, Kristin!
Sarah, Simple, Elegant, Gorgeous! I esp. love the vintage wood pants hanger. How do you clean your stencils after use so that they don’t get damaged? Just curious…
Sometimes I’ll try and rinse them and rub off what paint I can with my finger, but I don’t worry about it too much. If you don’t use too much paint on your brush, the build up doesn’t get that bad.
Those turned out so beautifully! What a great idea and so well done.
Thank you, Pam!
You have such a FABULOUS eye for the upcycle, Sarah!!
Don’t forget to join us over at the Creative Crafts Linky Party every Wednesday through Sunday
https://creativelybeth.com/creative-crafts-linky-party/
Followed and Pinned!
Creatively, Beth
Thank you so much, Beth!
How clever is this?! These leaf botanical prints really came out beautiful! And yes, a definite boho vibe!
Thank you so much, Donna- and for the feature!