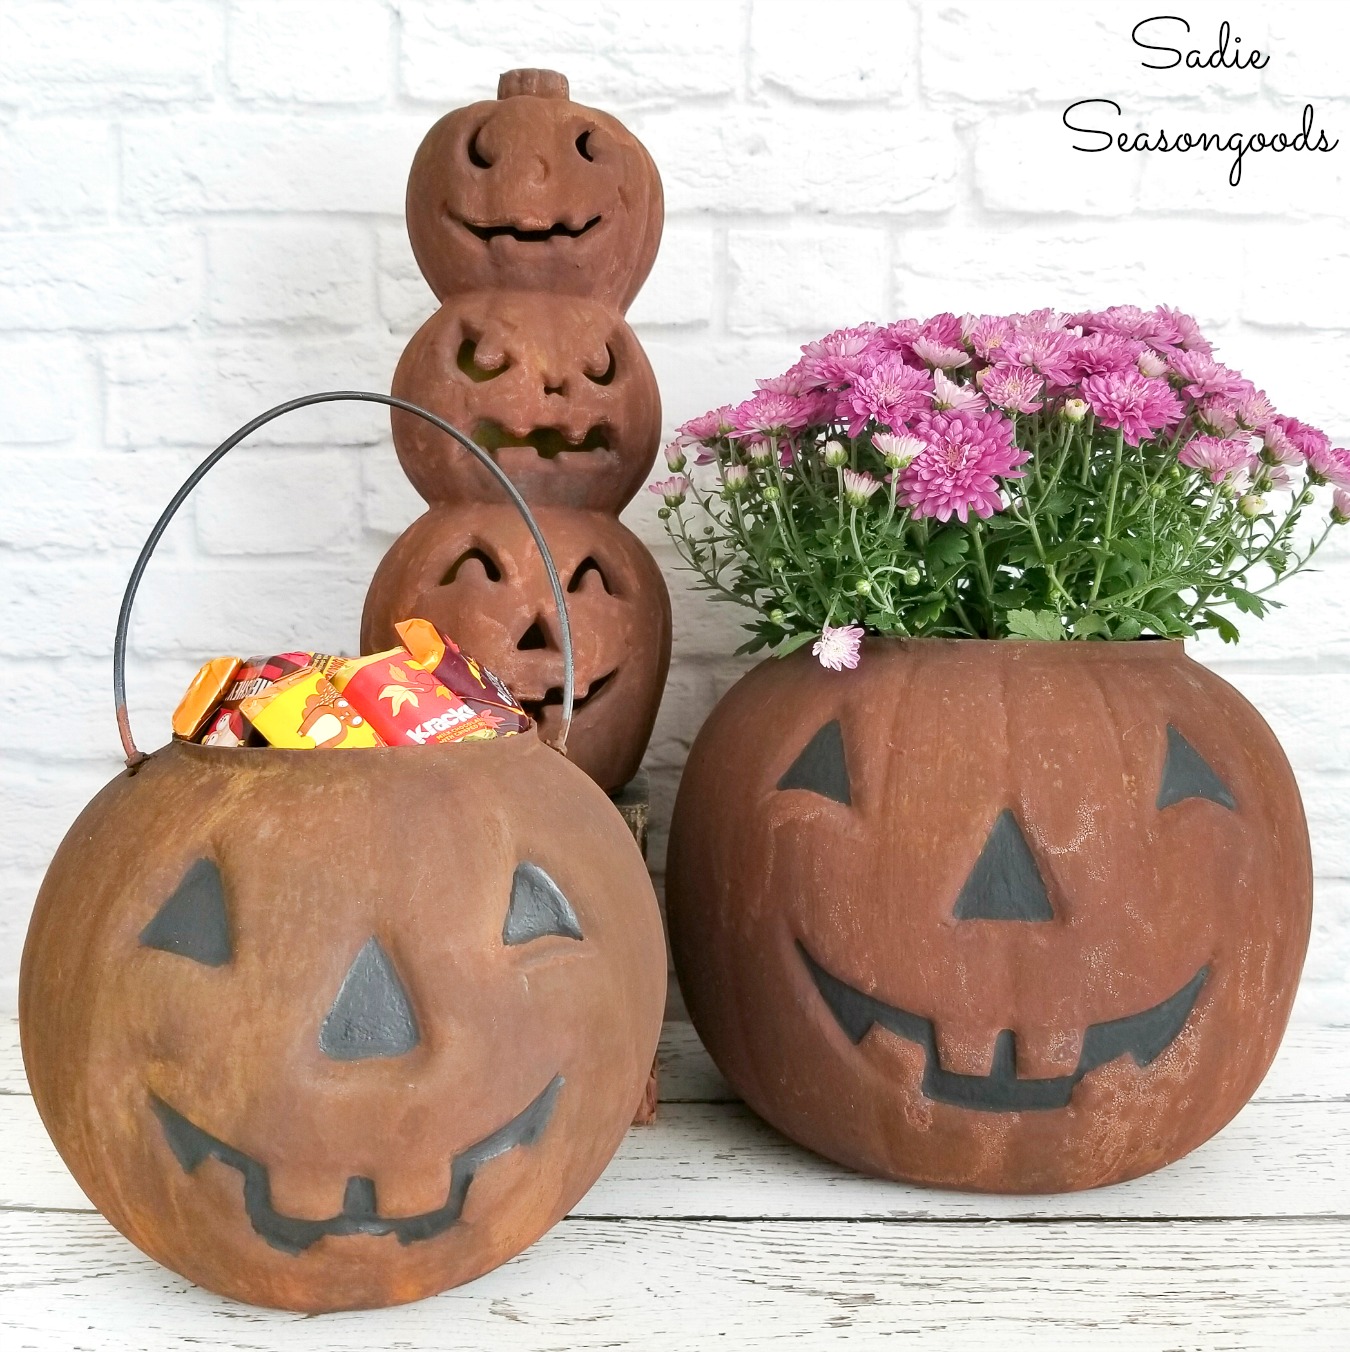
I have to admit, on certain junk or antique pieces, I like the look of rust more than actually dealing with rust. Sometimes, the chipping and the flaking of real rust is too much for me to deal with, especially indoors. So, when I had a chance to try out the Rust Effect Paint by Modern Masters, I jumped at the chance! Right off the bat, I knew I wanted to try it on the plastic pumpkins and pumpkin candy buckets that crowd the thrift store shelves.

Come Fall, these plastic jack-o-lanterns are EVERYWHERE, which makes them perfect for upcycling.

I had a feeling that those plastic pumpkins would look pretty darn good with a rust patina. I just didn’t know how to achieve that on my own.
Basically, this opportunity was a match made in DIY heaven.

This post is sponsored by Rust-oleum, who provided a Rust Finish Metal Effects Kit by Modern Masters at no charge to me. All opinions are my own.
This post also contains affiliate links for your crafting convenience. As an Amazon Associate, I earn from qualifying purchases. All blue, bold, and underlined text is a clickable link, either to a product or to a related post.
Rust Effect Paint on Plastic Pumpkins and Jack-o-Lanterns
There are several steps to getting the rust patina using this kit, but none of them take very long. AND there’s no special painting technique required.
Let’s consider this one of my “Product Test Drive” posts, so long as I make it very clear that this kit was provided to me free of charge.
The first step was applying the primer (that link is for the same kit as mine, but in smaller quantities), which is a rust-brown color on its own. The “rougher” your surface is, the better this stuff adheres.
It dries pretty quickly so I brushed on two coats on the plastic pumpkins, as mentioned in the instructions.

Next, I added two coats of the iron paint, which also dried quickly.
This gave the plastic pumpkins an almost chalkboard paint look.

NOW came the most exciting step: spritzing on the rust activator! I had painted the primer and iron paint inside my home, but moved everything outside for this step.
Following the instructions in the kit, I spritzed on a light layer on the plastic pumpkins. I then waited a few minutes and spritzed on a second layer.

At the time that I worked on “rustifying” my plastic pumpkins, it was SUPER humid out. So, I let the rust activator work for 48 hours to fully achieve a rust patina.
And almost magically, the plastic pumpkins looked all kinds of rusty and old!
Even though the rust finish didn’t rub off or easily chip, I went ahead and spritzed on the sealer, as recommended.

As far as the Rust Finish Metal Effects Kit was concerned, I was done! But the plastic pumpkins still needed one more thing (in my opinion).
So, I finished them off by re-painting the face indents with black craft paint!

Plastic Pumpkins as Primitive Halloween Decor with Rust Effect Paint
That was it! I had achieved a wonderful rust patina on the plastic pumpkins.
And while there were several steps required, the finish was SO realistic. And any level of crafter can do this, so I’d call it a rousing success.

The rust effect paint worked like an absolute charm on these plastic pumpkins. They are perfect as primitive Halloween decor, like little old cauldrons.

You might say that these jack-o-lanterns are now… JUNK-O-LANTERNS!

A couple of Product Test Drive thoughts to consider:
- Spraying a smooth plastic surface with regular flat grey primer made a HUGE difference in how easily the rust primer could be brushed on, but this was not included in the kit and added yet another step to the process.
- Do not use a sponge brush for the primer or iron paint steps- use a chip brush!
- Humidity matters! On humid days, the oxidizing finish takes a LONG time to process- so if you’re able to complete that step on a dry, crisp day, I definitely recommend it.
What would you try this rust finish kit on?
If you enjoyed this upcycling idea for DIY Halloween decor, then you may also enjoy these creepy candles that are made from a thrift store find, as well!

And don’t forget to check out these fabric pumpkins that are made from Halloween colored bandanas, too!

Craft on!
S
Want to be notified when I publish my next upcycling project tutorial?
Join me on Social Media:


PIN ME!


Sarah Ramberg is the owner of Sadie Seasongoods, a website that celebrates all things secondhand. From upcycling ideas and thrifted decor to vintage-centric travel itineraries, Sadie Seasongoods is a one-stop shop for anyone who loves thrifting and approachable repurposing ideas. Sarah is also the author of “Crafting with Flannel” and has been featured in numerous media outlets and magazines.
- Sarah Ramberg
- Sarah Ramberg
- Sarah Ramberg
- Sarah Ramberg
- Sarah Ramberg
- Sarah Ramberg
- Sarah Ramberg
- Sarah Ramberg
- Sarah Ramberg
- Sarah Ramberg
- Sarah Ramberg
- Sarah Ramberg
- Sarah Ramberg
- Sarah Ramberg
- Sarah Ramberg
- Sarah Ramberg
- Sarah Ramberg
- Sarah Ramberg
- Sarah Ramberg
- Sarah Ramberg
- Sarah Ramberg
- Sarah Ramberg
- Sarah Ramberg
- Sarah Ramberg
- Sarah Ramberg
- Sarah Ramberg
- Sarah Ramberg
- Sarah Ramberg
- Sarah Ramberg
- Sarah Ramberg
- Sarah Ramberg
- Sarah Ramberg
- Sarah Ramberg
- Sarah Ramberg
- Sarah Ramberg
- Sarah Ramberg
- Sarah Ramberg
- Sarah Ramberg
- Sarah Ramberg
- Sarah Ramberg
- Sarah Ramberg
- Sarah Ramberg
- Sarah Ramberg
- Sarah Ramberg
- Sarah Ramberg
- Sarah Ramberg
- Sarah Ramberg
- Sarah Ramberg
- Sarah Ramberg
- Sarah Ramberg
- Sarah Ramberg
- Sarah Ramberg
- Sarah Ramberg
- Sarah Ramberg
- Sarah Ramberg
- Sarah Ramberg
- Sarah Ramberg
- Sarah Ramberg
- Sarah Ramberg
- Sarah Ramberg
- Sarah Ramberg
- Sarah Ramberg
- Sarah Ramberg
- Sarah Ramberg
- Sarah Ramberg
- Sarah Ramberg
- Sarah Ramberg
- Sarah Ramberg
- Sarah Ramberg
- Sarah Ramberg
- Sarah Ramberg
- Sarah Ramberg
- Sarah Ramberg
- Sarah Ramberg
- Sarah Ramberg
- Sarah Ramberg
- Sarah Ramberg
- Sarah Ramberg
- Sarah Ramberg
- Sarah Ramberg
- Sarah Ramberg
- Sarah Ramberg
- Sarah Ramberg
- Sarah Ramberg
- Sarah Ramberg
- Sarah Ramberg
- Sarah Ramberg
- Sarah Ramberg
- Sarah Ramberg
- Sarah Ramberg
- Sarah Ramberg
- Sarah Ramberg
- Sarah Ramberg
- Sarah Ramberg
- Sarah Ramberg
- Sarah Ramberg
- Sarah Ramberg
- Sarah Ramberg
- Sarah Ramberg
- Sarah Ramberg
- Sarah Ramberg
- Sarah Ramberg
- Sarah Ramberg
- Sarah Ramberg
- Sarah Ramberg
- Sarah Ramberg
- Sarah Ramberg
- Sarah Ramberg
- Sarah Ramberg
- Sarah Ramberg
- Sarah Ramberg
- Sarah Ramberg
- Sarah Ramberg
- Sarah Ramberg
- Sarah Ramberg
- Sarah Ramberg
- Sarah Ramberg
- Sarah Ramberg
- Sarah Ramberg
- Sarah Ramberg
- Sarah Ramberg
- Sarah Ramberg
- Sarah Ramberg
- Sarah Ramberg
- Sarah Ramberg
- Sarah Ramberg
- Sarah Ramberg
- Sarah Ramberg
- Sarah Ramberg
- Sarah Ramberg
- Sarah Ramberg
- Sarah Ramberg
- Sarah Ramberg
- Sarah Ramberg
- Sarah Ramberg
- Sarah Ramberg
- Sarah Ramberg
- Sarah Ramberg
- Sarah Ramberg
- Sarah Ramberg
- Sarah Ramberg
- Sarah Ramberg
- Sarah Ramberg
- Sarah Ramberg
- Sarah Ramberg
- Sarah Ramberg
- Sarah Ramberg
- Sarah Ramberg
- Sarah Ramberg
- Sarah Ramberg
- Sarah Ramberg
- Sarah Ramberg
- Sarah Ramberg
- Sarah Ramberg
- Sarah Ramberg
- Sarah Ramberg
- Sarah Ramberg
- Sarah Ramberg
- Sarah Ramberg
- Sarah Ramberg
- Sarah Ramberg
- Sarah Ramberg
- Sarah Ramberg
- Sarah Ramberg
- Sarah Ramberg
- Sarah Ramberg
- Sarah Ramberg
- Sarah Ramberg
- Sarah Ramberg
- Sarah Ramberg
- Sarah Ramberg
- Sarah Ramberg
- Sarah Ramberg
- Sarah Ramberg
- Sarah Ramberg
- Sarah Ramberg
- Sarah Ramberg
- Sarah Ramberg
- Sarah Ramberg
- Sarah Ramberg
- Sarah Ramberg
- Sarah Ramberg
- Sarah Ramberg
- Sarah Ramberg
- Sarah Ramberg
- Sarah Ramberg
- Sarah Ramberg
- Sarah Ramberg
- Sarah Ramberg
- Sarah Ramberg
- Sarah Ramberg
- Sarah Ramberg
- Sarah Ramberg
- Sarah Ramberg
- Sarah Ramberg
- Sarah Ramberg
- Sarah Ramberg
- Sarah Ramberg
- Sarah Ramberg
- Sarah Ramberg
- Sarah Ramberg
- Sarah Ramberg
- Sarah Ramberg
- Sarah Ramberg
- Sarah Ramberg
- Sarah Ramberg
- Sarah Ramberg
- Sarah Ramberg
- Sarah Ramberg
- Sarah Ramberg
- Sarah Ramberg
- Sarah Ramberg
- Sarah Ramberg
- Sarah Ramberg
- Sarah Ramberg
- Sarah Ramberg
- Sarah Ramberg
- Sarah Ramberg
- Sarah Ramberg
- Sarah Ramberg
- Sarah Ramberg
- Sarah Ramberg
- Sarah Ramberg
- Sarah Ramberg
- Sarah Ramberg
- Sarah Ramberg
- Sarah Ramberg
- Sarah Ramberg
- Sarah Ramberg
- Sarah Ramberg
- Sarah Ramberg
- Sarah Ramberg
- Sarah Ramberg
- Sarah Ramberg
- Sarah Ramberg
- Sarah Ramberg
- Sarah Ramberg
- Sarah Ramberg
- Sarah Ramberg
- Sarah Ramberg
- Sarah Ramberg
- Sarah Ramberg
- Sarah Ramberg
- Sarah Ramberg
- Sarah Ramberg
- Sarah Ramberg
- Sarah Ramberg
- Sarah Ramberg
- Sarah Ramberg
- Sarah Ramberg
- Sarah Ramberg
- Sarah Ramberg
- Sarah Ramberg
- Sarah Ramberg
- Sarah Ramberg
- Sarah Ramberg
- Sarah Ramberg
- Sarah Ramberg
- Sarah Ramberg
- Sarah Ramberg
- Sarah Ramberg
- Sarah Ramberg
- Sarah Ramberg
- Sarah Ramberg
- Sarah Ramberg
- Sarah Ramberg
- Sarah Ramberg
- Sarah Ramberg
- Sarah Ramberg
- Sarah Ramberg
- Sarah Ramberg
- Sarah Ramberg
- Sarah Ramberg
- Sarah Ramberg
- Sarah Ramberg
- Sarah Ramberg
- Sarah Ramberg
- Sarah Ramberg
- Sarah Ramberg
- Sarah Ramberg
- Sarah Ramberg
- Sarah Ramberg
- Sarah Ramberg
- Sarah Ramberg
- Sarah Ramberg
- Sarah Ramberg
- Sarah Ramberg
- Sarah Ramberg
- Sarah Ramberg
- Sarah Ramberg
- Sarah Ramberg
- Sarah Ramberg
- Sarah Ramberg
- Sarah Ramberg
- Sarah Ramberg
- Sarah Ramberg
- Sarah Ramberg
- Sarah Ramberg
- Sarah Ramberg
- Sarah Ramberg
- Sarah Ramberg
- Sarah Ramberg
- Sarah Ramberg
- Sarah Ramberg
- Sarah Ramberg
- Sarah Ramberg
- Sarah Ramberg
- Sarah Ramberg
- Sarah Ramberg
- Sarah Ramberg
- Sarah Ramberg
- Sarah Ramberg
- Sarah Ramberg
- Sarah Ramberg
- Sarah Ramberg
- Sarah Ramberg
- Sarah Ramberg
- Sarah Ramberg
- Sarah Ramberg
- Sarah Ramberg
- Sarah Ramberg
- Sarah Ramberg
- Sarah Ramberg
- Sarah Ramberg
- Sarah Ramberg
- Sarah Ramberg
- Sarah Ramberg
- Sarah Ramberg
- Sarah Ramberg
- Sarah Ramberg
- Sarah Ramberg
- Sarah Ramberg
- Sarah Ramberg
- Sarah Ramberg
- Sarah Ramberg
- Sarah Ramberg
- Sarah Ramberg
- Sarah Ramberg
- Sarah Ramberg
- Sarah Ramberg
- Sarah Ramberg
- Sarah Ramberg
- Sarah Ramberg
- Sarah Ramberg
- Sarah Ramberg
- Sarah Ramberg
- Sarah Ramberg
- Sarah Ramberg
- Sarah Ramberg
- Sarah Ramberg
- Sarah Ramberg
- Sarah Ramberg
- Sarah Ramberg
- Sarah Ramberg
- Sarah Ramberg
- Sarah Ramberg
- Sarah Ramberg
- Sarah Ramberg
- Sarah Ramberg
- Sarah Ramberg
- Sarah Ramberg
- Sarah Ramberg
- Sarah Ramberg
- Sarah Ramberg
- Sarah Ramberg
- Sarah Ramberg
- Sarah Ramberg
- Sarah Ramberg
- Sarah Ramberg
- Sarah Ramberg
- Sarah Ramberg
- Sarah Ramberg
- Sarah Ramberg
- Sarah Ramberg
- Sarah Ramberg
- Sarah Ramberg
- Sarah Ramberg
- Sarah Ramberg
- Sarah Ramberg
- Sarah Ramberg
- Sarah Ramberg
- Sarah Ramberg
- Sarah Ramberg
- Sarah Ramberg
- Sarah Ramberg
- Sarah Ramberg
- Sarah Ramberg
- Sarah Ramberg
- Sarah Ramberg
- Sarah Ramberg
- Sarah Ramberg
- Sarah Ramberg
- Sarah Ramberg
- Sarah Ramberg
- Sarah Ramberg
- Sarah Ramberg
- Sarah Ramberg
- Sarah Ramberg
- Sarah Ramberg
- Sarah Ramberg
- Sarah Ramberg
- Sarah Ramberg
- Sarah Ramberg
- Sarah Ramberg
- Sarah Ramberg
- Sarah Ramberg
- Sarah Ramberg
- Sarah Ramberg
- Sarah Ramberg
- Sarah Ramberg
- Sarah Ramberg
- Sarah Ramberg
- Sarah Ramberg
- Sarah Ramberg
- Sarah Ramberg
- Sarah Ramberg
- Sarah Ramberg
- Sarah Ramberg
- Sarah Ramberg
- Sarah Ramberg
- Sarah Ramberg
- Sarah Ramberg
- Sarah Ramberg
- Sarah Ramberg
- Sarah Ramberg
- Sarah Ramberg
- Sarah Ramberg
- Sarah Ramberg
- Sarah Ramberg
- Sarah Ramberg
- Sarah Ramberg
- Sarah Ramberg
- Sarah Ramberg
- Sarah Ramberg
- Sarah Ramberg
- Sarah Ramberg
- Sarah Ramberg
- Sarah Ramberg
- Sarah Ramberg
- Sarah Ramberg
- Sarah Ramberg
- Sarah Ramberg
- Sarah Ramberg
- Sarah Ramberg
- Sarah Ramberg
- Sarah Ramberg
- Sarah Ramberg
- Sarah Ramberg
- Sarah Ramberg
- Sarah Ramberg
- Sarah Ramberg
- Sarah Ramberg
- Sarah Ramberg
- Sarah Ramberg
- Sarah Ramberg
- Sarah Ramberg
- Sarah Ramberg
- Sarah Ramberg
- Sarah Ramberg
- Sarah Ramberg
- Sarah Ramberg
- Sarah Ramberg
- Sarah Ramberg
- Sarah Ramberg
- Sarah Ramberg
- Sarah Ramberg
- Sarah Ramberg
- Sarah Ramberg
- Sarah Ramberg
- Sarah Ramberg
- Sarah Ramberg
- Sarah Ramberg
- Sarah Ramberg
- Sarah Ramberg
- Sarah Ramberg
- Sarah Ramberg
- Sarah Ramberg
- Sarah Ramberg
- Sarah Ramberg
- Sarah Ramberg
- Sarah Ramberg
- Sarah Ramberg
- Sarah Ramberg
- Sarah Ramberg
- Sarah Ramberg
- Sarah Ramberg
- Sarah Ramberg
- Sarah Ramberg
- Sarah Ramberg
- Sarah Ramberg
- Sarah Ramberg
- Sarah Ramberg
- Sarah Ramberg
- Sarah Ramberg
- Sarah Ramberg
- Sarah Ramberg
- Sarah Ramberg
- Sarah Ramberg
- Sarah Ramberg
- Sarah Ramberg
- Sarah Ramberg
- Sarah Ramberg
- Sarah Ramberg
- Sarah Ramberg
- Sarah Ramberg
- Sarah Ramberg
- Sarah Ramberg
- Sarah Ramberg
- Sarah Ramberg
- Sarah Ramberg
- Sarah Ramberg
- Sarah Ramberg
- Sarah Ramberg
- Sarah Ramberg
- Sarah Ramberg
- Sarah Ramberg
- Sarah Ramberg
- Sarah Ramberg
- Sarah Ramberg
- Sarah Ramberg
- Sarah Ramberg
- Sarah Ramberg
- Sarah Ramberg
- Sarah Ramberg
- Sarah Ramberg
- Sarah Ramberg
- Sarah Ramberg
- Sarah Ramberg
- Sarah Ramberg
- Sarah Ramberg
- Sarah Ramberg
- Sarah Ramberg
- Sarah Ramberg
- Sarah Ramberg
- Sarah Ramberg
- Sarah Ramberg
- Sarah Ramberg
- Sarah Ramberg
- Sarah Ramberg
- Sarah Ramberg
- Sarah Ramberg
- Sarah Ramberg
- Sarah Ramberg
- Sarah Ramberg
- Sarah Ramberg
- Sarah Ramberg
- Sarah Ramberg
- Sarah Ramberg
- Sarah Ramberg
- Sarah Ramberg
- Sarah Ramberg
- Sarah Ramberg
- Sarah Ramberg
- Sarah Ramberg
- Sarah Ramberg
- Sarah Ramberg
- Sarah Ramberg
- Sarah Ramberg
- Sarah Ramberg
- Sarah Ramberg
- Sarah Ramberg
- Sarah Ramberg
- Sarah Ramberg
- Sarah Ramberg
- Sarah Ramberg
- Sarah Ramberg
- Sarah Ramberg
- Sarah Ramberg
- Sarah Ramberg
- Sarah Ramberg
- Sarah Ramberg
- Sarah Ramberg
- Sarah Ramberg
- Sarah Ramberg
- Sarah Ramberg
- Sarah Ramberg
- Sarah Ramberg
- Sarah Ramberg
- Sarah Ramberg
- Sarah Ramberg
- Sarah Ramberg
- Sarah Ramberg
- Sarah Ramberg
- Sarah Ramberg
- Sarah Ramberg
- Sarah Ramberg
- Sarah Ramberg
- Sarah Ramberg
- Sarah Ramberg
- Sarah Ramberg
- Sarah Ramberg
- Sarah Ramberg
- Sarah Ramberg
- Sarah Ramberg
- Sarah Ramberg
- Sarah Ramberg
- Sarah Ramberg
- Sarah Ramberg
- Sarah Ramberg
- Sarah Ramberg
- Sarah Ramberg
- Sarah Ramberg
- Sarah Ramberg
- Sarah Ramberg
- Sarah Ramberg
- Sarah Ramberg
- Sarah Ramberg
- Sarah Ramberg
- Sarah Ramberg
- Sarah Ramberg
- Sarah Ramberg
- Sarah Ramberg
- Sarah Ramberg
- Sarah Ramberg
- Sarah Ramberg
- Sarah Ramberg
- Sarah Ramberg
- Sarah Ramberg
- Sarah Ramberg
- Sarah Ramberg
- Sarah Ramberg
- Sarah Ramberg
- Sarah Ramberg
- Sarah Ramberg
- Sarah Ramberg
- Sarah Ramberg
- Sarah Ramberg
- Sarah Ramberg
- Sarah Ramberg
- Sarah Ramberg
- Sarah Ramberg
- Sarah Ramberg
- Sarah Ramberg
- Sarah Ramberg
- Sarah Ramberg
- Sarah Ramberg
- Sarah Ramberg
- Sarah Ramberg
- Sarah Ramberg
- Sarah Ramberg
- Sarah Ramberg
- Sarah Ramberg
- Sarah Ramberg
- Sarah Ramberg
- Sarah Ramberg
- Sarah Ramberg
- Sarah Ramberg
- Sarah Ramberg
- Sarah Ramberg
- Sarah Ramberg
- Sarah Ramberg
- Sarah Ramberg
- Sarah Ramberg
- Sarah Ramberg
- Sarah Ramberg
- Sarah Ramberg
- Sarah Ramberg
- Sarah Ramberg
- Sarah Ramberg
- Sarah Ramberg
- Sarah Ramberg
- Sarah Ramberg
- Sarah Ramberg


Oh my gosh!! I need that stuff!!!! I love this project!!
You would LOVE IT! I’ve seen faux rust finishes before that needed paint mixing or special techniques, but then they don’t *feel* like rust, so this kit definitely has them beat!
I LIKE them! But if I make them, I’d add bright yellow or yellow-orange in the eyes because the black is so little contrast I’m not sure they’d be identified as jack-O-lanterns when seen from a distance. Other than that, they’re adorable!
You are immensely clever and creative; thanks for sharing this idea.
I’ll stick with black but to each her own for sure!
Can the pumpkins be painted a different base color? I’m not a big fan of the brown base color. I’d prefer more of a iron gray shade… Your finished product sure didn’t look like plastic! Makes me want to hit the thrift stores…
I’m not sure what you mean- the whole point it to make them look rusty, which is inherently brown-burnt orange in color. You can paint them any color you want, but I specifically used this rust-finish kit that came with all the paints to be used and the goal is to make them rusty-looking.
Love the look!
Thank you so much, Donna!
Brilliant!
Thanks, Sheryl!
Wow, those plastic pumpkins actually look good now! Thanks for sharing the idea…I probably have some stuff around my house that would look way better in a rusty finish ;0
Yesssss- rustify all the things! 😉
Did you use the whole kit on these pumpkins? I’d love to try this product out and just trying to figure how far 1 kit goes. Thanks! Pumpkins are super cute!
The kit that Rust-oleum sent me is much larger than the one I link to- I simply couldn’t find the same size kit online. If I were you, check Hobby Lobby(I’ve heard it’s sold there but haven’t looked myself) and pair it up with a coupon. I still have a ton of paint/spray left over from my sized kit, and I did even more pumpkins that I show in my photos!
Gosh, this is so neat! Thanks for sharing this. I just pinned it to my Pinterest board titled: Halloween!
So glad you like it, Linda!
Sarah, these pumpkins look perfectly rusty-licious! Based on these photographs, had I not seen this post, I would have thought these pumpkins were made of rusty metal for sure! What a great kit to rust out your non-metal thrift store scores, awesome!
Question, are the products strong smelling or offensive?
Thank you!! And the primer & iron paint steps don’t smell any worse than using regular latex or acrylic paint- but I do recommend using the rust activator outside for better ventilation. It’s not obnoxious, but not something you want to get on anything in your home (acid).
Boy, if you hadn’t told me, I would have thot these were expensive metal! In these pictures they have a velour look to them. Rust isn’t my favorite buy it is a heckuva lot better than orange plastic! I may have to look for pumpkins at GW once the season has passed!
I love this look, and what a great use for those plastic buckets. I especially love the look with the mums inside.
Thank you so much, Janet- I agree!
Love Modern Master’s metal effects kits and this particular one is on my Must Try list. Love the pumpkin transformation, Sarah 🙂
This was my first time trying them and now I want to try them all. Thank you so much, Marie!
I can’t believe it actually adheres to plastic–VERY cool!
So long as you follow the directions and don’t skip any steps, it sure does!
Love that rusty look! For an indoor project I’ve had good results with brown spray paint and cinnamon sprinkled over when it’s still wet. It’s a simple and cheap rusty look!
I’ve seen others use that before- quite interesting indeed!
Oooooohhhhhh, I’m going to have to get some of that stuff!!
I think the possibilities for using it are endless!
The very day after reading this I found myself in a thrift store face to face with one of those plastic pumpkins. He had such a quirky grin, I knew he was meant for me! (and the 25 cent price…). Mine did not come out quite as evenly colored as yours did, probably my fault, trying to do three things at once, but even so, I am happy with its’ grungy, rusty look. Thanks for letting us in on this product, I’ll have to use the leftovers on something else….
I think you never actually know how it’ll turn out but I’m so glad you gave it a try!!
Hi! I love this idea and I am planning on using/borrowing/stealing it!! ?. I’m planning to do 3 plastic pumpkins. Looks like the kits on Amazon are either 4 oz, 16 oz or gallon. Which did you use????
The kit I had came directly from Rust-oleum, so I don’t know if the exact sizes are normally sold in stores. The paints were 8oz each and the sprays were 10oz. I have a ton left over each one, though, so I definitely didn’t need that much for the pumpkins I did.
Oh these rusty junk-o-lanterns are so cool! I love the rusty look too, but not the rust in the house. I need some of this paint. ?
I just love these! Especially the stacked pumpkins!
These are really cute! Love the look and my plan would be to do the same, on pumpkins.
Thank you so much, Beth!