When I first spotted this thing at a thrift store, I had no idea what it was. Which, I suppose, made it even more attractive to me because it ended up in my cart! Posting it on my Facebook page revealed what it was- a casserole dish holder- but I was already mulling over using it as a DIY loom. A DIY loom that could double as a standing frame to display a Hello Fall sign!

Image credit: Sadie Seasongoods.
And then the thrifting fates intervened when I spotted another one several months later! Clearly I was meant to put my weaving idea to the test.

Image credit: Sadie Seasongoods.
And yes, this would not be the first project of mine that I turned into a loom. Remember how I upcycled this pizza pan?
Image credit: Sadie Seasongoods.
So, with that in mind and the desire to create yet another Fall-themed project, I set out to test my DIY loom theory.
This post contains affiliate links for your crafting convenience. As an Amazon Associate, I earn from qualifying purchases. All blue, bold, and underlined text is a clickable link, either to a product or to a related blog post.
From Casserole Dish Holder to DIY Loom
My plan was to use these casserole dish holders as a DIY loom, frame, and stand- all in one! And I wouldn’t have to do too much to them to achieve my goal.

Image credit: Sadie Seasongoods.
First, we used a hack saw to remove one handle from each holder. That way, they could then stand on their own with a flat bottom.

Image credit: Sadie Seasongoods.
After sawing, I used our orbital sander with an 80-grit, then a 120-grit disk to smooth out the cut dowels and ensure a flat, even surface.
Next, I needed to add a way to warp the loom. Which meant I needed a row of tiny nails at the bottom and top for my warping thread.
And since they’d need to be spaced evenly, I grabbed a ruler and pencil.

Image credit: Sadie Seasongoods.
From there, I measured and marked every ½”, making sure the first and last mark were a full ½” in from the edges of the wood.
Which meant that a couple of the interior marks were slightly smaller than ½” to make it work. I didn’t mind fudging the measurements a little- this was an experimental project, after all!

Image credit: Sadie Seasongoods.
Then, I tapped in these perfect little copper-colored nails with my funky craft hammer. The nails were the perfect size AND color for my project.

Image credit: Sadie Seasongoods.
Weaving on a DIY Loom
Now I could warp it for weaving! I used the same ball of warping twine that I used on the pizza pan project.
After tying the string to one end nail, I went up and down, wrapping it over each nail. Not too tightly, but taut enough to hold itself in place. Then, I tied it off again when I reached the last nail.

Image credit: Sadie Seasongoods.
Now the fun part- the weaving! I’d gathered some boho-fall colored skeins of yarn in varying size, texture. Even though I planned to do very simple weaving, I wanted it to be texturally interesting.
Texturally interesting AND colorful- not brightly so, but in a boho-cozy way.

Image credit: Sadie Seasongoods.
And weave, I did! I used an extra long embroidery needle to go over-under-over several warp strings at a time. And yes, I used a literal fork from my kitchen to push the woven yarn down and snugly against each previous row.

Image credit: Sadie Seasongoods.
If I do any more upcycled weaving projects, I will treat myself to some actual weaving tools!
I continued to weave, using different yarns every few rows. I also pinched and held the yarn whenever I changed direction to keep from pulling too tightly.

Image credit: Sadie Seasongoods.
Woven pieces can get an hourglass shape in the center from pulling the weaving yarn too tightly row after row.
When all was said and done, this is what I had created on my DIY loom! As for all the yarn tales, I carefully wrapped them around the back and hot glued them in place.

Image credit: Sadie Seasongoods.
Adding the Hello Fall Sign
Now that my actual weaving was done, I could add the sign portion. I’d purchased a Hello Fall wooden cutout from Etsy that fit my weaving perfectly.

Image credit: Sadie Seasongoods.
I wanted it to be warmer and richer in color, so I wiped it with some wood stain that I already had on hand.

Image credit: Sadie Seasongoods.
Now, to add it to the weaving. I didn’t want to glue it to the weaving because, well, I liked how the weaving looked naked!
So, if I wanted to display my woven piece year-round, it’d look a little weird with the Hello Fall sign permanently attached.
Needle and thread it is! I used a medium brown thread to very carefully (and discreetly!) stitch the sign to the woven background.

Image credit: Sadie Seasongoods.
See the tiny stitches at the top of that cursive loop? I used the nooks and crannies of the sign to my advantage for covert attachment.
And that was it! My hello fall sign on a DIY loom was all done and ready to display in our living room.

Image credit: Sadie Seasongoods.
Hello Fall Sign on a DIY Loom
I always love it when I have a wacky project idea (i.e., upcycling a casserole dish holder into a DIY loom) and it totally works out! And this one did not disappoint one bit.

Image credit: Sadie Seasongoods.
The casserole dish holder really was perfect for this upcycle, wasn’t it? Because it was transformed into a loom and acts as a standing frame for my woven piece.
A woven piece that is temporarily displaying a Hello Fall sign, that is!
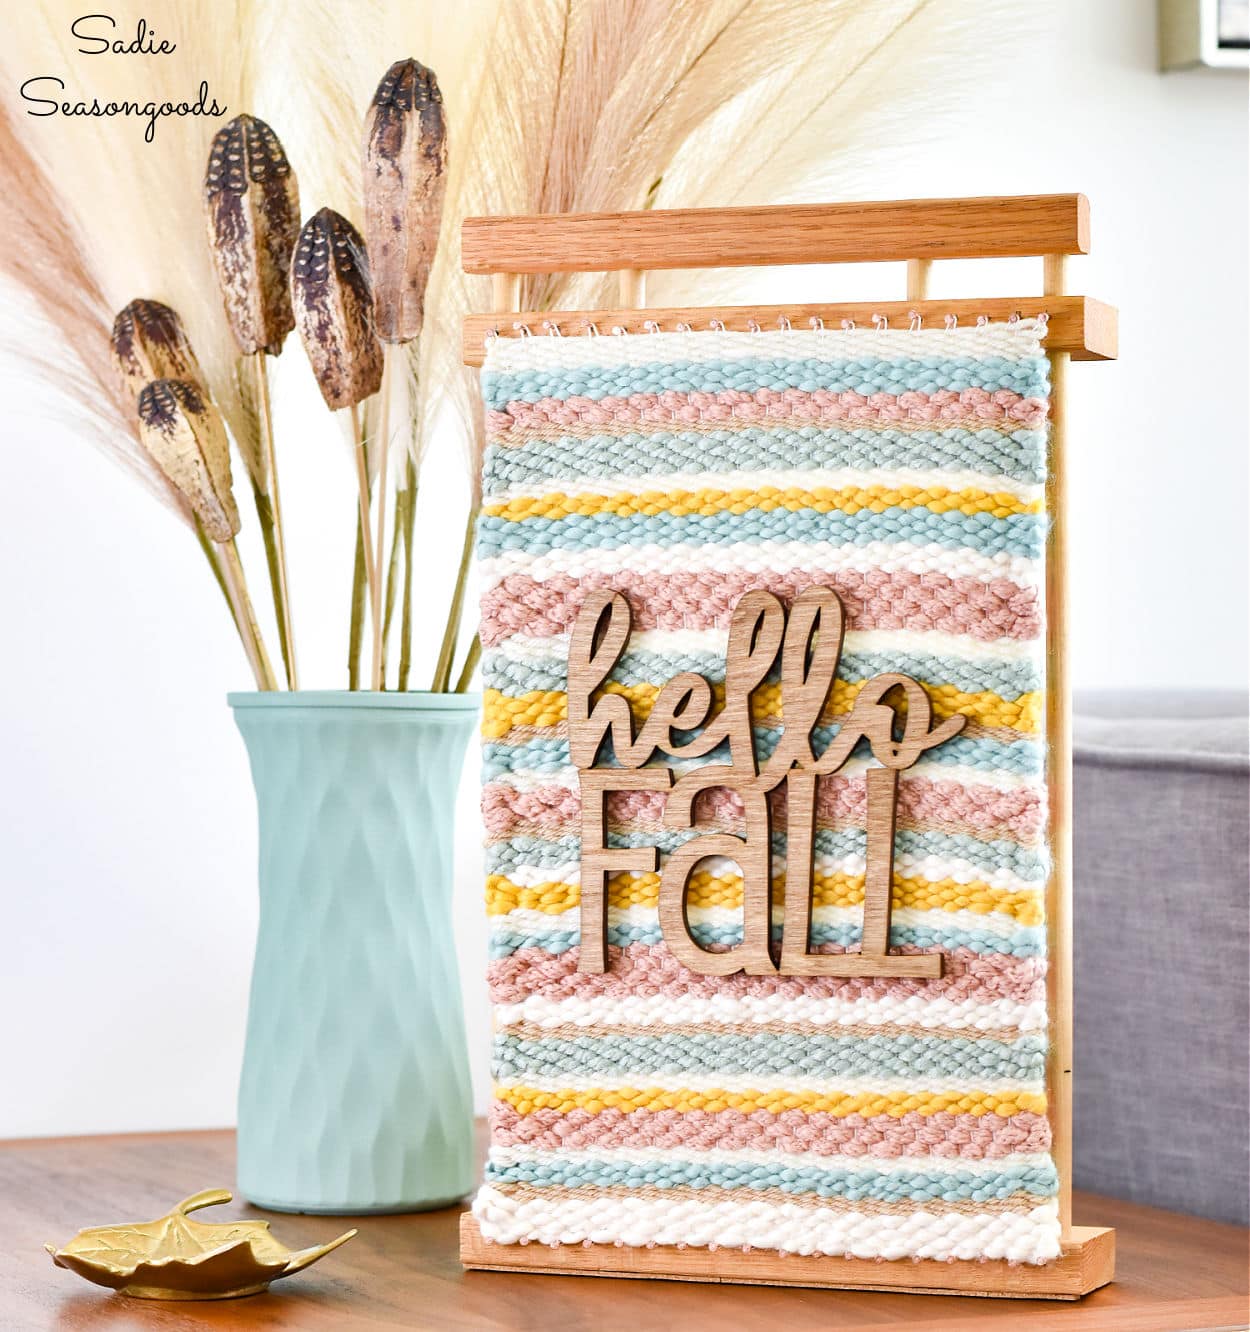
Image credit: Sadie Seasongoods.
Also, the wooden cutout made my display a little front heavy. So I attached narrow strips of cork tile to the bottom edge to help even it out.
I hope you enjoyed this project and process as much as I enjoyed bringing it to life! And BONUS- today is Thrift Store Decor Day, so check out what my blogging gal pals have been up to:

1. DIY Multi-Colored Mercury Glass – Petticoat Junktion
2. Broken Vintage Stool Makeover – Organized Clutter
3. Hello Fall Sign on a Casserole Dish Holder as a DIY Loom – Sadie Seasongoods
4. Customize Your Pumpkins – Shop at Blu
5. Drop Leaf Table Makeover – My Repurposed Life
7. Personalized Beverage Tub – My Uncommon Slice of Suburbia
8. Wooden Stool Makeover with Oven Cleaner – Our Southern Home
Has the weather started to really feel like Fall outside your door? Otherwise known as flannel season! Make sure you check out my book for all sorts of cozy craft projects, including lots of autumn themed ones, too!
Image credit: Sadie Seasongoods.
Craft on!
S
Want to be notified when I publish my next upcycling project tutorial?
Join me on Social Media:


PIN ME!

Image credit: Sadie Seasongoods.

Image credit: Sadie Seasongoods.
Sarah Ramberg is the owner of Sadie Seasongoods, a website that celebrates all things secondhand. From upcycling ideas and thrifted decor to vintage-centric travel itineraries, Sadie Seasongoods is a one-stop shop for anyone who loves thrifting and approachable repurposing ideas. Sarah is also the author of “Crafting with Flannel” and has been featured in numerous media outlets and magazines.


I never would have guessed it was a casserole holder! I love what you did with it, perfect for fall and the colors of the loom are beautiful.
Thank you so much, Kristin!
Such a great use of a casserole dish holder!! It makes a great frame 😊 Pinned!
Thanks!
Amazing, clever, creative, and beautiful! Never, ever would I have ever seen that coming. Happy to hear you didn’t glue it! I can see this in so many other decor options.
pinned!
gail
Thank you so very much, Gail!
Hello love it, good idea. It is so fun to reuse and give another life
Thank you, Josee!
I love the subtle colors for fall! Such a creative project. So many ways to use this too.
Thanks, Suzanne!