As we transition from our old decor style (vintage farmhouse) to our new style (mid century modern eclectic), I am slowly replacing things around our home. In particular, I needed to replace the key bowl that my husband has relied upon for years as a safe haven for his keys and wallet.
He’s been using a very charming mini crate that once held hatchets, of all things! You may recall seeing it as a photo prop in this hat stand project that I made.
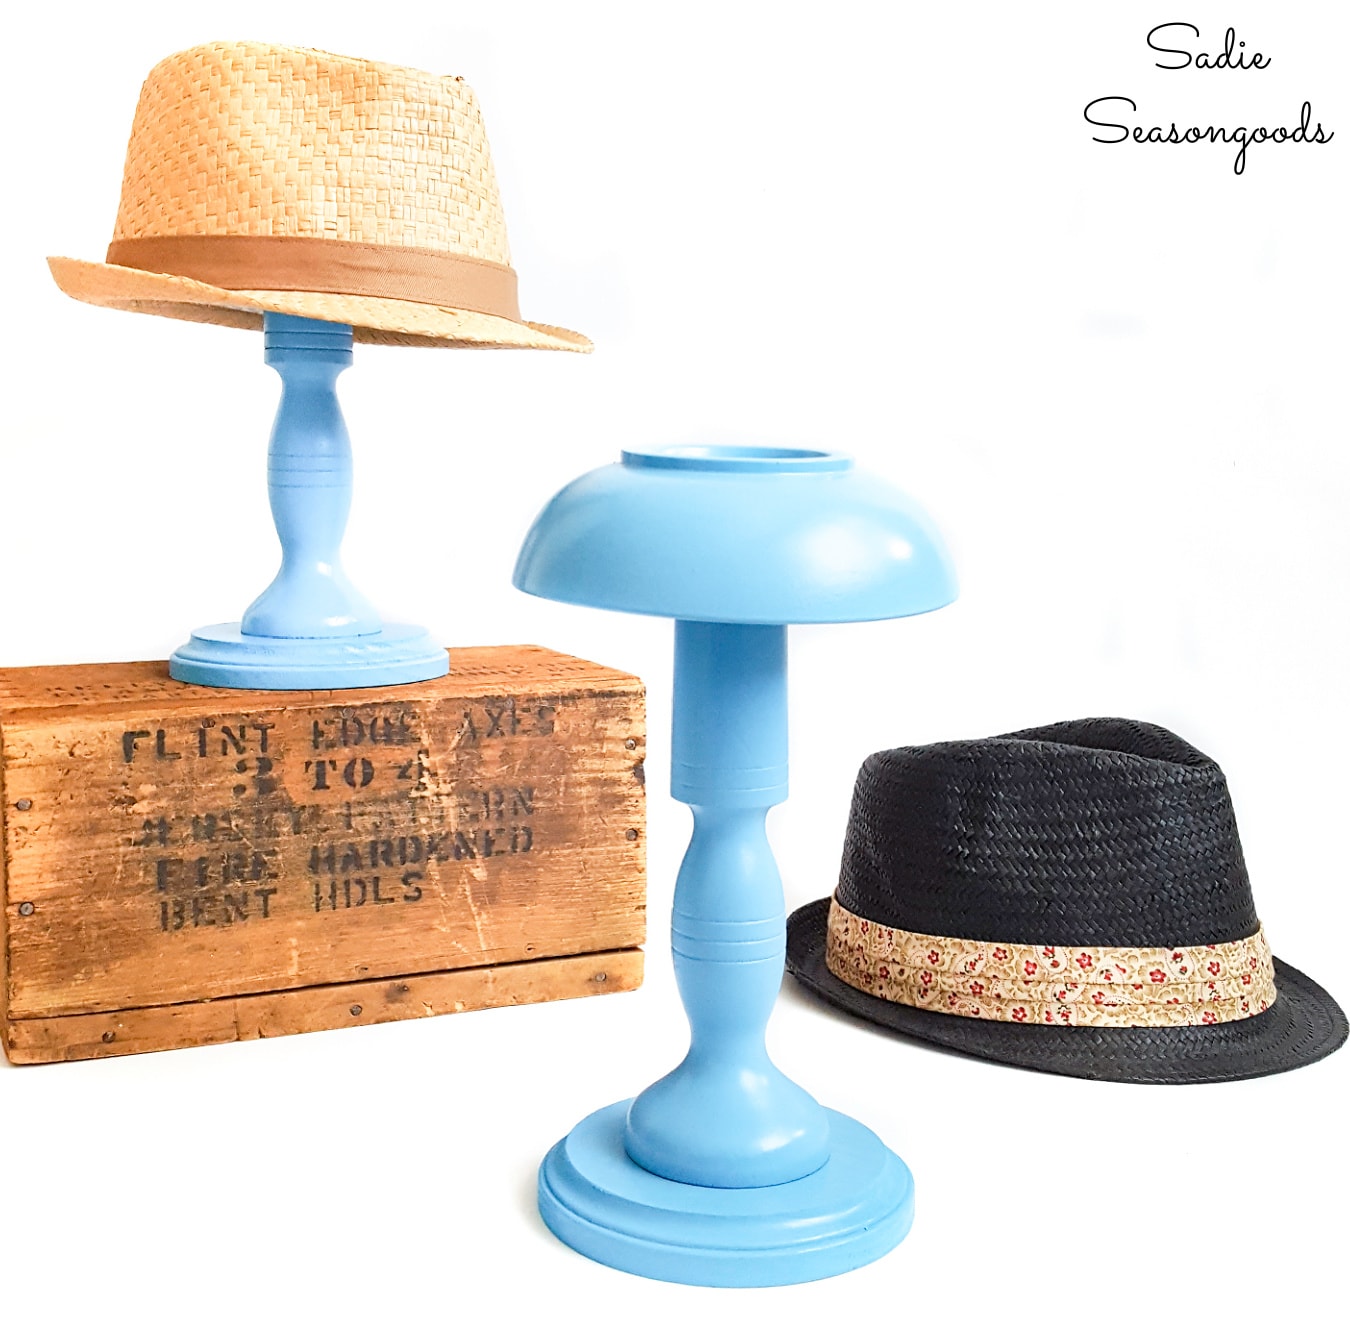
Image credit: Sadie Seasongoods.
And while it IS indeed adorable, truthfully, it’s not ideal. The opening is narrow and the sides are not smooth, full of splinters-to-be. He’s effectively played the game “Operation” while retrieving his wallet for many, many years now.
So, when I spotted this wooden bowl at a thrift recently, I decided that the time had come to swap it out!

Image credit: Sadie Seasongoods.
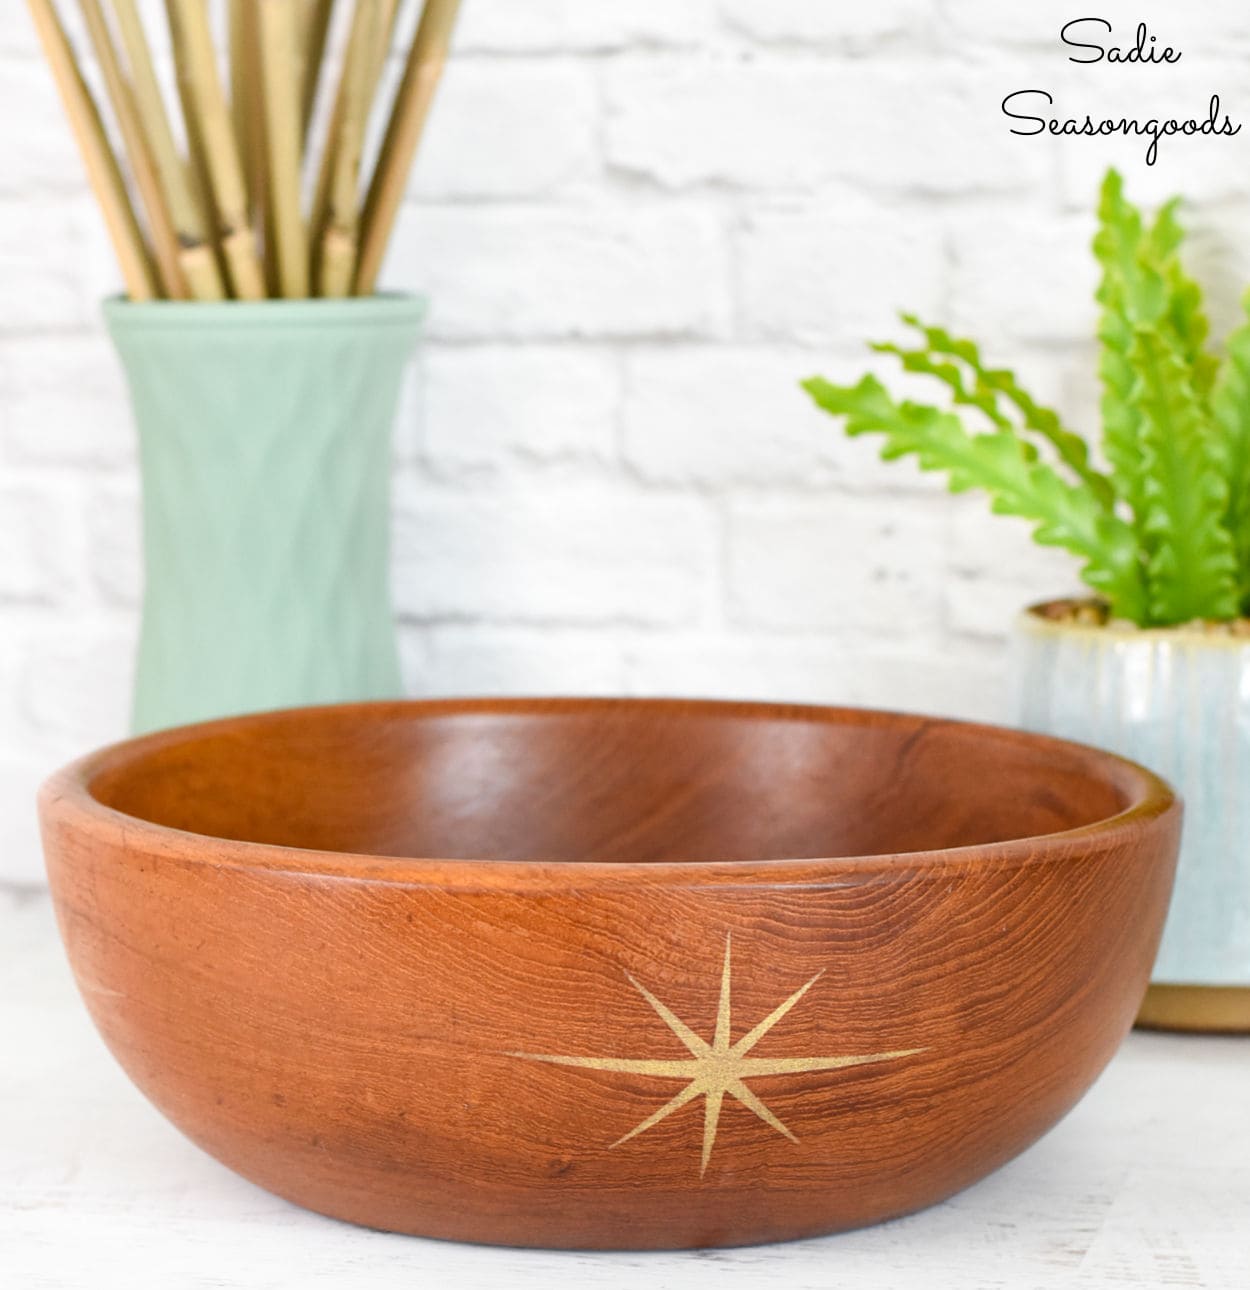
Sure, it was scratched up and in need of some TLC. But it was made from a single piece of turned wood, had a GORGEOUS grain, and was wide open and smooth.

Image credit: Sadie Seasongoods.
In other words, simply perfect for using as a key bowl in our entryway! And I knew exactly how I wanted to restore it.
This post contains affiliate links for your crafting convenience. As an Amazon Affiliate, I earn from qualifying purchases. All blue, bold, and underlined text is a clickable link, either to a product or to a related post.
Key Bowl Restoration: The Experiment
My plan was pretty simple: restore the scratched-up wood (using this furniture salve) and add a touch of gold stenciling. By the way, the stencil I’m using is no longer available, but it looks like you can find similar versions on Etsy.

Image credit: Sadie Seasongoods.
But, I had a chicken vs. egg situation: Should I restore first, stencil second? Or stencil first, restore second?
Since I was honestly not sure which should come first, I decided that my $3.99 bowl could serve as an experiment. First, I applied a touch of furniture salve to one half of the bowl’s flat bottom.

Image credit: Sadie Seasongoods.
The blue painter’s tape denotes which side was salved. You can easily see where the scuffing around the bottom edge starts and stops!
Then, I centered one of my mid-century modern stencils on the bottom (remember me using it on this project first?).

Image credit: Sadie Seasongoods.
I situated the stencil so that half of the atomic star design fell over the conditioned half, and the rest was on the non-conditioned half.
Next, I stippled on some matte gold paint and removed the stencil. Now for the test- would there be a noticeable difference in the stenciling??

Image credit: Sadie Seasongoods.
And you know what? There didn’t seem to be much of a difference at all. If anything, the conditioned side looked a smidge cleaner!
Mid Century Modern Pattern on Wood
So, I went ahead and buffed on some salve to the entire bowl, inside and out. Now the key bowl positively gleamed and much of the scuffing disappeared.

Image credit: Sadie Seasongoods.
From there, I once again centered my stencil (after cutting it out from the full size stencil- otherwise, it wouldn’t have fit) and used the same gold paint to stencil the design.

Image credit: Sadie Seasongoods.
And voila, it looked perfect. I just LOVE how gold stenciling looks on unpainted wood…

Image credit: Sadie Seasongoods.
So, yeah…stenciling over the conditioned wood was a smashing success! What a pleasant surprise.
But, now- the scary part. Stenciling on the rounded sides of the key bowl. I wanted four more stars on the bowl- at about every 90°.
So, I placed the stencil and taped it in place. Wish me luck, friends- this could go terribly right OR terribly wrong…

Image credit: Sadie Seasongoods.
The first star came out just OK. But it was partially the bowls’ fault, as there was a slight bump in the wood that I hadn’t noticed before I started.
But the second star? DIVINE.

Image credit: Sadie Seasongoods.
Using minimal paint, straight up-and-down stippling, and my fingers to keep the stencil from stretching or getting distorted was key. I ended up with gold fingers- but, they were easy to clean and worth it those neat and tidy stars!
Finally, after stenciling all four exterior stars, I buffed clear wax onto the key bowl. Since it’ll be a workhorse in our entryway, I wanted a nice smooth topcoat to protect it (AND my stenciling) from further damage.

Image credit: Sadie Seasongoods.
Key Bowl for the Entryway
Full disclosure, our entryway is surprisingly dark- so I couldn’t take my final photos in its actual, long-term spot. But I styled it elsewhere so you could see it in all its gorgeous glory.

Image credit: Sadie Seasongoods.
Isn’t it so lovely now? All gleaming wood, succulent grain, and a touch of gold to make it pop.
Plus, its wide openness and smooth interior will be such a breath of fresh air for my husband as he grabs his keys and wallet each morning. Not too shabby for a $3.99 thrift store purchase, eh?

Image credit: Sadie Seasongoods.
This is the second project I’ve used that furniture salve on (this being the first), and man- I am HOOKED! It really is a miracle worker on those blemished wooden pieces from the thrifts.
If you enjoyed this upcycling project for a key bowl, then you may also appreciate how I restored this ugly, stained wooden lazy Susan, as well!

Image credit: Sadie Seasongoods.
Craft on!
S
Want to be notified when I publish my next upcycling project tutorial?
Join me on Social Media:


PIN ME!

Image credit: Sadie Seasongoods.

Image credit: Sadie Seasongoods.
Sarah Ramberg is the owner of Sadie Seasongoods, a website that celebrates all things secondhand. From upcycling ideas and thrifted decor to vintage-centric travel itineraries, Sadie Seasongoods is a one-stop shop for anyone who loves thrifting and approachable repurposing ideas. Sarah is also the author of “Crafting with Flannel” and has been featured in numerous media outlets and magazines.
- Sarah Ramberg
- Sarah Ramberg
- Sarah Ramberg
- Sarah Ramberg
- Sarah Ramberg
- Sarah Ramberg
- Sarah Ramberg
- Sarah Ramberg
- Sarah Ramberg
- Sarah Ramberg
- Sarah Ramberg
- Sarah Ramberg
- Sarah Ramberg
- Sarah Ramberg
- Sarah Ramberg
- Sarah Ramberg
- Sarah Ramberg
- Sarah Ramberg
- Sarah Ramberg
- Sarah Ramberg
- Sarah Ramberg
- Sarah Ramberg
- Sarah Ramberg
- Sarah Ramberg
- Sarah Ramberg
- Sarah Ramberg
- Sarah Ramberg
- Sarah Ramberg
- Sarah Ramberg
- Sarah Ramberg
- Sarah Ramberg
- Sarah Ramberg
- Sarah Ramberg
- Sarah Ramberg
- Sarah Ramberg
- Sarah Ramberg
- Sarah Ramberg
- Sarah Ramberg
- Sarah Ramberg
- Sarah Ramberg
- Sarah Ramberg
- Sarah Ramberg
- Sarah Ramberg
- Sarah Ramberg
- Sarah Ramberg
- Sarah Ramberg
- Sarah Ramberg
- Sarah Ramberg
- Sarah Ramberg
- Sarah Ramberg
- Sarah Ramberg
- Sarah Ramberg
- Sarah Ramberg
- Sarah Ramberg
- Sarah Ramberg
- Sarah Ramberg
- Sarah Ramberg
- Sarah Ramberg
- Sarah Ramberg
- Sarah Ramberg
- Sarah Ramberg
- Sarah Ramberg
- Sarah Ramberg
- Sarah Ramberg
- Sarah Ramberg
- Sarah Ramberg
- Sarah Ramberg
- Sarah Ramberg
- Sarah Ramberg
- Sarah Ramberg
- Sarah Ramberg
- Sarah Ramberg
- Sarah Ramberg
- Sarah Ramberg
- Sarah Ramberg
- Sarah Ramberg
- Sarah Ramberg
- Sarah Ramberg
- Sarah Ramberg
- Sarah Ramberg
- Sarah Ramberg
- Sarah Ramberg
- Sarah Ramberg
- Sarah Ramberg
- Sarah Ramberg
- Sarah Ramberg
- Sarah Ramberg
- Sarah Ramberg
- Sarah Ramberg
- Sarah Ramberg
- Sarah Ramberg
- Sarah Ramberg
- Sarah Ramberg
- Sarah Ramberg
- Sarah Ramberg
- Sarah Ramberg
- Sarah Ramberg
- Sarah Ramberg
- Sarah Ramberg
- Sarah Ramberg
- Sarah Ramberg
- Sarah Ramberg
- Sarah Ramberg
- Sarah Ramberg
- Sarah Ramberg
- Sarah Ramberg
- Sarah Ramberg
- Sarah Ramberg
- Sarah Ramberg
- Sarah Ramberg
- Sarah Ramberg
- Sarah Ramberg
- Sarah Ramberg
- Sarah Ramberg
- Sarah Ramberg
- Sarah Ramberg
- Sarah Ramberg
- Sarah Ramberg
- Sarah Ramberg
- Sarah Ramberg
- Sarah Ramberg
- Sarah Ramberg
- Sarah Ramberg
- Sarah Ramberg
- Sarah Ramberg
- Sarah Ramberg
- Sarah Ramberg
- Sarah Ramberg
- Sarah Ramberg
- Sarah Ramberg
- Sarah Ramberg
- Sarah Ramberg
- Sarah Ramberg
- Sarah Ramberg
- Sarah Ramberg
- Sarah Ramberg
- Sarah Ramberg
- Sarah Ramberg
- Sarah Ramberg
- Sarah Ramberg
- Sarah Ramberg
- Sarah Ramberg
- Sarah Ramberg
- Sarah Ramberg
- Sarah Ramberg
- Sarah Ramberg
- Sarah Ramberg
- Sarah Ramberg
- Sarah Ramberg
- Sarah Ramberg
- Sarah Ramberg
- Sarah Ramberg
- Sarah Ramberg
- Sarah Ramberg
- Sarah Ramberg
- Sarah Ramberg
- Sarah Ramberg
- Sarah Ramberg
- Sarah Ramberg
- Sarah Ramberg
- Sarah Ramberg
- Sarah Ramberg
- Sarah Ramberg
- Sarah Ramberg
- Sarah Ramberg
- Sarah Ramberg
- Sarah Ramberg
- Sarah Ramberg
- Sarah Ramberg
- Sarah Ramberg
- Sarah Ramberg
- Sarah Ramberg
- Sarah Ramberg
- Sarah Ramberg
- Sarah Ramberg
- Sarah Ramberg
- Sarah Ramberg
- Sarah Ramberg
- Sarah Ramberg
- Sarah Ramberg
- Sarah Ramberg
- Sarah Ramberg
- Sarah Ramberg
- Sarah Ramberg
- Sarah Ramberg
- Sarah Ramberg
- Sarah Ramberg
- Sarah Ramberg
- Sarah Ramberg
- Sarah Ramberg
- Sarah Ramberg
- Sarah Ramberg
- Sarah Ramberg
- Sarah Ramberg
- Sarah Ramberg
- Sarah Ramberg
- Sarah Ramberg
- Sarah Ramberg
- Sarah Ramberg
- Sarah Ramberg
- Sarah Ramberg
- Sarah Ramberg
- Sarah Ramberg
- Sarah Ramberg
- Sarah Ramberg
- Sarah Ramberg
- Sarah Ramberg
- Sarah Ramberg
- Sarah Ramberg
- Sarah Ramberg
- Sarah Ramberg
- Sarah Ramberg
- Sarah Ramberg
- Sarah Ramberg
- Sarah Ramberg
- Sarah Ramberg
- Sarah Ramberg
- Sarah Ramberg
- Sarah Ramberg
- Sarah Ramberg
- Sarah Ramberg
- Sarah Ramberg
- Sarah Ramberg
- Sarah Ramberg
- Sarah Ramberg
- Sarah Ramberg
- Sarah Ramberg
- Sarah Ramberg
- Sarah Ramberg
- Sarah Ramberg
- Sarah Ramberg
- Sarah Ramberg
- Sarah Ramberg
- Sarah Ramberg
- Sarah Ramberg
- Sarah Ramberg
- Sarah Ramberg
- Sarah Ramberg
- Sarah Ramberg
- Sarah Ramberg
- Sarah Ramberg
- Sarah Ramberg
- Sarah Ramberg
- Sarah Ramberg
- Sarah Ramberg
- Sarah Ramberg
- Sarah Ramberg
- Sarah Ramberg
- Sarah Ramberg
- Sarah Ramberg
- Sarah Ramberg
- Sarah Ramberg
- Sarah Ramberg
- Sarah Ramberg
- Sarah Ramberg
- Sarah Ramberg
- Sarah Ramberg
- Sarah Ramberg
- Sarah Ramberg
- Sarah Ramberg
- Sarah Ramberg
- Sarah Ramberg
- Sarah Ramberg
- Sarah Ramberg
- Sarah Ramberg
- Sarah Ramberg
- Sarah Ramberg
- Sarah Ramberg
- Sarah Ramberg
- Sarah Ramberg
- Sarah Ramberg
- Sarah Ramberg
- Sarah Ramberg
- Sarah Ramberg
- Sarah Ramberg
- Sarah Ramberg
- Sarah Ramberg
- Sarah Ramberg
- Sarah Ramberg
- Sarah Ramberg
- Sarah Ramberg
- Sarah Ramberg
- Sarah Ramberg
- Sarah Ramberg
- Sarah Ramberg
- Sarah Ramberg
- Sarah Ramberg
- Sarah Ramberg
- Sarah Ramberg
- Sarah Ramberg
- Sarah Ramberg
- Sarah Ramberg
- Sarah Ramberg
- Sarah Ramberg
- Sarah Ramberg
- Sarah Ramberg
- Sarah Ramberg
- Sarah Ramberg
- Sarah Ramberg
- Sarah Ramberg
- Sarah Ramberg
- Sarah Ramberg
- Sarah Ramberg
- Sarah Ramberg
- Sarah Ramberg
- Sarah Ramberg
- Sarah Ramberg
- Sarah Ramberg
- Sarah Ramberg
- Sarah Ramberg
- Sarah Ramberg
- Sarah Ramberg
- Sarah Ramberg
- Sarah Ramberg
- Sarah Ramberg
- Sarah Ramberg
- Sarah Ramberg
- Sarah Ramberg
- Sarah Ramberg
- Sarah Ramberg
- Sarah Ramberg
- Sarah Ramberg
- Sarah Ramberg
- Sarah Ramberg
- Sarah Ramberg
- Sarah Ramberg
- Sarah Ramberg
- Sarah Ramberg
- Sarah Ramberg
- Sarah Ramberg
- Sarah Ramberg
- Sarah Ramberg
- Sarah Ramberg
- Sarah Ramberg
- Sarah Ramberg
- Sarah Ramberg
- Sarah Ramberg
- Sarah Ramberg
- Sarah Ramberg
- Sarah Ramberg
- Sarah Ramberg
- Sarah Ramberg
- Sarah Ramberg
- Sarah Ramberg
- Sarah Ramberg
- Sarah Ramberg
- Sarah Ramberg
- Sarah Ramberg
- Sarah Ramberg
- Sarah Ramberg
- Sarah Ramberg
- Sarah Ramberg
- Sarah Ramberg
- Sarah Ramberg
- Sarah Ramberg
- Sarah Ramberg
- Sarah Ramberg
- Sarah Ramberg
- Sarah Ramberg
- Sarah Ramberg
- Sarah Ramberg
- Sarah Ramberg
- Sarah Ramberg
- Sarah Ramberg
- Sarah Ramberg
- Sarah Ramberg
- Sarah Ramberg
- Sarah Ramberg
- Sarah Ramberg
- Sarah Ramberg
- Sarah Ramberg
- Sarah Ramberg
- Sarah Ramberg
- Sarah Ramberg
- Sarah Ramberg
- Sarah Ramberg
- Sarah Ramberg
- Sarah Ramberg
- Sarah Ramberg
- Sarah Ramberg
- Sarah Ramberg
- Sarah Ramberg
- Sarah Ramberg
- Sarah Ramberg
- Sarah Ramberg
- Sarah Ramberg
- Sarah Ramberg
- Sarah Ramberg
- Sarah Ramberg
- Sarah Ramberg
- Sarah Ramberg
- Sarah Ramberg
- Sarah Ramberg
- Sarah Ramberg
- Sarah Ramberg
- Sarah Ramberg
- Sarah Ramberg
- Sarah Ramberg
- Sarah Ramberg
- Sarah Ramberg
- Sarah Ramberg
- Sarah Ramberg
- Sarah Ramberg
- Sarah Ramberg
- Sarah Ramberg
- Sarah Ramberg
- Sarah Ramberg
- Sarah Ramberg
- Sarah Ramberg
- Sarah Ramberg
- Sarah Ramberg
- Sarah Ramberg
- Sarah Ramberg
- Sarah Ramberg
- Sarah Ramberg
- Sarah Ramberg
- Sarah Ramberg
- Sarah Ramberg
- Sarah Ramberg
- Sarah Ramberg
- Sarah Ramberg
- Sarah Ramberg
- Sarah Ramberg
- Sarah Ramberg
- Sarah Ramberg
- Sarah Ramberg
- Sarah Ramberg
- Sarah Ramberg
- Sarah Ramberg
- Sarah Ramberg
- Sarah Ramberg
- Sarah Ramberg
- Sarah Ramberg
- Sarah Ramberg
- Sarah Ramberg
- Sarah Ramberg
- Sarah Ramberg
- Sarah Ramberg
- Sarah Ramberg
- Sarah Ramberg
- Sarah Ramberg
- Sarah Ramberg
- Sarah Ramberg
- Sarah Ramberg
- Sarah Ramberg
- Sarah Ramberg
- Sarah Ramberg
- Sarah Ramberg
- Sarah Ramberg
- Sarah Ramberg
- Sarah Ramberg
- Sarah Ramberg
- Sarah Ramberg
- Sarah Ramberg
- Sarah Ramberg
- Sarah Ramberg
- Sarah Ramberg
- Sarah Ramberg
- Sarah Ramberg
- Sarah Ramberg
- Sarah Ramberg
- Sarah Ramberg
- Sarah Ramberg
- Sarah Ramberg
- Sarah Ramberg
- Sarah Ramberg
- Sarah Ramberg
- Sarah Ramberg
- Sarah Ramberg
- Sarah Ramberg
- Sarah Ramberg
- Sarah Ramberg
- Sarah Ramberg
- Sarah Ramberg
- Sarah Ramberg
- Sarah Ramberg
- Sarah Ramberg
- Sarah Ramberg
- Sarah Ramberg
- Sarah Ramberg
- Sarah Ramberg
- Sarah Ramberg
- Sarah Ramberg
- Sarah Ramberg
- Sarah Ramberg
- Sarah Ramberg
- Sarah Ramberg
- Sarah Ramberg
- Sarah Ramberg
- Sarah Ramberg
- Sarah Ramberg
- Sarah Ramberg
- Sarah Ramberg
- Sarah Ramberg
- Sarah Ramberg
- Sarah Ramberg
- Sarah Ramberg
- Sarah Ramberg
- Sarah Ramberg
- Sarah Ramberg
- Sarah Ramberg
- Sarah Ramberg
- Sarah Ramberg
- Sarah Ramberg
- Sarah Ramberg
- Sarah Ramberg
- Sarah Ramberg
- Sarah Ramberg
- Sarah Ramberg
- Sarah Ramberg
- Sarah Ramberg
- Sarah Ramberg
- Sarah Ramberg
- Sarah Ramberg
- Sarah Ramberg
- Sarah Ramberg
- Sarah Ramberg
- Sarah Ramberg
- Sarah Ramberg
- Sarah Ramberg
- Sarah Ramberg
- Sarah Ramberg
- Sarah Ramberg
- Sarah Ramberg
- Sarah Ramberg
- Sarah Ramberg
- Sarah Ramberg
- Sarah Ramberg
- Sarah Ramberg
- Sarah Ramberg
- Sarah Ramberg
- Sarah Ramberg
- Sarah Ramberg
- Sarah Ramberg
- Sarah Ramberg
- Sarah Ramberg
- Sarah Ramberg
- Sarah Ramberg
- Sarah Ramberg
- Sarah Ramberg
- Sarah Ramberg
- Sarah Ramberg
- Sarah Ramberg
- Sarah Ramberg
- Sarah Ramberg
- Sarah Ramberg
- Sarah Ramberg
- Sarah Ramberg
- Sarah Ramberg
- Sarah Ramberg
- Sarah Ramberg
- Sarah Ramberg
- Sarah Ramberg
- Sarah Ramberg
- Sarah Ramberg
- Sarah Ramberg
- Sarah Ramberg
- Sarah Ramberg
- Sarah Ramberg
- Sarah Ramberg
- Sarah Ramberg
- Sarah Ramberg
- Sarah Ramberg
- Sarah Ramberg
- Sarah Ramberg
- Sarah Ramberg
- Sarah Ramberg
- Sarah Ramberg
- Sarah Ramberg
- Sarah Ramberg
- Sarah Ramberg
- Sarah Ramberg
- Sarah Ramberg
- Sarah Ramberg
- Sarah Ramberg
- Sarah Ramberg
- Sarah Ramberg
- Sarah Ramberg
- Sarah Ramberg
- Sarah Ramberg
- Sarah Ramberg
- Sarah Ramberg
- Sarah Ramberg
- Sarah Ramberg
- Sarah Ramberg
- Sarah Ramberg
- Sarah Ramberg
- Sarah Ramberg
- Sarah Ramberg
- Sarah Ramberg
- Sarah Ramberg
- Sarah Ramberg
- Sarah Ramberg
- Sarah Ramberg
- Sarah Ramberg
- Sarah Ramberg
- Sarah Ramberg
- Sarah Ramberg
- Sarah Ramberg
- Sarah Ramberg
- Sarah Ramberg
- Sarah Ramberg
- Sarah Ramberg
- Sarah Ramberg
- Sarah Ramberg
- Sarah Ramberg
- Sarah Ramberg
- Sarah Ramberg
- Sarah Ramberg
- Sarah Ramberg
- Sarah Ramberg
- Sarah Ramberg
- Sarah Ramberg
- Sarah Ramberg
- Sarah Ramberg
- Sarah Ramberg
- Sarah Ramberg
- Sarah Ramberg
- Sarah Ramberg
- Sarah Ramberg
- Sarah Ramberg
- Sarah Ramberg
- Sarah Ramberg
- Sarah Ramberg
- Sarah Ramberg
- Sarah Ramberg
- Sarah Ramberg
- Sarah Ramberg
- Sarah Ramberg
- Sarah Ramberg
- Sarah Ramberg
- Sarah Ramberg
- Sarah Ramberg
- Sarah Ramberg
- Sarah Ramberg
- Sarah Ramberg
- Sarah Ramberg
- Sarah Ramberg
- Sarah Ramberg
- Sarah Ramberg
- Sarah Ramberg
- Sarah Ramberg
- Sarah Ramberg
- Sarah Ramberg
- Sarah Ramberg
- Sarah Ramberg
- Sarah Ramberg
- Sarah Ramberg
- Sarah Ramberg
- Sarah Ramberg
- Sarah Ramberg
- Sarah Ramberg
- Sarah Ramberg
- Sarah Ramberg
- Sarah Ramberg
- Sarah Ramberg
- Sarah Ramberg
- Sarah Ramberg
- Sarah Ramberg
- Sarah Ramberg
- Sarah Ramberg
- Sarah Ramberg


It looks beautiful, so glad it worked out perfectly. I love the natural wood with the touch of gold, looks lush.x
Thank you so much! I’m glad I’m not the only one who loves the wood/gold combo!
I have a wooden bowl to do something with. I did infect think of keys, BUT, never did it in fear of scratching, nicking, etc the bowl.
Any suggestions?
Here’s hoping the last step I took in my post does the trick! Only time will tell.
Worked out wonderfully! Love it!
Thanks, Fonda!
I love the gold against the wood; it really makes it look more MCM to me! Lovely job–and great problem solving!I have a very scratched metal tray in my front hall but haven’t found anything that I want to replace it with–yet! And it has cut out clovers–as a nod to Irish heritage.