I love coin jewelry (especially a coin bracelet), but it can be expensive and difficult to make. It has great bohemian style and feels exotic to wear. When I stumbled across an artisan who has created a gorgeous line of “coin” jewelry by upcycling vintage metal buttons, I was instantly smitten. The button jewelry looked JUST like old coins (or even pirate coins!) and I knew I had to give it a go.Who would have thunk it? It’s a GENIUS upcycling idea. And silly me, I’ve always passed up metal buttons in favor of pretty plastic and glass ones.

Well, not anymore! I couldn’t wait to try to make a coin bracelet from vintage metal buttons and create the gypsy jewelry of my dreams.
This post contains affiliate links for your crafting convenience. As an Amazon Affiliate, I earn from qualifying purchases. All blue, bold, and underlined text is a clickable link, either to a product or to a related post.
Upcycling the Metal Buttons into Fake Gold Coins
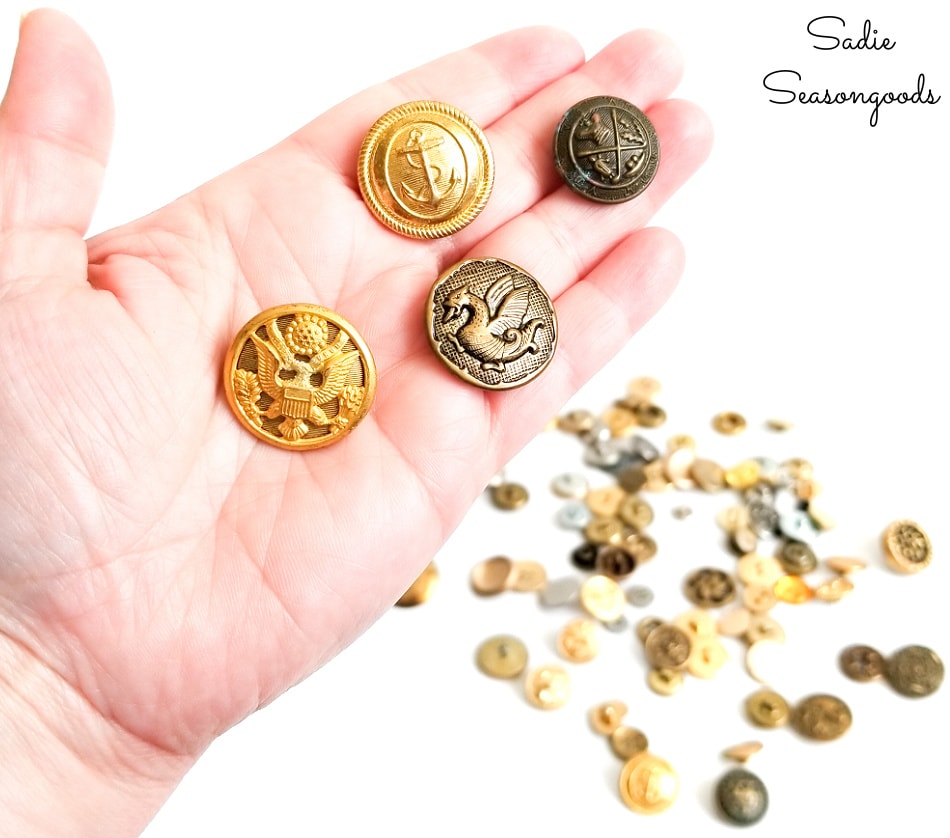
First, I started collecting some metal buttons from local shops and online Etsy stores. I wanted all sorts of sizes and designs. Having a mixture of metallics was also ideal so that I could make gold “coins” and silver “coins”, alike.
Then, I turned my attention to flattening them. Since I already had a blacksmith anvil which I had used to flatten spoons for my cameo spoon pendants, I used it again for the vintage metal buttons.

I’ve since experimented with flattening metal buttons NOT using the anvil in this post, if you’re curious.
All I did was tap the vintage brass button with my hammer until it was sufficiently flat. And no, you don’t need to remove the shanks first; they’ll flatten just fine without issue.

Pro tip – wrapping the metal buttons in soft fabric before flattening on the anvil (or concrete pad) will help prevent metal scuffing during the process. Just remember that you aren’t driving in stubborn nails. Try a few light taps with your hammer first to determine how much force is necessary.
See what I mean, though? They look like pirate coins or fake gold coins, don’t they? I would have LOVED having these for my backyard adventures when I was a little girl.

They’d also be perfect for a Halloween costume or for general make-believe games, as well!
Assembling a Coin Bracelet or Button Bracelet
Once the vintage metal buttons were upcycled into fake gold coins, I used a simple awl to pop holes in the coins. To do so, I placed them on a piece of scrap wood first and then punched a hole near the top.

If you were making a coin ring, perhaps, you wouldn’t need the hole. But for a coin necklace or coin bracelet, the hole was necessary.
After the holes were punched through the vintage brass buttons, I gently hammered the back of each hole to flatten the sharp metal bits. Then, I threaded jump rings through the holes.

Now I had coin charms that were perfect for making a coin bracelet!
Next, I measured a length of chain that would work well on my wrist, and began attaching the jump rings to the chain.

Don’t these vintage metal buttons look perfect as fake gold coins for my bracelet? I LOVE HOW THIS IS GOING!
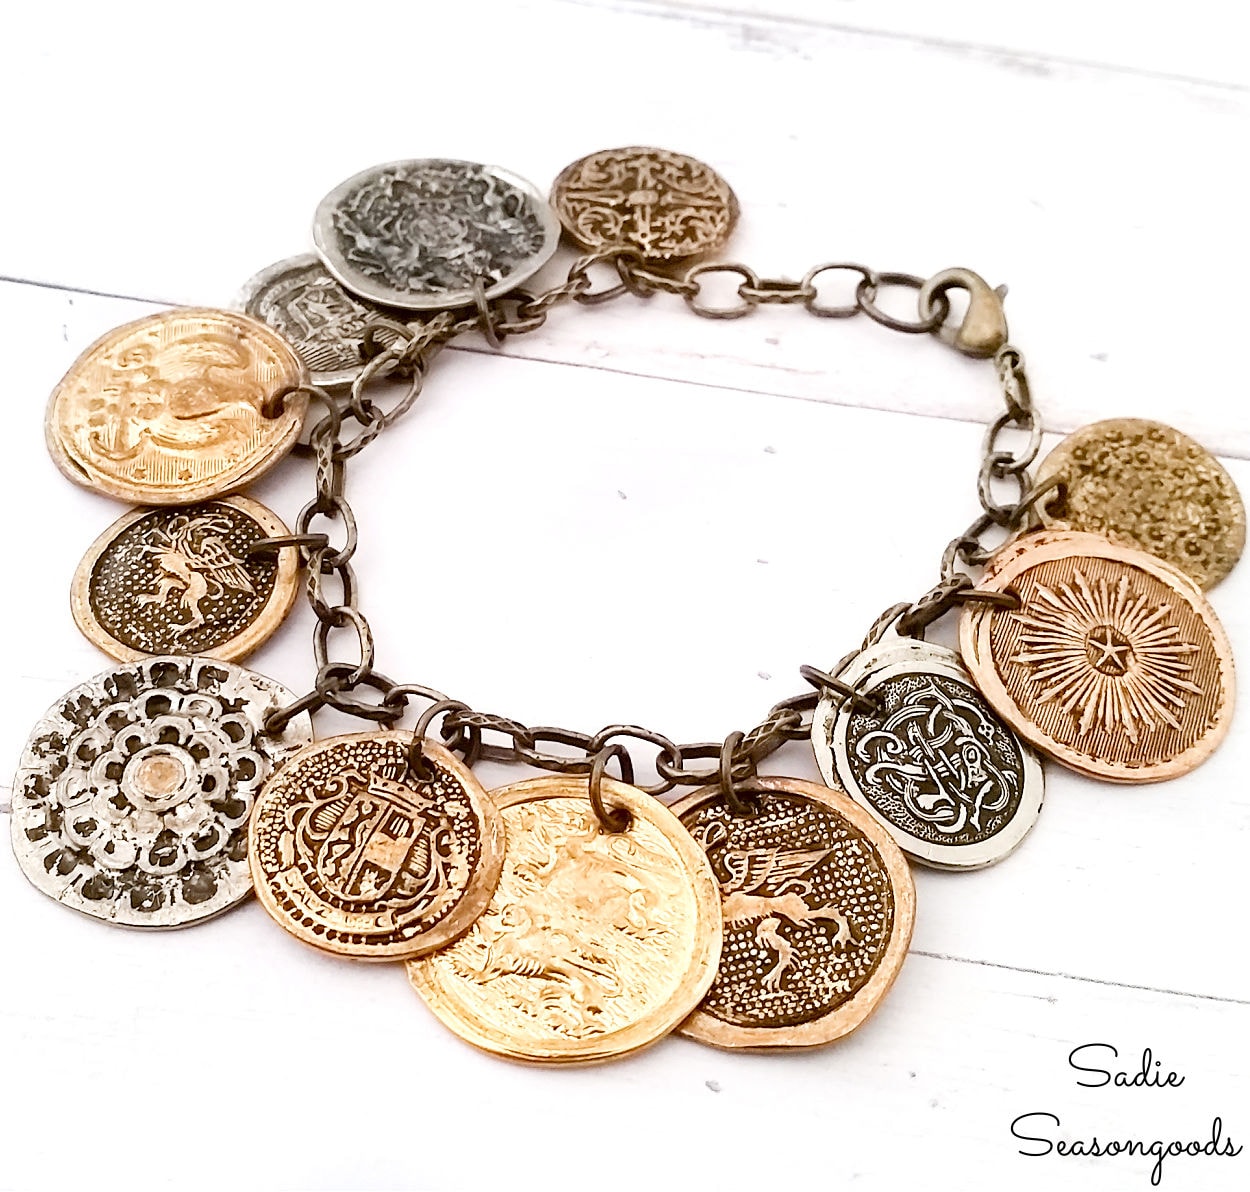
After I attached all of the metal buttons to the chain, I had the coin bracelet of my dreams. It was lightweight and shiny, and cost just a few dollars to make.

Coin Bracelet from Vintage Metal Buttons
The honest truth is that I’m obsessed with this idea for button jewelry. The process is cathartic and fun, and the end result is…well…charming.
I also love the mixture of gold coins and silver coins and how different each one is. Flattening the vintage buttons didn’t remove the designs, but gave them that weathered look that makes old coins look so appealing.

I don’t know why I think of coin jewelry as being boho jewelry or exotic, but I do. Perhaps it’s because I always saved coins from my (limited) world travels.

I really do love it, and I have plenty of metal buttons left to make a coin necklace. Or maybe several necklaces!
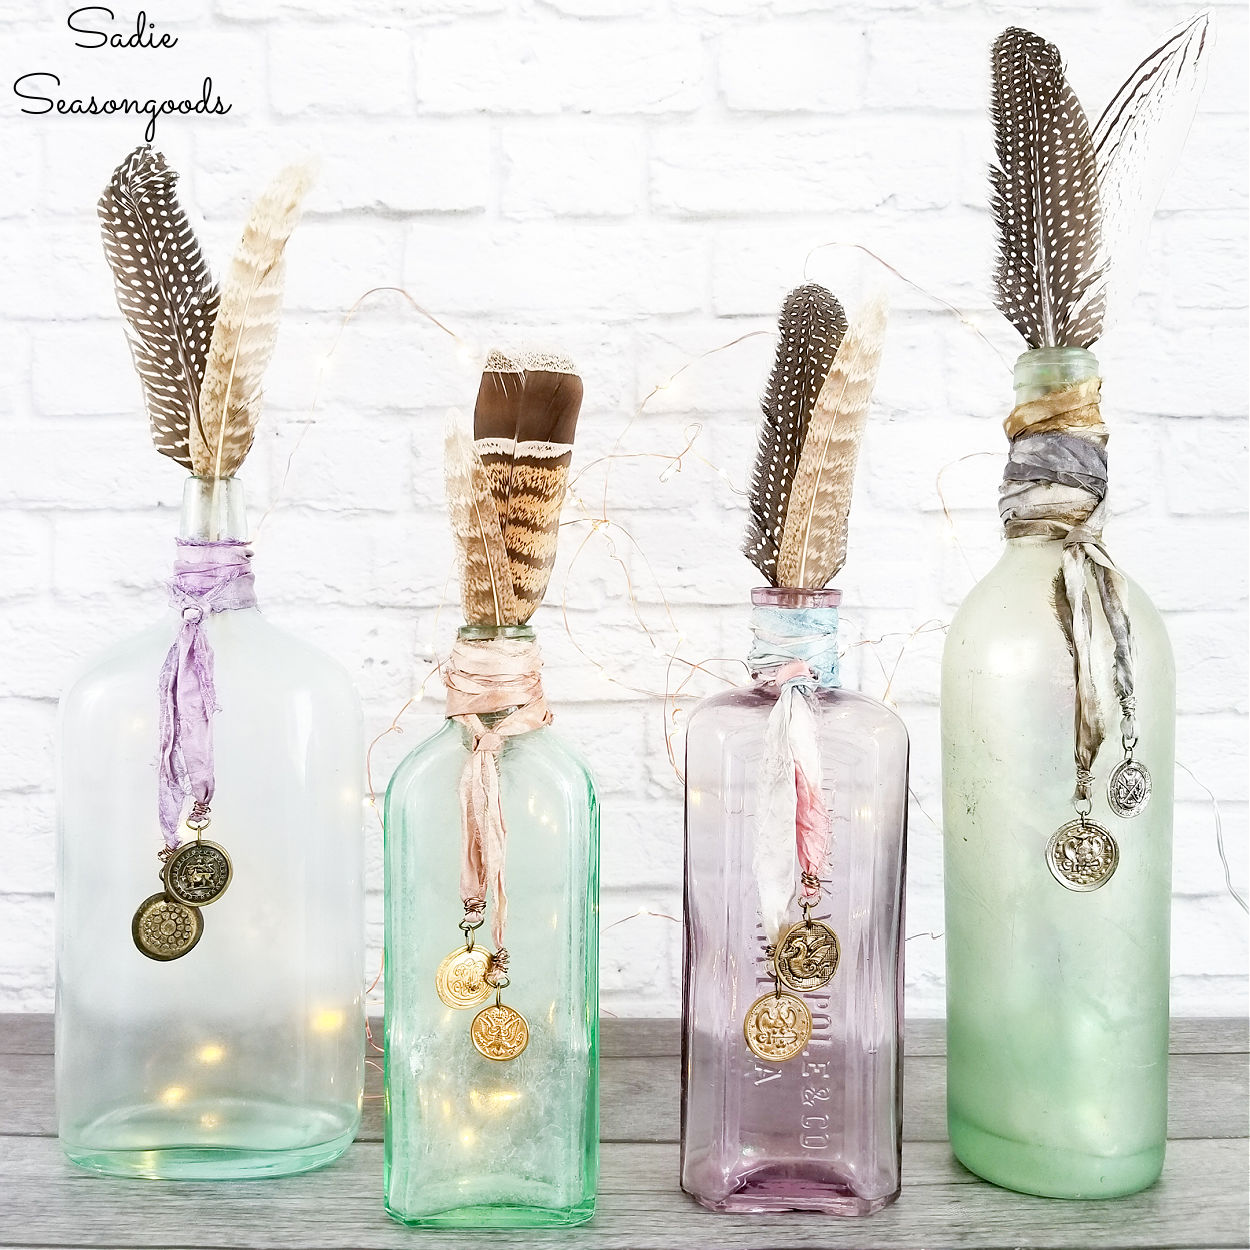
Update! Not only is this idea great for gypsy jewelry, but I’ve also created this Bohemian decor idea with metal buttons.
And if you enjoyed this upcycling idea for DIY jewelry, then you may also be interested in the friendship necklaces / mother daughter jewelry I made from clip on earrings!

Craft on!
S
Want to be notified when I publish my next upcycling project tutorial?
Join me on Social Media:


PIN ME!

Sarah Ramberg is the owner of Sadie Seasongoods, a website that celebrates all things secondhand. From upcycling ideas and thrifted decor to vintage-centric travel itineraries, Sadie Seasongoods is a one-stop shop for anyone who loves thrifting and approachable repurposing ideas. Sarah is also the author of “Crafting with Flannel” and has been featured in numerous media outlets and magazines.
- Sarah Ramberg
- Sarah Ramberg
- Sarah Ramberg
- Sarah Ramberg
- Sarah Ramberg
- Sarah Ramberg
- Sarah Ramberg
- Sarah Ramberg
- Sarah Ramberg
- Sarah Ramberg
- Sarah Ramberg
- Sarah Ramberg
- Sarah Ramberg
- Sarah Ramberg
- Sarah Ramberg
- Sarah Ramberg
- Sarah Ramberg
- Sarah Ramberg
- Sarah Ramberg
- Sarah Ramberg
- Sarah Ramberg
- Sarah Ramberg
- Sarah Ramberg
- Sarah Ramberg
- Sarah Ramberg
- Sarah Ramberg
- Sarah Ramberg
- Sarah Ramberg
- Sarah Ramberg
- Sarah Ramberg
- Sarah Ramberg
- Sarah Ramberg
- Sarah Ramberg
- Sarah Ramberg
- Sarah Ramberg
- Sarah Ramberg
- Sarah Ramberg
- Sarah Ramberg
- Sarah Ramberg
- Sarah Ramberg
- Sarah Ramberg
- Sarah Ramberg
- Sarah Ramberg
- Sarah Ramberg
- Sarah Ramberg
- Sarah Ramberg
- Sarah Ramberg
- Sarah Ramberg
- Sarah Ramberg
- Sarah Ramberg
- Sarah Ramberg
- Sarah Ramberg
- Sarah Ramberg
- Sarah Ramberg
- Sarah Ramberg
- Sarah Ramberg
- Sarah Ramberg
- Sarah Ramberg
- Sarah Ramberg
- Sarah Ramberg
- Sarah Ramberg
- Sarah Ramberg
- Sarah Ramberg
- Sarah Ramberg
- Sarah Ramberg
- Sarah Ramberg
- Sarah Ramberg
- Sarah Ramberg
- Sarah Ramberg
- Sarah Ramberg
- Sarah Ramberg
- Sarah Ramberg
- Sarah Ramberg
- Sarah Ramberg
- Sarah Ramberg
- Sarah Ramberg
- Sarah Ramberg
- Sarah Ramberg
- Sarah Ramberg
- Sarah Ramberg
- Sarah Ramberg
- Sarah Ramberg
- Sarah Ramberg
- Sarah Ramberg
- Sarah Ramberg
- Sarah Ramberg
- Sarah Ramberg
- Sarah Ramberg
- Sarah Ramberg
- Sarah Ramberg
- Sarah Ramberg
- Sarah Ramberg
- Sarah Ramberg
- Sarah Ramberg
- Sarah Ramberg
- Sarah Ramberg
- Sarah Ramberg
- Sarah Ramberg
- Sarah Ramberg
- Sarah Ramberg
- Sarah Ramberg
- Sarah Ramberg
- Sarah Ramberg
- Sarah Ramberg
- Sarah Ramberg
- Sarah Ramberg
- Sarah Ramberg
- Sarah Ramberg
- Sarah Ramberg
- Sarah Ramberg
- Sarah Ramberg
- Sarah Ramberg
- Sarah Ramberg
- Sarah Ramberg
- Sarah Ramberg
- Sarah Ramberg
- Sarah Ramberg
- Sarah Ramberg
- Sarah Ramberg
- Sarah Ramberg
- Sarah Ramberg
- Sarah Ramberg
- Sarah Ramberg
- Sarah Ramberg
- Sarah Ramberg
- Sarah Ramberg
- Sarah Ramberg
- Sarah Ramberg
- Sarah Ramberg
- Sarah Ramberg
- Sarah Ramberg
- Sarah Ramberg
- Sarah Ramberg
- Sarah Ramberg
- Sarah Ramberg
- Sarah Ramberg
- Sarah Ramberg
- Sarah Ramberg
- Sarah Ramberg
- Sarah Ramberg
- Sarah Ramberg
- Sarah Ramberg
- Sarah Ramberg
- Sarah Ramberg
- Sarah Ramberg
- Sarah Ramberg
- Sarah Ramberg
- Sarah Ramberg
- Sarah Ramberg
- Sarah Ramberg
- Sarah Ramberg
- Sarah Ramberg
- Sarah Ramberg
- Sarah Ramberg
- Sarah Ramberg
- Sarah Ramberg
- Sarah Ramberg
- Sarah Ramberg
- Sarah Ramberg
- Sarah Ramberg
- Sarah Ramberg
- Sarah Ramberg
- Sarah Ramberg
- Sarah Ramberg
- Sarah Ramberg
- Sarah Ramberg
- Sarah Ramberg
- Sarah Ramberg
- Sarah Ramberg
- Sarah Ramberg
- Sarah Ramberg
- Sarah Ramberg
- Sarah Ramberg
- Sarah Ramberg
- Sarah Ramberg
- Sarah Ramberg
- Sarah Ramberg
- Sarah Ramberg
- Sarah Ramberg
- Sarah Ramberg
- Sarah Ramberg
- Sarah Ramberg
- Sarah Ramberg
- Sarah Ramberg
- Sarah Ramberg
- Sarah Ramberg
- Sarah Ramberg
- Sarah Ramberg
- Sarah Ramberg
- Sarah Ramberg
- Sarah Ramberg
- Sarah Ramberg
- Sarah Ramberg
- Sarah Ramberg
- Sarah Ramberg
- Sarah Ramberg
- Sarah Ramberg
- Sarah Ramberg
- Sarah Ramberg
- Sarah Ramberg
- Sarah Ramberg
- Sarah Ramberg
- Sarah Ramberg
- Sarah Ramberg
- Sarah Ramberg
- Sarah Ramberg
- Sarah Ramberg
- Sarah Ramberg
- Sarah Ramberg
- Sarah Ramberg
- Sarah Ramberg
- Sarah Ramberg
- Sarah Ramberg
- Sarah Ramberg
- Sarah Ramberg
- Sarah Ramberg
- Sarah Ramberg
- Sarah Ramberg
- Sarah Ramberg
- Sarah Ramberg
- Sarah Ramberg
- Sarah Ramberg
- Sarah Ramberg
- Sarah Ramberg
- Sarah Ramberg
- Sarah Ramberg
- Sarah Ramberg
- Sarah Ramberg
- Sarah Ramberg
- Sarah Ramberg
- Sarah Ramberg
- Sarah Ramberg
- Sarah Ramberg
- Sarah Ramberg
- Sarah Ramberg
- Sarah Ramberg
- Sarah Ramberg
- Sarah Ramberg
- Sarah Ramberg
- Sarah Ramberg
- Sarah Ramberg
- Sarah Ramberg
- Sarah Ramberg
- Sarah Ramberg
- Sarah Ramberg
- Sarah Ramberg
- Sarah Ramberg
- Sarah Ramberg
- Sarah Ramberg
- Sarah Ramberg
- Sarah Ramberg
- Sarah Ramberg
- Sarah Ramberg
- Sarah Ramberg
- Sarah Ramberg
- Sarah Ramberg
- Sarah Ramberg
- Sarah Ramberg
- Sarah Ramberg
- Sarah Ramberg
- Sarah Ramberg
- Sarah Ramberg
- Sarah Ramberg
- Sarah Ramberg
- Sarah Ramberg
- Sarah Ramberg
- Sarah Ramberg
- Sarah Ramberg
- Sarah Ramberg
- Sarah Ramberg
- Sarah Ramberg
- Sarah Ramberg
- Sarah Ramberg
- Sarah Ramberg
- Sarah Ramberg
- Sarah Ramberg
- Sarah Ramberg
- Sarah Ramberg
- Sarah Ramberg
- Sarah Ramberg
- Sarah Ramberg
- Sarah Ramberg
- Sarah Ramberg
- Sarah Ramberg
- Sarah Ramberg
- Sarah Ramberg
- Sarah Ramberg
- Sarah Ramberg
- Sarah Ramberg
- Sarah Ramberg
- Sarah Ramberg
- Sarah Ramberg
- Sarah Ramberg
- Sarah Ramberg
- Sarah Ramberg
- Sarah Ramberg
- Sarah Ramberg
- Sarah Ramberg
- Sarah Ramberg
- Sarah Ramberg
- Sarah Ramberg
- Sarah Ramberg
- Sarah Ramberg
- Sarah Ramberg
- Sarah Ramberg
- Sarah Ramberg
- Sarah Ramberg
- Sarah Ramberg
- Sarah Ramberg
- Sarah Ramberg
- Sarah Ramberg
- Sarah Ramberg
- Sarah Ramberg
- Sarah Ramberg
- Sarah Ramberg
- Sarah Ramberg
- Sarah Ramberg
- Sarah Ramberg
- Sarah Ramberg
- Sarah Ramberg
- Sarah Ramberg
- Sarah Ramberg
- Sarah Ramberg
- Sarah Ramberg
- Sarah Ramberg
- Sarah Ramberg
- Sarah Ramberg
- Sarah Ramberg
- Sarah Ramberg
- Sarah Ramberg
- Sarah Ramberg
- Sarah Ramberg
- Sarah Ramberg
- Sarah Ramberg
- Sarah Ramberg
- Sarah Ramberg
- Sarah Ramberg
- Sarah Ramberg
- Sarah Ramberg
- Sarah Ramberg
- Sarah Ramberg
- Sarah Ramberg
- Sarah Ramberg
- Sarah Ramberg
- Sarah Ramberg
- Sarah Ramberg
- Sarah Ramberg
- Sarah Ramberg
- Sarah Ramberg
- Sarah Ramberg
- Sarah Ramberg
- Sarah Ramberg
- Sarah Ramberg
- Sarah Ramberg
- Sarah Ramberg
- Sarah Ramberg
- Sarah Ramberg
- Sarah Ramberg
- Sarah Ramberg
- Sarah Ramberg
- Sarah Ramberg
- Sarah Ramberg
- Sarah Ramberg
- Sarah Ramberg
- Sarah Ramberg
- Sarah Ramberg
- Sarah Ramberg
- Sarah Ramberg
- Sarah Ramberg
- Sarah Ramberg
- Sarah Ramberg
- Sarah Ramberg
- Sarah Ramberg
- Sarah Ramberg
- Sarah Ramberg
- Sarah Ramberg
- Sarah Ramberg
- Sarah Ramberg
- Sarah Ramberg
- Sarah Ramberg
- Sarah Ramberg
- Sarah Ramberg
- Sarah Ramberg
- Sarah Ramberg
- Sarah Ramberg
- Sarah Ramberg
- Sarah Ramberg
- Sarah Ramberg
- Sarah Ramberg
- Sarah Ramberg
- Sarah Ramberg
- Sarah Ramberg
- Sarah Ramberg
- Sarah Ramberg
- Sarah Ramberg
- Sarah Ramberg
- Sarah Ramberg
- Sarah Ramberg
- Sarah Ramberg
- Sarah Ramberg
- Sarah Ramberg
- Sarah Ramberg
- Sarah Ramberg
- Sarah Ramberg
- Sarah Ramberg
- Sarah Ramberg
- Sarah Ramberg
- Sarah Ramberg
- Sarah Ramberg
- Sarah Ramberg
- Sarah Ramberg
- Sarah Ramberg
- Sarah Ramberg
- Sarah Ramberg
- Sarah Ramberg
- Sarah Ramberg
- Sarah Ramberg
- Sarah Ramberg
- Sarah Ramberg
- Sarah Ramberg
- Sarah Ramberg
- Sarah Ramberg
- Sarah Ramberg
- Sarah Ramberg
- Sarah Ramberg
- Sarah Ramberg
- Sarah Ramberg
- Sarah Ramberg
- Sarah Ramberg
- Sarah Ramberg
- Sarah Ramberg
- Sarah Ramberg
- Sarah Ramberg
- Sarah Ramberg
- Sarah Ramberg
- Sarah Ramberg
- Sarah Ramberg
- Sarah Ramberg
- Sarah Ramberg
- Sarah Ramberg
- Sarah Ramberg
- Sarah Ramberg
- Sarah Ramberg
- Sarah Ramberg
- Sarah Ramberg
- Sarah Ramberg
- Sarah Ramberg
- Sarah Ramberg
- Sarah Ramberg
- Sarah Ramberg
- Sarah Ramberg
- Sarah Ramberg
- Sarah Ramberg
- Sarah Ramberg
- Sarah Ramberg
- Sarah Ramberg
- Sarah Ramberg
- Sarah Ramberg
- Sarah Ramberg
- Sarah Ramberg
- Sarah Ramberg
- Sarah Ramberg
- Sarah Ramberg
- Sarah Ramberg
- Sarah Ramberg
- Sarah Ramberg
- Sarah Ramberg
- Sarah Ramberg
- Sarah Ramberg
- Sarah Ramberg
- Sarah Ramberg
- Sarah Ramberg
- Sarah Ramberg
- Sarah Ramberg
- Sarah Ramberg
- Sarah Ramberg
- Sarah Ramberg
- Sarah Ramberg
- Sarah Ramberg
- Sarah Ramberg
- Sarah Ramberg
- Sarah Ramberg
- Sarah Ramberg
- Sarah Ramberg
- Sarah Ramberg
- Sarah Ramberg
- Sarah Ramberg
- Sarah Ramberg
- Sarah Ramberg
- Sarah Ramberg
- Sarah Ramberg
- Sarah Ramberg
- Sarah Ramberg
- Sarah Ramberg
- Sarah Ramberg
- Sarah Ramberg
- Sarah Ramberg
- Sarah Ramberg
- Sarah Ramberg
- Sarah Ramberg
- Sarah Ramberg
- Sarah Ramberg
- Sarah Ramberg
- Sarah Ramberg
- Sarah Ramberg
- Sarah Ramberg
- Sarah Ramberg
- Sarah Ramberg
- Sarah Ramberg
- Sarah Ramberg
- Sarah Ramberg
- Sarah Ramberg
- Sarah Ramberg
- Sarah Ramberg
- Sarah Ramberg
- Sarah Ramberg
- Sarah Ramberg
- Sarah Ramberg
- Sarah Ramberg
- Sarah Ramberg
- Sarah Ramberg
- Sarah Ramberg
- Sarah Ramberg
- Sarah Ramberg
- Sarah Ramberg
- Sarah Ramberg
- Sarah Ramberg
- Sarah Ramberg
- Sarah Ramberg
- Sarah Ramberg
- Sarah Ramberg
- Sarah Ramberg
- Sarah Ramberg
- Sarah Ramberg
- Sarah Ramberg
- Sarah Ramberg
- Sarah Ramberg
- Sarah Ramberg
- Sarah Ramberg
- Sarah Ramberg
- Sarah Ramberg
- Sarah Ramberg
- Sarah Ramberg
- Sarah Ramberg
- Sarah Ramberg
- Sarah Ramberg
- Sarah Ramberg
- Sarah Ramberg
- Sarah Ramberg
- Sarah Ramberg
- Sarah Ramberg
- Sarah Ramberg
- Sarah Ramberg
- Sarah Ramberg
- Sarah Ramberg
- Sarah Ramberg
- Sarah Ramberg
- Sarah Ramberg
- Sarah Ramberg
- Sarah Ramberg
- Sarah Ramberg
- Sarah Ramberg
- Sarah Ramberg
- Sarah Ramberg
- Sarah Ramberg
- Sarah Ramberg
- Sarah Ramberg
- Sarah Ramberg
- Sarah Ramberg
- Sarah Ramberg
- Sarah Ramberg
- Sarah Ramberg
- Sarah Ramberg
- Sarah Ramberg
- Sarah Ramberg
- Sarah Ramberg
- Sarah Ramberg
- Sarah Ramberg
- Sarah Ramberg
- Sarah Ramberg
- Sarah Ramberg
- Sarah Ramberg
- Sarah Ramberg
- Sarah Ramberg
- Sarah Ramberg
- Sarah Ramberg
- Sarah Ramberg
- Sarah Ramberg
- Sarah Ramberg
- Sarah Ramberg
- Sarah Ramberg
- Sarah Ramberg
- Sarah Ramberg
- Sarah Ramberg
- Sarah Ramberg
- Sarah Ramberg
- Sarah Ramberg
- Sarah Ramberg
- Sarah Ramberg
- Sarah Ramberg
- Sarah Ramberg
- Sarah Ramberg
- Sarah Ramberg
- Sarah Ramberg
- Sarah Ramberg
- Sarah Ramberg
- Sarah Ramberg
- Sarah Ramberg
- Sarah Ramberg
- Sarah Ramberg
- Sarah Ramberg
- Sarah Ramberg
- Sarah Ramberg
- Sarah Ramberg
- Sarah Ramberg
- Sarah Ramberg
- Sarah Ramberg
- Sarah Ramberg
- Sarah Ramberg
- Sarah Ramberg
- Sarah Ramberg
- Sarah Ramberg
- Sarah Ramberg
- Sarah Ramberg
- Sarah Ramberg
- Sarah Ramberg
- Sarah Ramberg
- Sarah Ramberg
- Sarah Ramberg
- Sarah Ramberg
- Sarah Ramberg
- Sarah Ramberg
- Sarah Ramberg
- Sarah Ramberg
- Sarah Ramberg
- Sarah Ramberg
- Sarah Ramberg
- Sarah Ramberg
- Sarah Ramberg
- Sarah Ramberg
- Sarah Ramberg
- Sarah Ramberg
- Sarah Ramberg
- Sarah Ramberg
- Sarah Ramberg
- Sarah Ramberg
- Sarah Ramberg
- Sarah Ramberg
- Sarah Ramberg
- Sarah Ramberg
- Sarah Ramberg
- Sarah Ramberg
- Sarah Ramberg
- Sarah Ramberg
- Sarah Ramberg
- Sarah Ramberg
- Sarah Ramberg
- Sarah Ramberg
- Sarah Ramberg
- Sarah Ramberg
- Sarah Ramberg
- Sarah Ramberg


This is gorgeous! My dad was on a ship in the Navy and collected coins from all the countries he visited. I now have that collection and have always wanted to do something with them. I wonder if I can recreate this with actual coins, rather than smashed buttons. I love how this turned out!
I don’t see why not- but coins may require a drill because they’ll be a much harder metal. That’d be my only real concern…
You could check out my pin for this Kirsten:
https://www.pinterest.com/pin/152418768611742794/
That is a really creative idea. I like the way it can be done with stuff you already have around the house.
Did you remove the shank or just smash that too?!
Smashed the shank, too!!
You are hammering out some great ideas here. Sometimes I get stuck on a particular form, like a bottle cap, but the idea of smashing it flat opens up more options. Nice post – found you on the Makers Link Party. –Lorraine
What a clever idea and so therapeutic too:-) I have a drawer full of these metal buttons. Thanks so much for the inspiration and for sharing at VIParty.
Thanks, Betsy- and thank you for hosting!!
I found this link on the Smart Schoolhouse link up and I love this. I used to have a necklace like this, but it broke. I am looking forward to making one myself, but I don’t hae any of the buttone. Off to Etsy I go!
Let me know how yours turns out, Jasmine!!
I just love this new twist on button bracelets! I made them for a few years until arthritis took over but I never thought to smash them first! I think you have a one of a kind, fabulous gift for yourself!
Right?? Who’d a thunk it re: smashing them…but it turns out seriously awesome. 🙂
This is very creative…great job & thanks for another fun project to try…
Thanks, Sharon!
What a great way to use all those gold buttons (yes, the ones usually tossed aside in favor of the more “vintagy” looking ones.) Thanks for the inspiration.
You are so welcome, Linda!
Love this idea. Thanks for sharing!
Thanks, Cindy!
Oh my gosh this is too cool! I have a zillion old metal buttons lying around, I’ll have to try this asap!
Right?? Let me know how yours turns out, Alexandria!!
Well, you did make it look easy! Thanks for sharing with the Thursday Blog Hop!
Very pretty! Thanks for sharing on my Friday Favorites linkup!
This is absolutely beautiful! Found your post on Thursday Favorite Things Blog Hop:) While I am a painter by heart, I do love to play with jewelry!
Wow,..what a cool idea. Love the vintage charm.
I love your coin bracelet, I have all the supplies but cant get back in the mood.
Thanks for sharing on The Oh My Heartsie Girls WW this week.
Have a great weekend!
Karren
Oh My Heartsie Girls -Host
Those are buttons?! SO COOL! Thanks so much for joining us over at the #HomeMattersParty – be sure to send your blogging friends our way! And we hope to see YOU again next week!
Thanks, Kristen!
I came back by to let you know that you’ve been featured at this week’s #HomeMattersParty – we’d love to have you come check it out!
Here’s the link: http://theroadtodomestication.com/2015/02/27/home-matters-linky-party-26/
Happy Friday!!!
Love this!! I’ve been planning on smashing some of my metal buttons too. I only hope mine turn out as awesome as yours!
That’s a smashing good idea:) I would love to do this with coins I’ve collected from traveling.
I love this. It is so pretty! Thank you for sharing on Show Me Saturday!
Good idea! I would have never thought of this! visiting from Skip to my Lou Monday
Love this bracelet. Great tutorial. Thank you very much for joining in the celebration of #purebloglove, we enjoy having you each week. I hope to see you on Thursday at 8PM, EST through Sunday night. ~Cydnee
gor.geous! Simply love this – I never thought of hammering down metal buttons before. And using an awl to punch a hole – mind. blown! You completely rocked this inspiration!
Thank you so much, Jen!!
Just beautiful !!!
I’ve been hammering down tea light tins for a month now so this would be right up my ally LOL – and would never have thought of this in a million years – pinning !!!
xox
Oooh, what are you making with the tea light tins??
A wreath ( hopefully lol ) and I don’t have nearly enough yet !!!
Great idea!
Love the bracelet.
Kathy
Sarah this is just gorgeous! Really different and vintage looking. I wonder if you’d do me the honour of sharing this idea at my very new and shiny blog linky party, Five Star Frugal? We’d love to have you….Mimi xx
http://atrayofbliss.blogspot.com.au/2015/02/five-star-frugal-6.html
Thanks, Mimi! Just linked up. 🙂
This is so beautiful! I love it! Thanks for sharing at Totally Terrific Tuesday!
Oh my gosh I LOVE this! I can use this method for my belly dance and renaissance faire costumes!! Pinning to share, I’m serious – I love this so much I can hardly stand it!
Hollie!! That’s a GREAT idea- I’d love to see the jingle belts and such that you make with the buttons. Please send me pictures!!
Sadie, these are beautiful! I can’t believe they are smashed buttons. What a perfect and unique gift for someone special!
Oh I like your coin button bracelet.
I will try to make me one however I am not good at closing the O ring once attached to any bracelet, seems like I loose charms?
I have lots metal buttons so like I said i’m trying this
you just can’t beat a charm bracelet
Janice
Hi Sarah…thankyou for sharing your cleverness at Five Star Frugal this week. This was one of my favourite projects for the week! I look forward to more of your gorgeous work….Mimi xxx
I love this so much. It is very pretty and vintage looking. Great tutorial. Sharing! Thanks for sharing at Totally Terrific Tuesday last week! Can’t wait to see what you have been working on this week!
Thank you, Sharon!
Beautiful bracelet!
Thanks, Sherry!
Love this necklace. It is stunning. Pinned it. Love the name “Sadie” We have a beautiful yellow lab puppy with green eyes. Sadie means “beautiful” and “princess” It seemed to just fit her so that is her name 🙂
LOVE IT!!! 😀
Great idea! I have tons of buttons I could use 🙂
Thanks, Brenda!
Love this idea! I have quite a few of these type of buttons. Can’t wait to have fun smashing them! Thanks for sharing with SYC.
hugs,
Jann
ooooooooooooooh myyyyyyyy gosh. thank you so much for this tutorial….I gotta get me an anvil ASAP!!!!!
Hahaha! Do you have a Northern Tool in your town? That’s where I got my cutesy little anvil.
I’m so excited….I went out yesterday for all of my supplies (I used to collect buttons…I have enough for 60 bracelets!). had to order an anvil from home depot (2 weeks!), but in the meantime, I ordered a jewelers block from amazon that should be here by end of week….hopefully that will work for me.
I could be smashing buttons for days. 🙂
question: there are lots of different kinds of shanks on the back — did you smash any and all kinds? maybe it’s all softer than I suspect.
Woohoo!! And yes, you won’t believe how soft that metal is, so the shank will flatten out no problem. I do recommend wrapping the button in soft fabric- like an old undershirt- just to keep it from scratching.
Have fun smashing!!
Love this idea. I had to find a collective way to pin this to my Pinterest board so I ended up collaging some of your pictures…..thought I’d share how that turned out. https://www.pinterest.com/pin/114067803039843909/
Hi there, I just recently came across the smashed button jewelry idea. It’s such a great idea!
One word of caution, though– I think some of the vintage silver ones are actually made of pewter and therefore contains lead. Smashing them may create some amount of lead dust, which is hazardous to your health, so it’s probably a good idea to wipe the work area clean and also wipe the smashed silver buttons to remove the dust, just to be safe. Just my 2 cents…
You are so clever! This is an awesome idea.