A few years ago, I made a series of waterless snow globes. A trendy retailer had advertised their version for an uppity price, prompting me to try and recreate them myself. And let me tell you, an obsession was born! So, I decided to make a new DIY waterless snow globe so that I could share with you how I made them.
The waterless snow globes that I had made pre-blog used vintage glass jars and vintage Christmas decorations.
Surprise, surprise!
So, I hunted down another old glass jar to make this one for you.
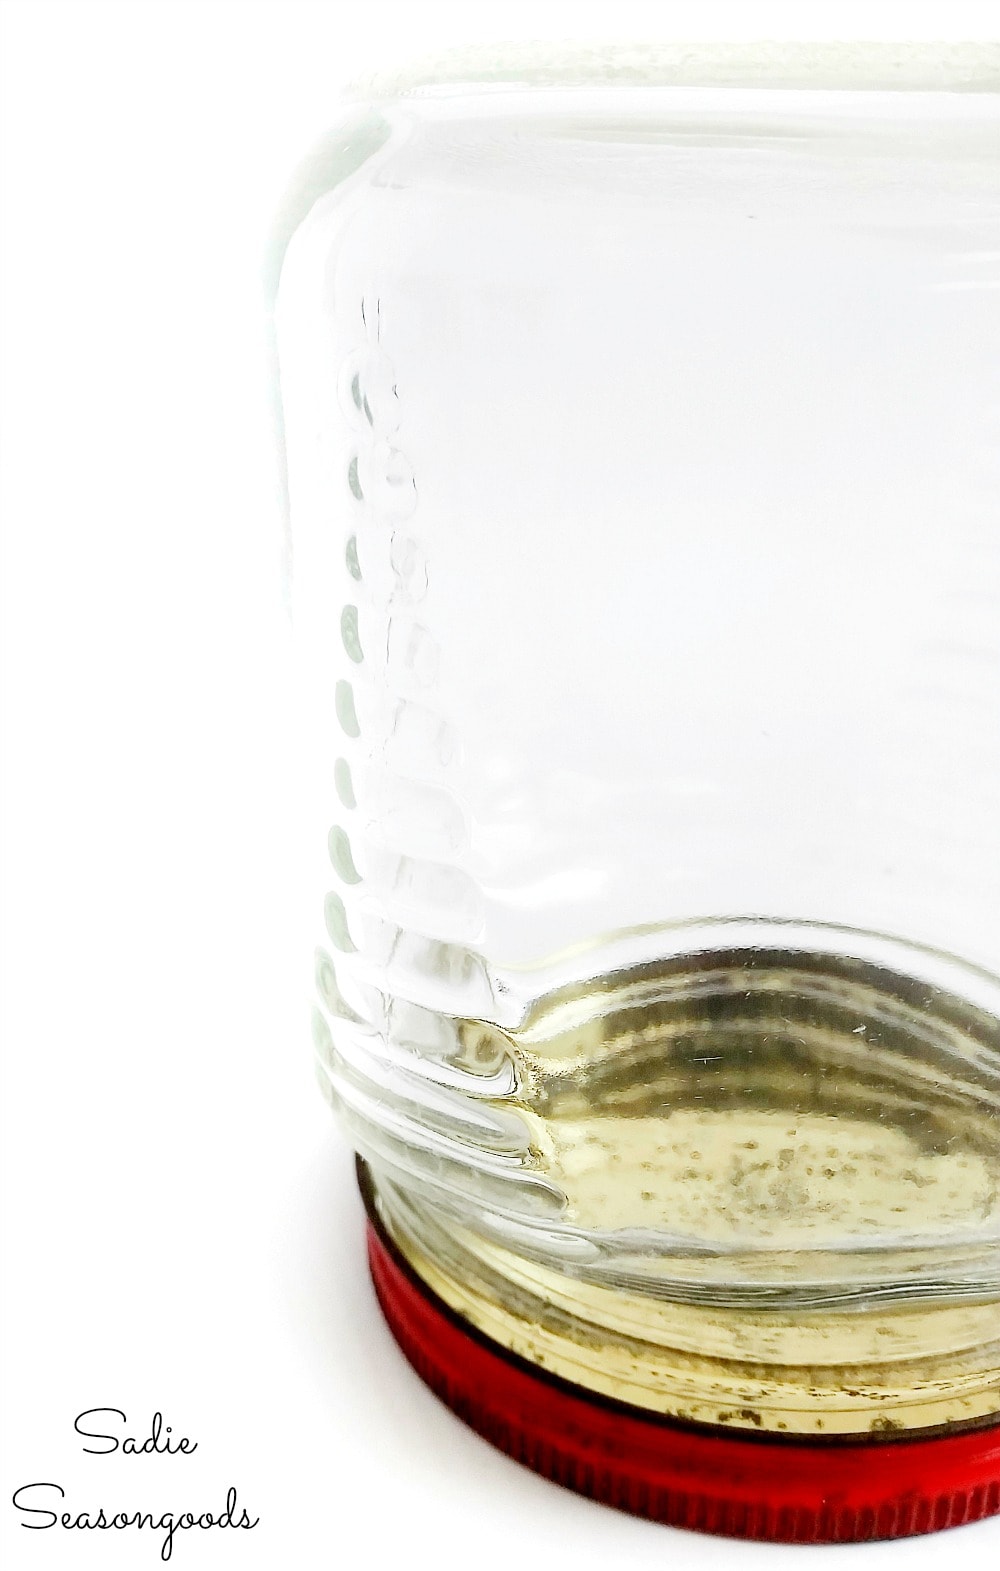
Image credit: Sadie Seasongoods.
It even had a red lid AND when upside-down, the ribbing looked like a Christmas tree!
I also gathered other craft supplies that I would need, including:
- Artificial snow;
- A piece of Styrofoam;
- A foam cutter;
- Vintage bottle brush Christmas tree; and
- My hot glue gun.
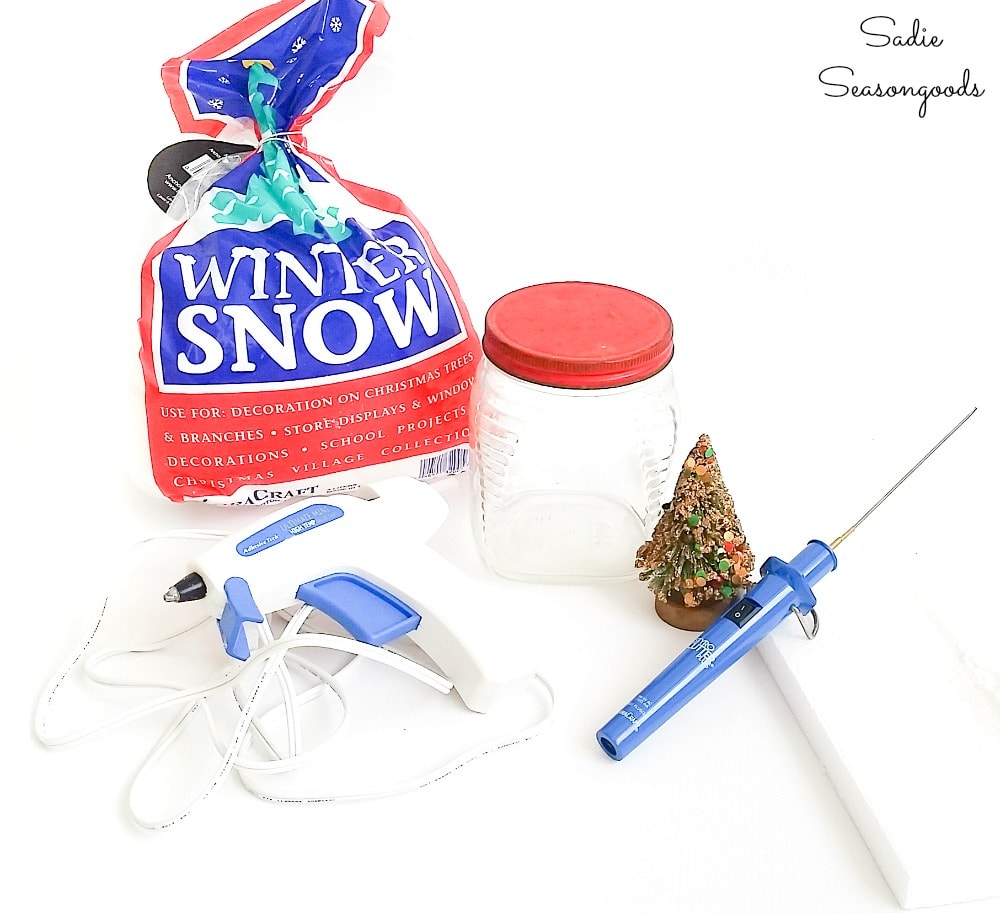
Image credit: Sadie Seasongoods.
And last but not least, I grabbed some other minis that would get tossed around with the artificial snow.
Namely, some dollhouse-sized Christmas presents and miniature pine cones.
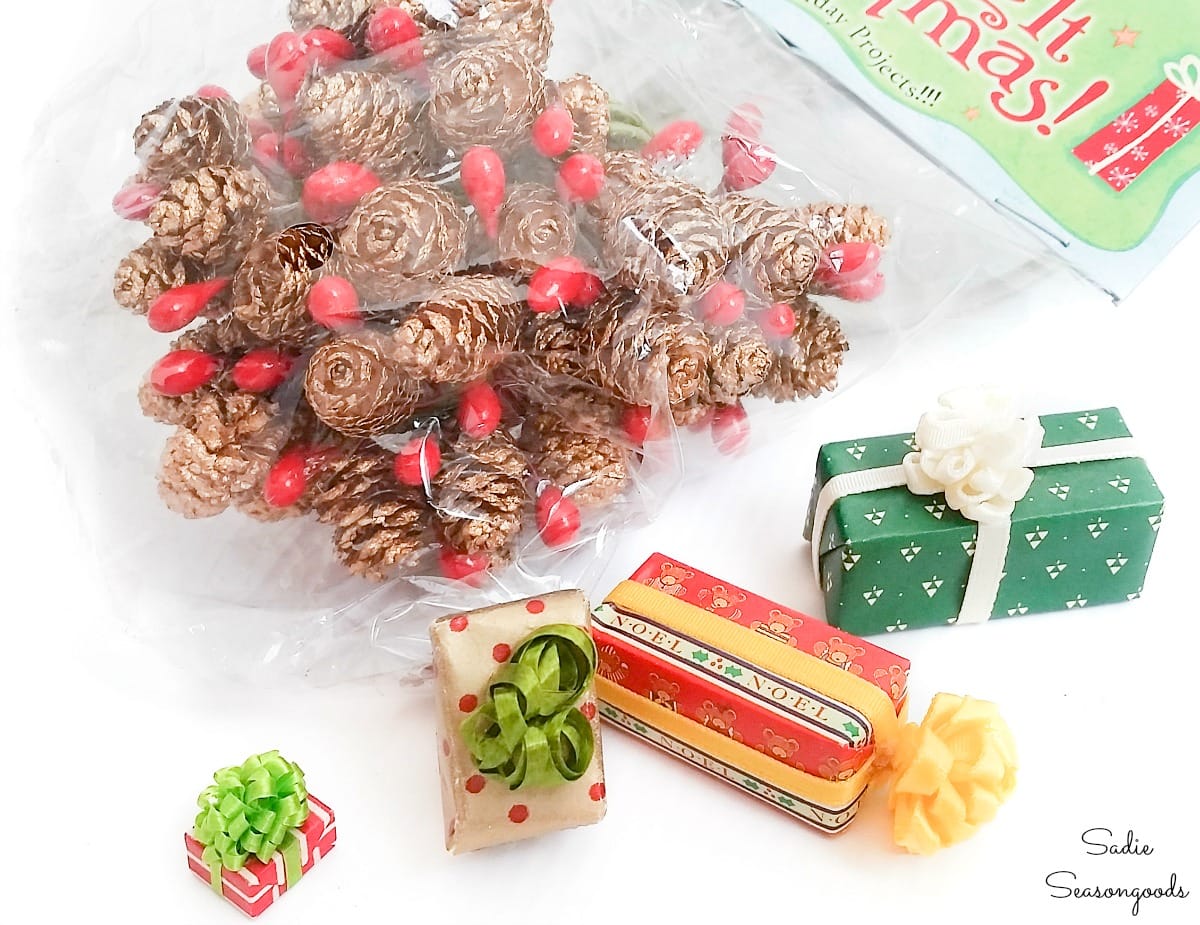
Image credit: Sadie Seasongoods.
NOW I could get started on my waterless snow globe!
This post contains affiliate links for your crafting convenience. As an Amazon Affiliate, I earn from qualifying purchases. All blue, bold, and underlined text is a clickable link, either to a product or to a related post.
Building a DIY Waterless Snow Globe
First, I removed the lid from my vintage glass jar and traced it on the Styrofoam with a pen.
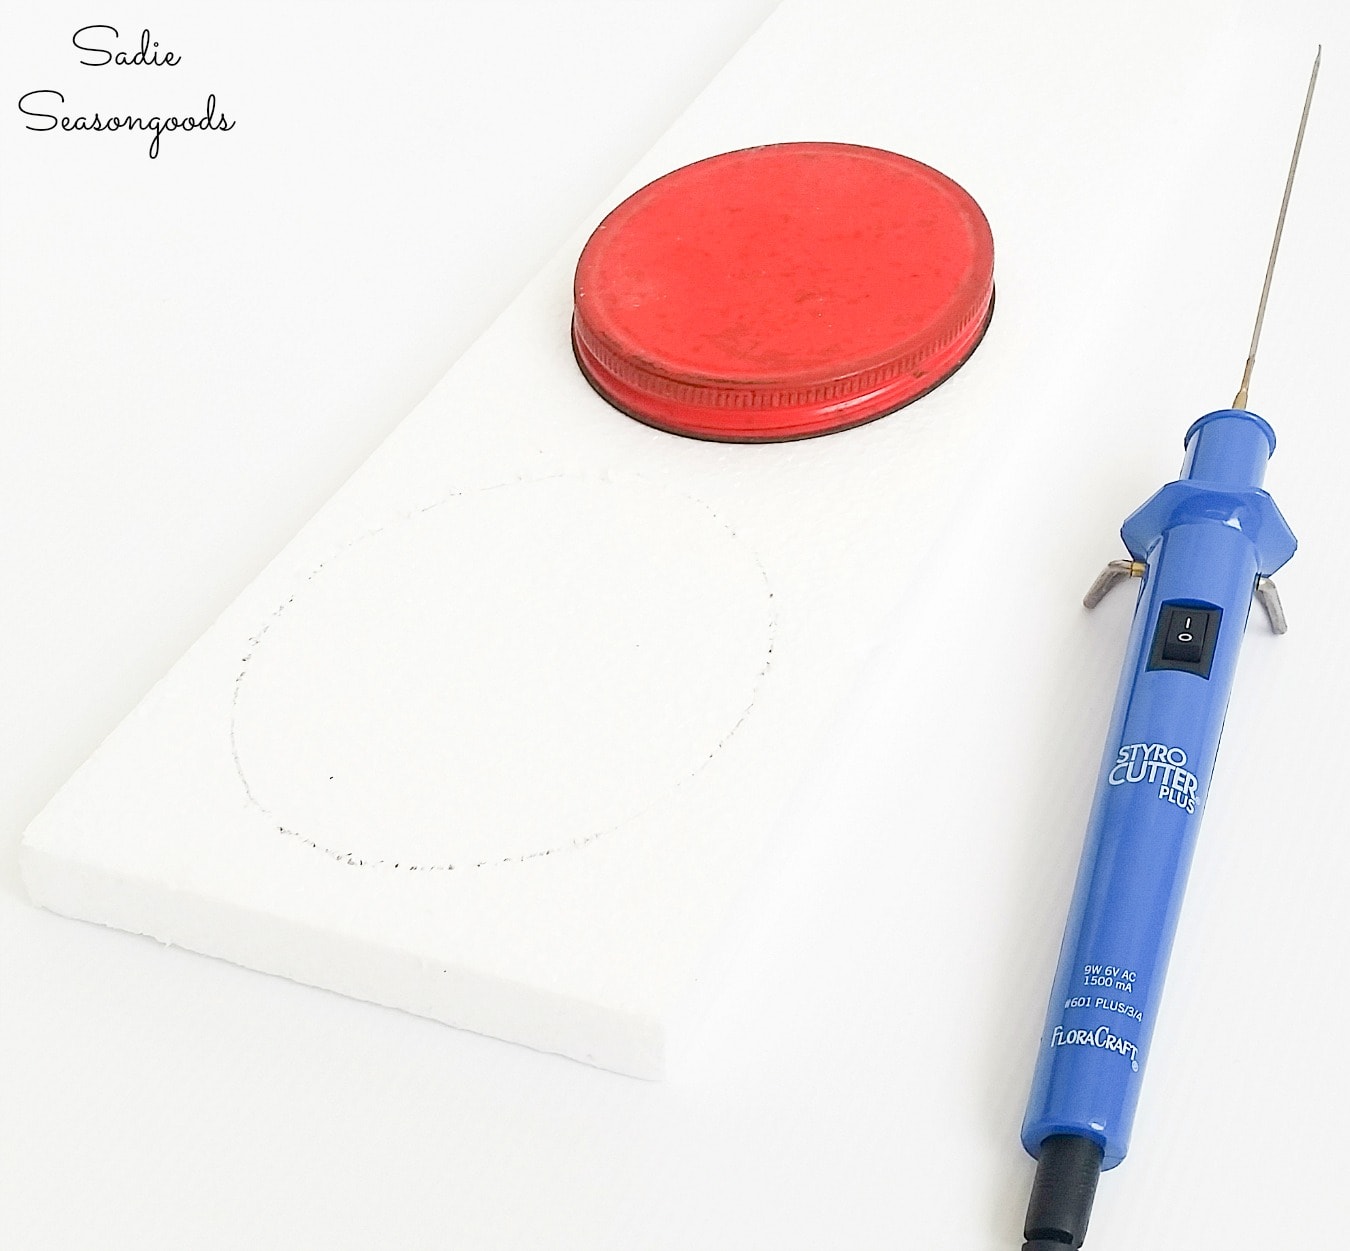
Image credit: Sadie Seasongoods.
Next, I used a foam cutter or hot pen to cut out the Styrofoam circle. I carefully shaved off about ¼” from my circle all the way around.
The foam cutter makes this step an absolute cinch!
Then, I set the foam circle on the inside of my jar lid, making sure there was plenty of clearance for screwing back on the jar. When I was satisfied, I glued the foam to the inside of the lid with my hot glue gun.
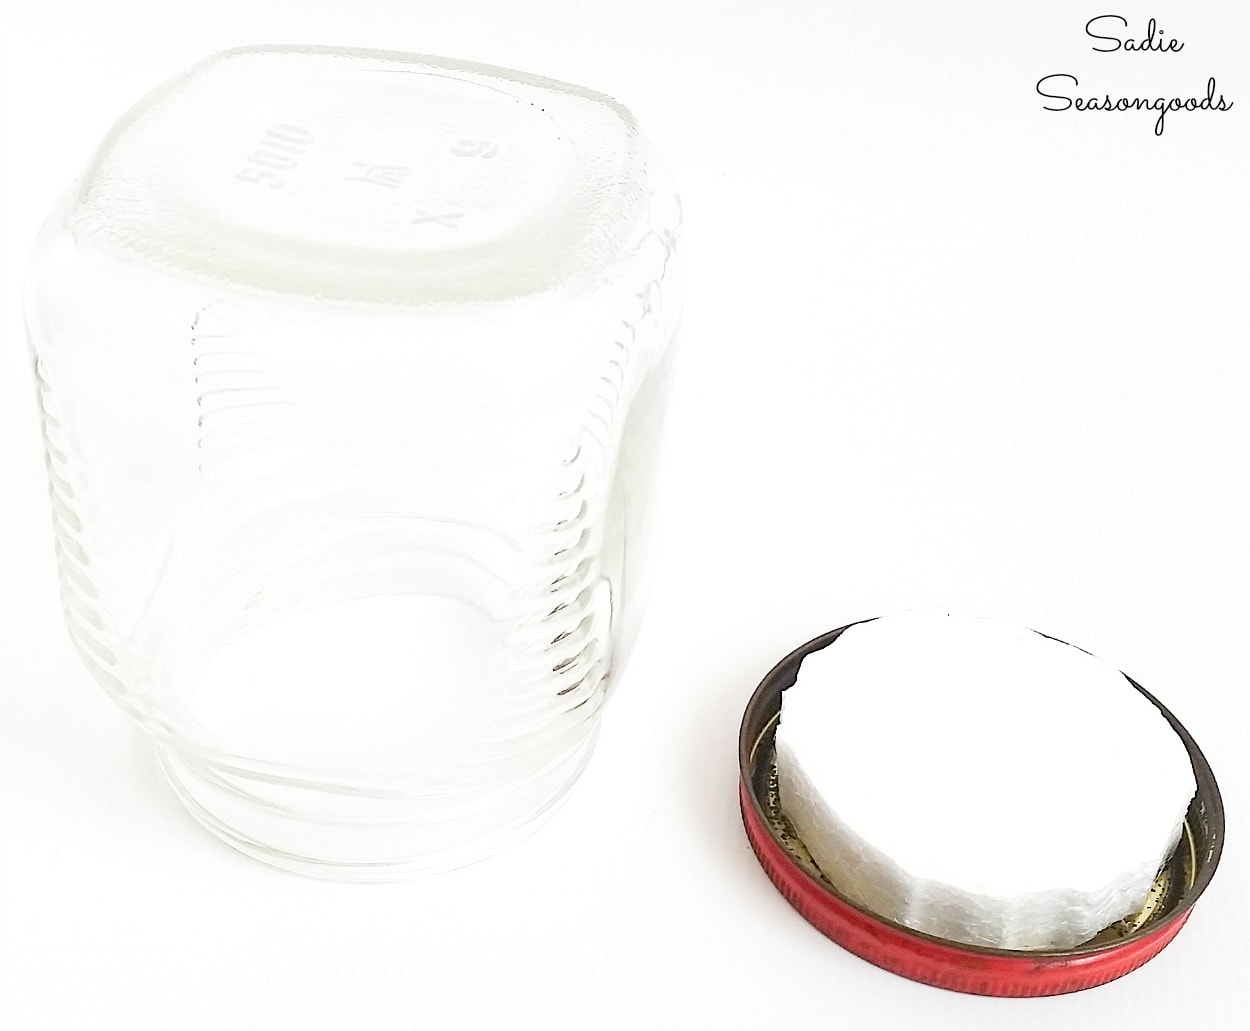
Image credit: Sadie Seasongoods.
Why am I adding the Styrofoam and not just gluing a bottlebrush tree directly to the lid? Because I want to “raise up” my tree and decorations above the neck of the jar. Otherwise, parts of my DIY waterless snow globe get lost by the rim of the lid- and I want to easily see it all!
After that, I placed my bottlebrush Christmas tree on the foam. Before gluing it to the center, I set the jar over it to make sure the tip wouldn’t touch the bottom of the jar (which will actually be the top).
Then, I simply hot glued the base of the tree to the Styrofoam base.
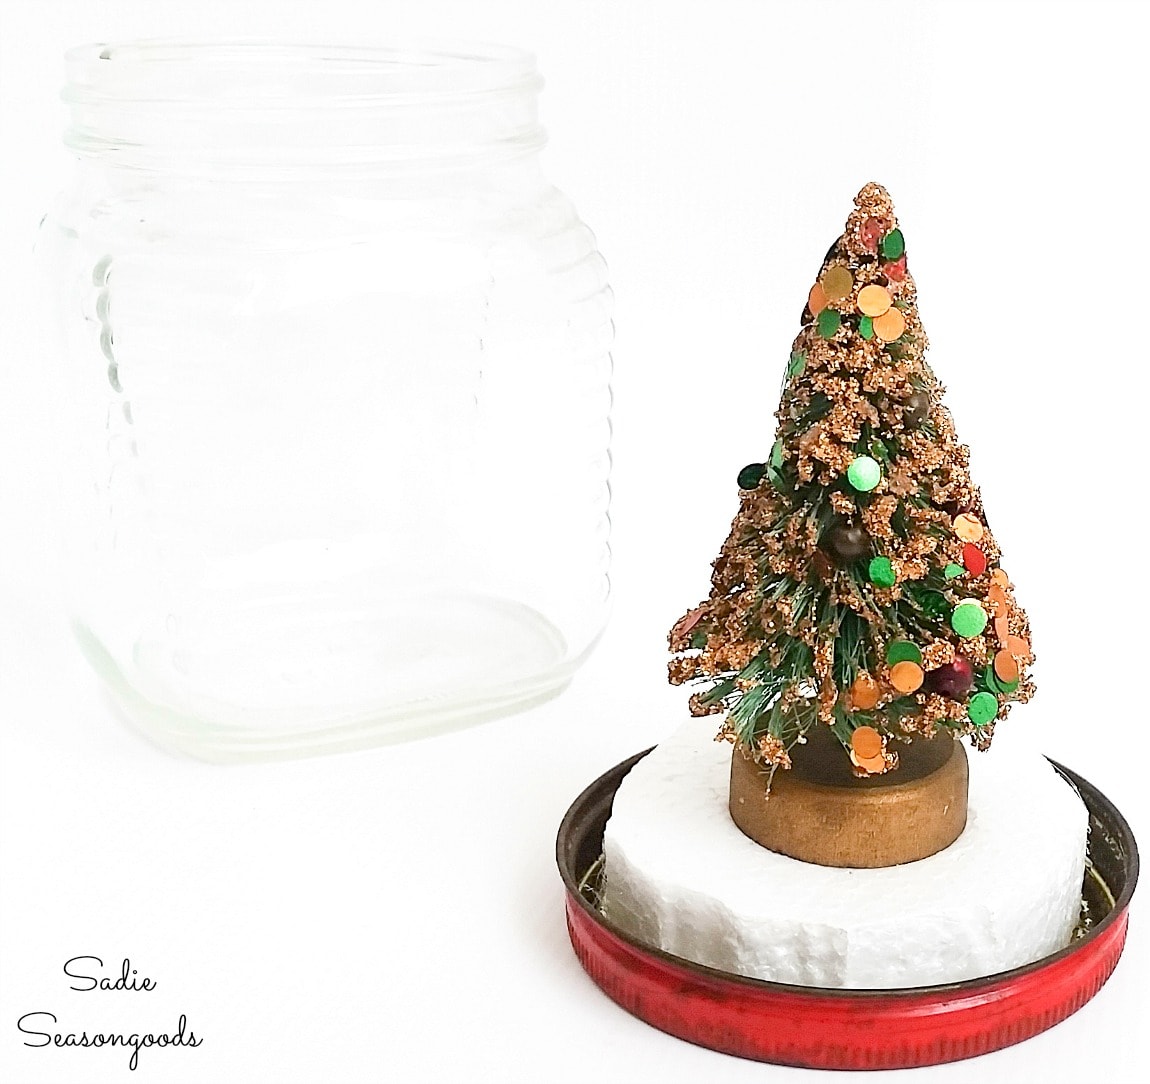
Image credit: Sadie Seasongoods.
Waterless Snow Globe with Vintage Christmas Decor
Finally, it was time to add the decorative bits to the inside of my vintage jar!
First, I dropped some miniature Christmas presents (from my own childhood dollhouse!) inside…
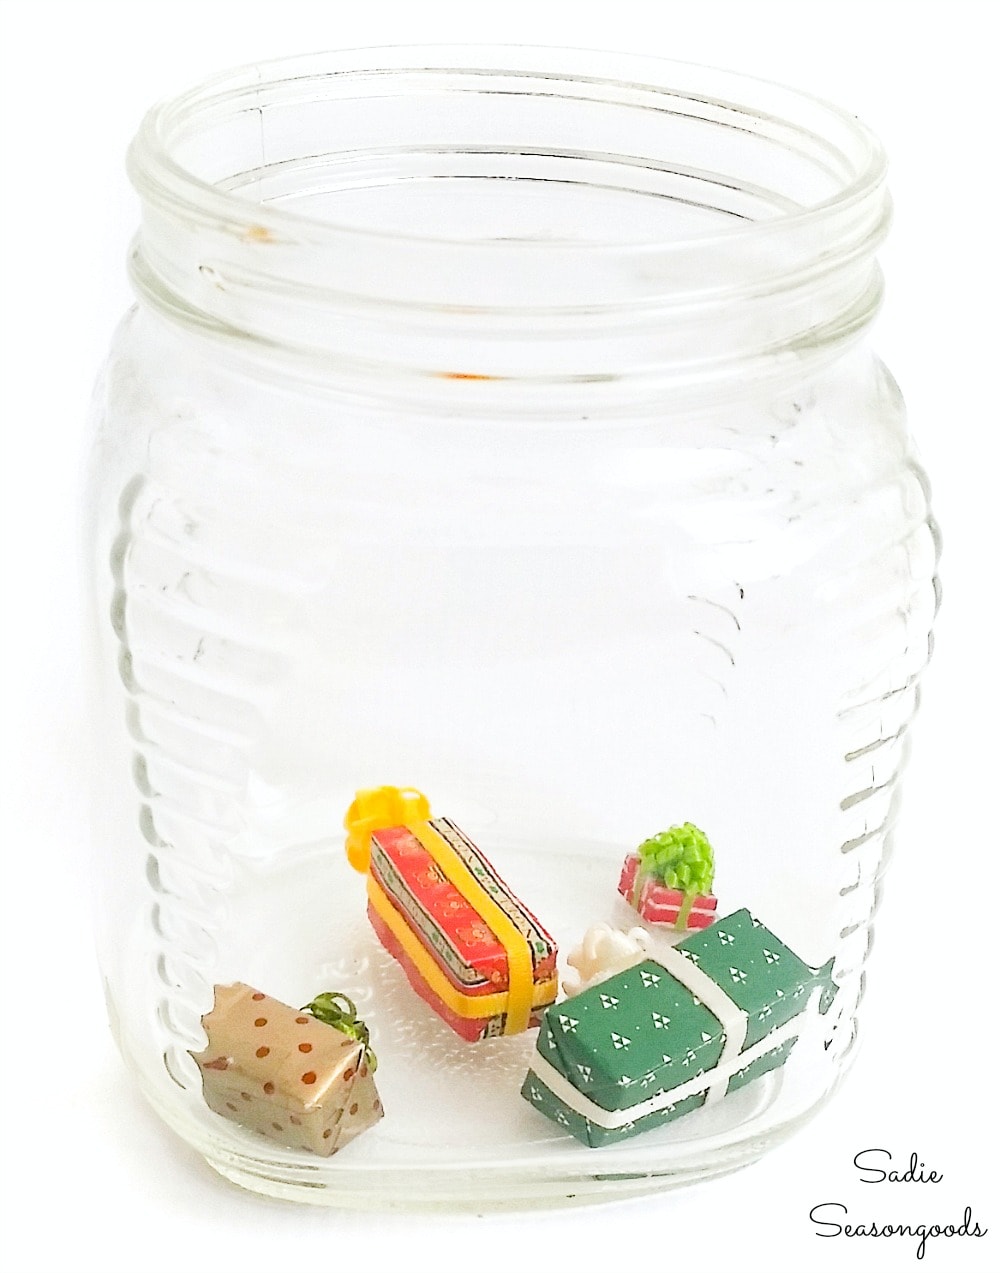
Image credit: Sadie Seasongoods.
Next, I poured in about 3/4″ of artificial snow.
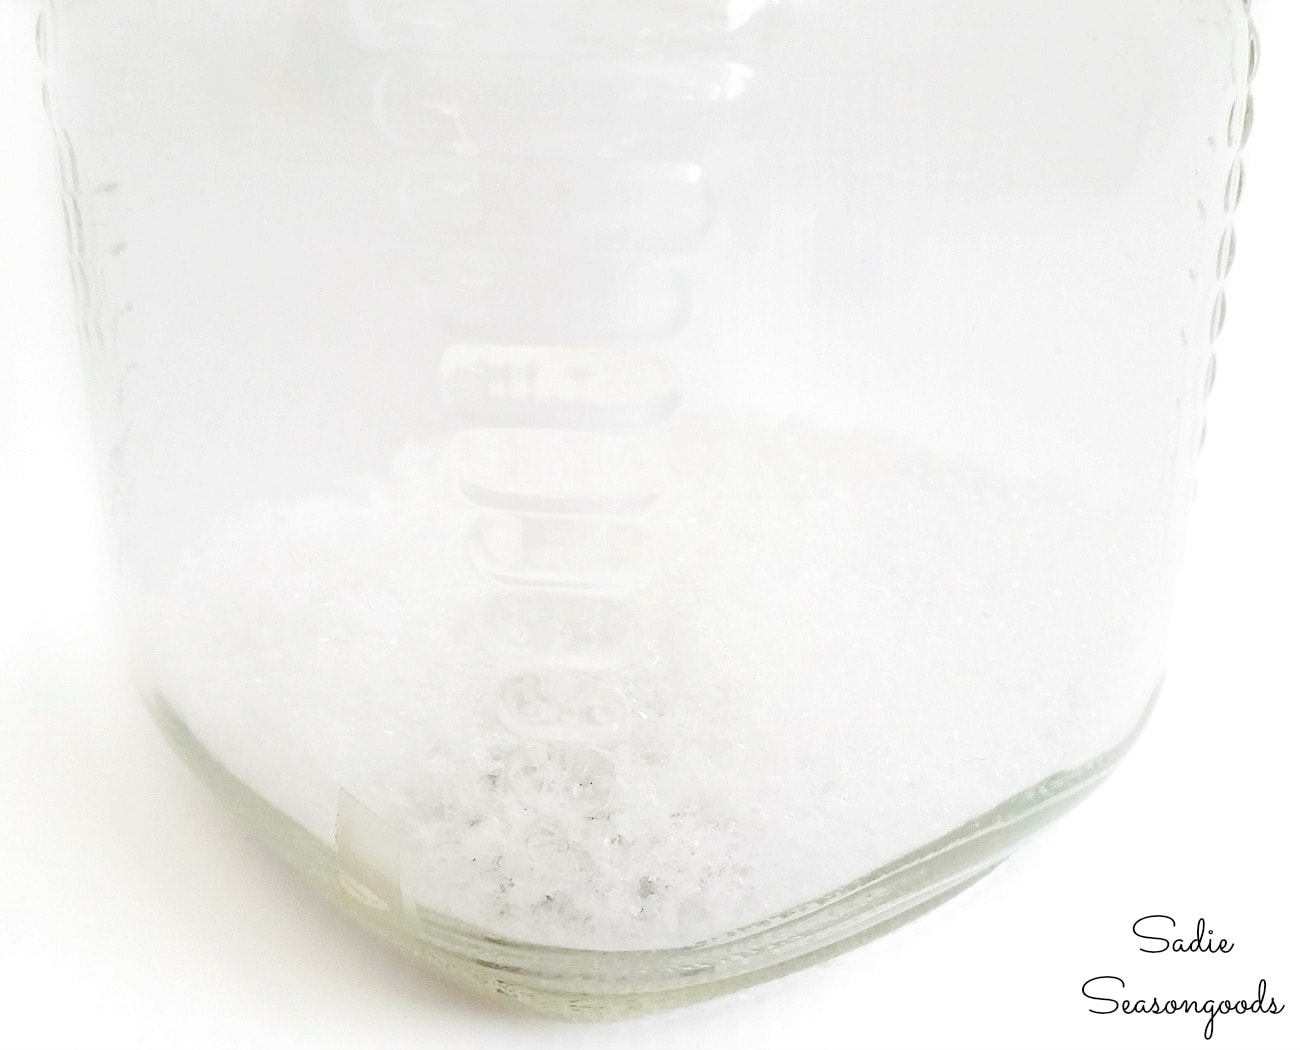
Image credit: Sadie Seasongoods.
Because every jar size is different and every Styrofoam base will be of different thicknesses, there’s not exact way to figure out how much snow you need to cover the base. Start with a little and add more as needed.
Finally, it was the moment of truth. I tightened the lid of my DIY waterless snow globe…
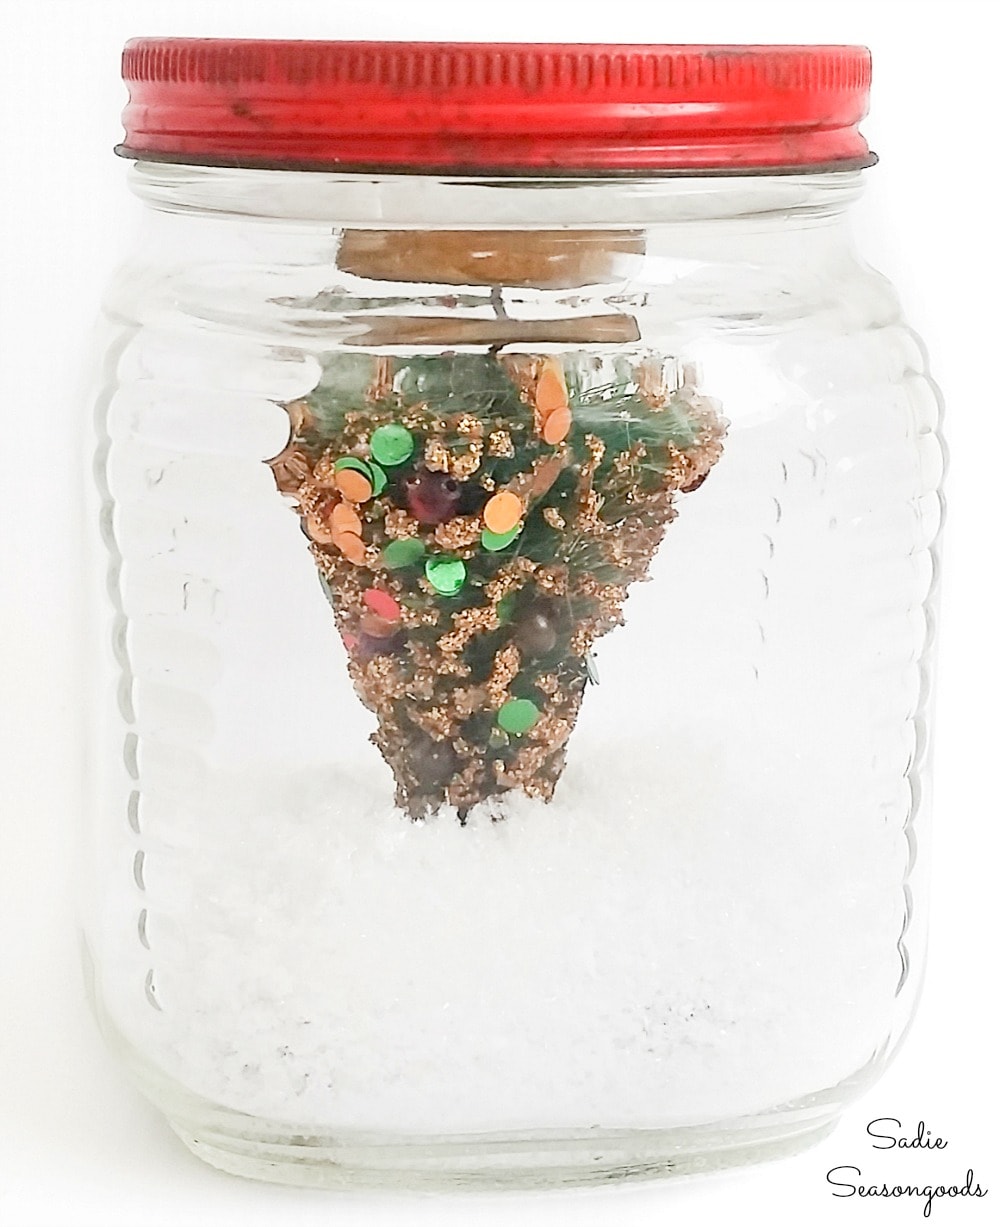
Image credit: Sadie Seasongoods.
And flipped it upside-down…which is now right-side-up!
DIY Waterless Snow Globe in a Vintage Glass Jar
After I flipped it, I determined I had too much snow…so I poured a little out and tried again.
I shook it gently until I was happy with how the miniature Christmas presents looked, and that was it!
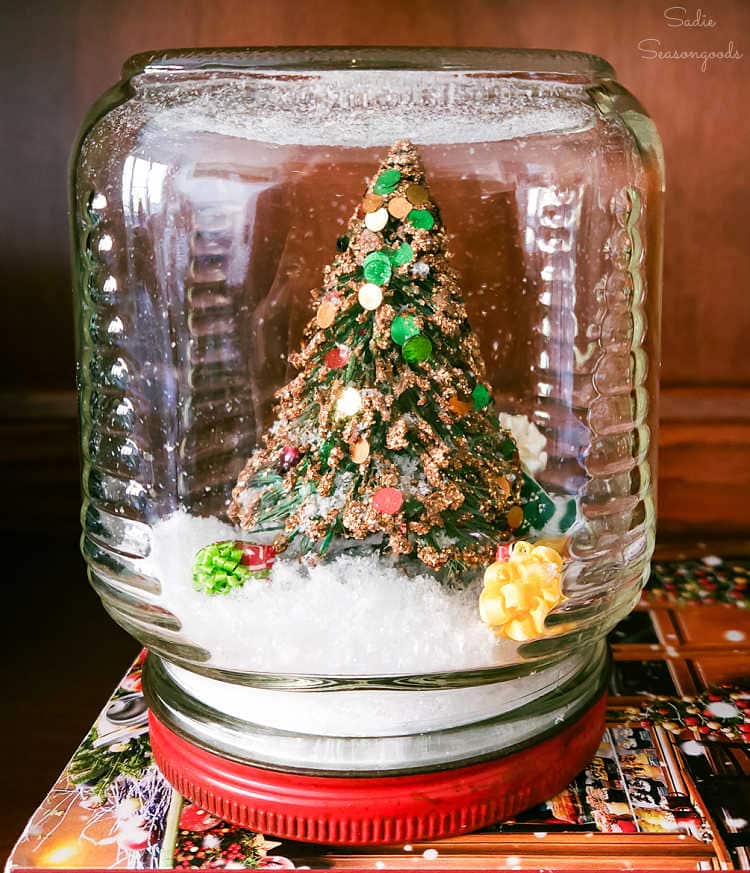
Image credit: Sadie Seasongoods.
Isn’t that the CUTEST? I swear, vintage Christmas decorations and old glass jars really do make the best waterless snow globes.
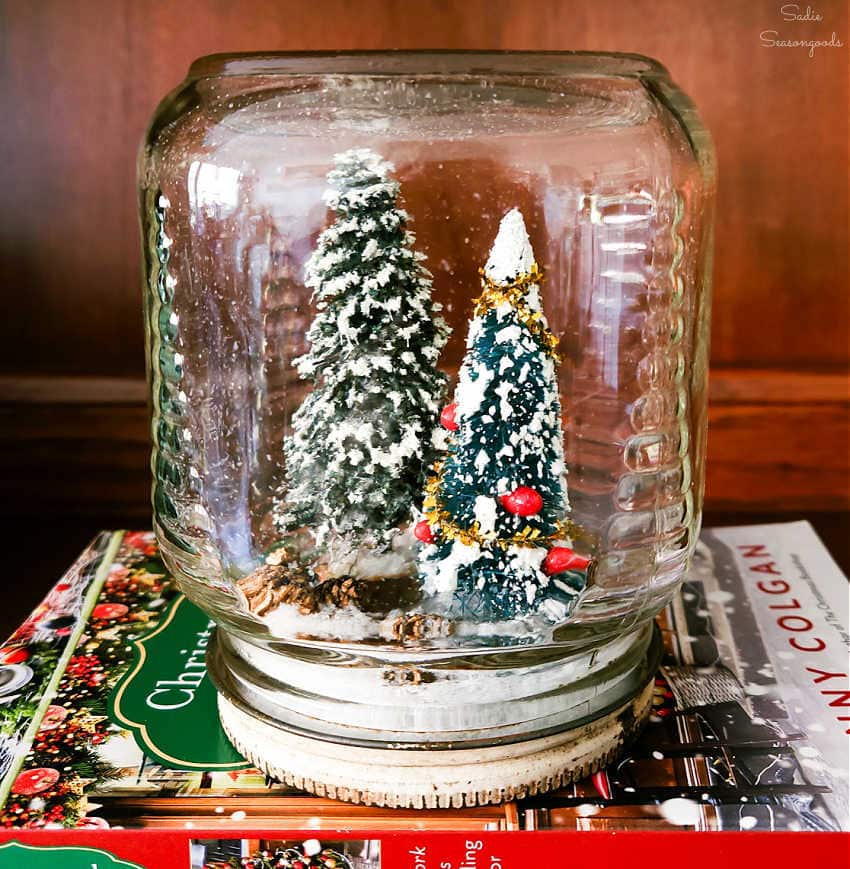
Image credit: Sadie Seasongoods.
So, do you think you’ll make some vintage Christmas snow globes this holiday season? Such a fun upcycling craft project and perfect for those vintage Christmas decorations that deserve to be showcased!
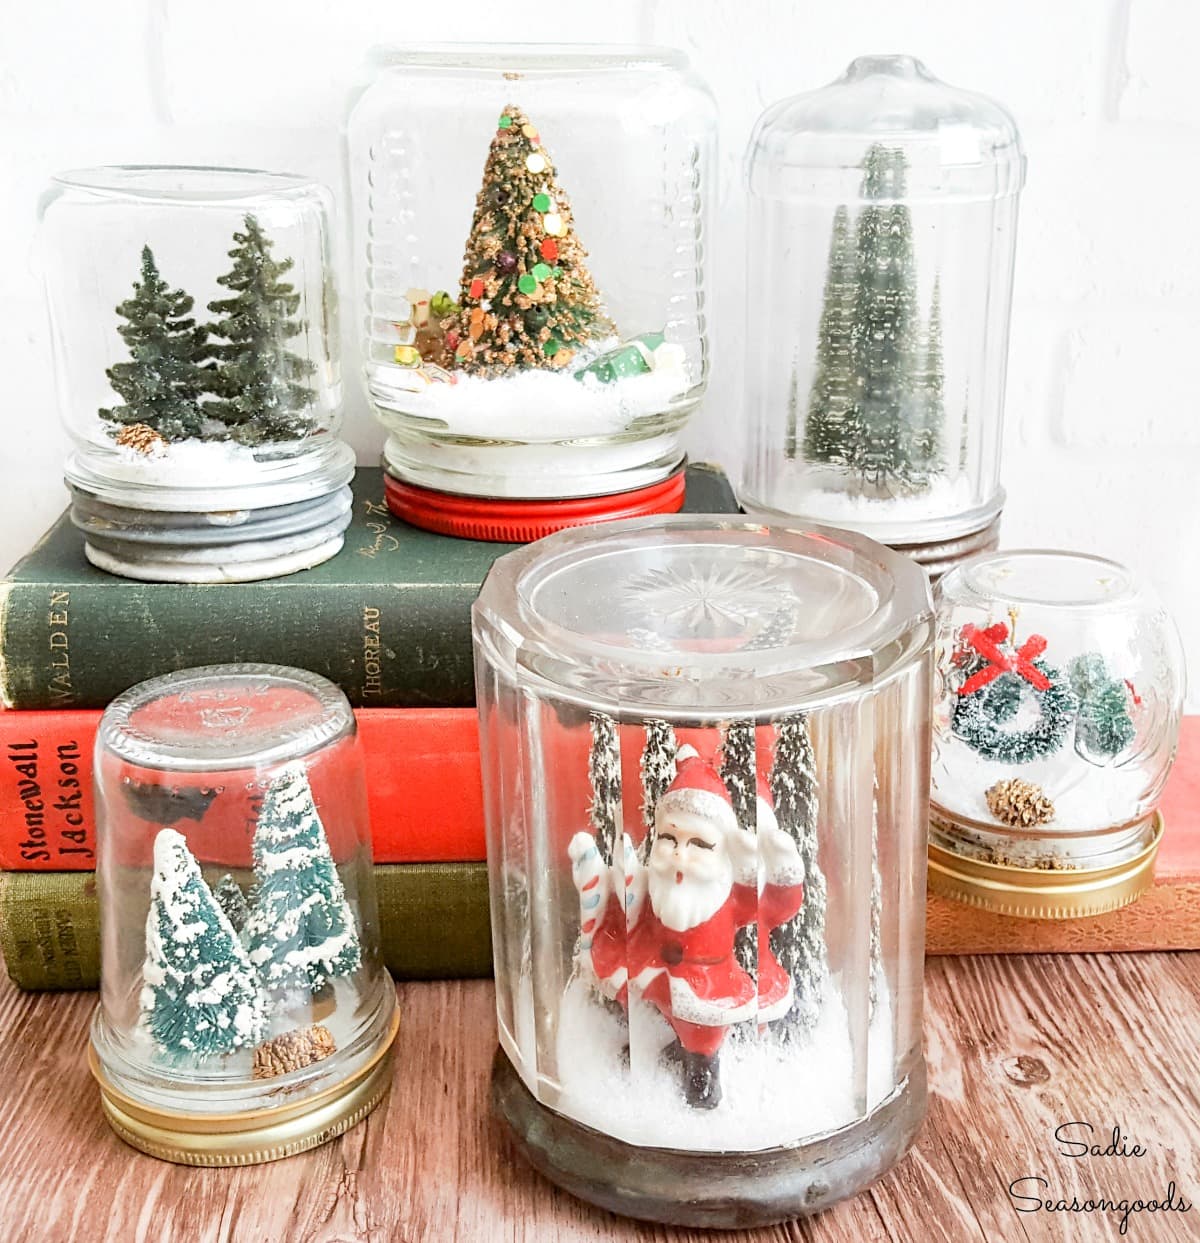
Image credit: Sadie Seasongoods.
If you enjoyed this upcycling idea for vintage Christmas decorations, then you’ll love this winter scene I made with a cheese dome, too!
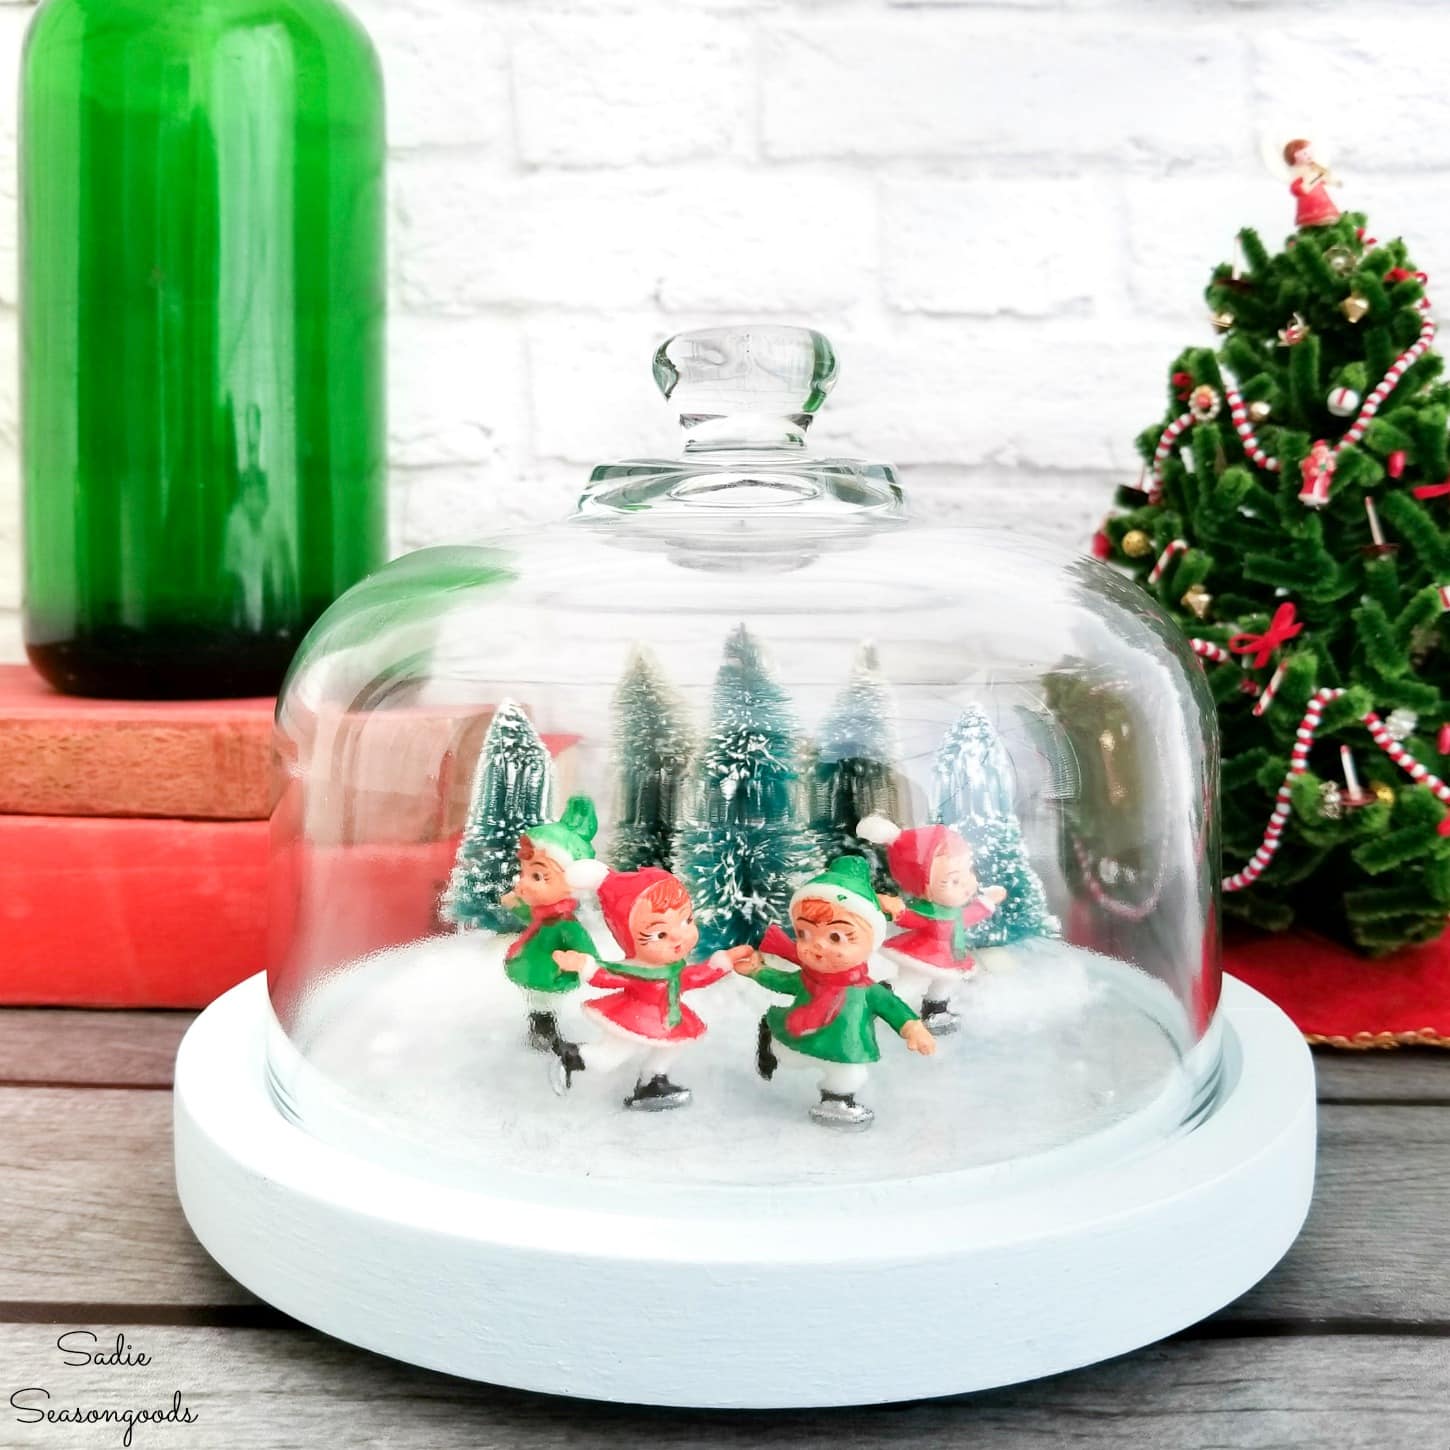
Image credit: Sadie Seasongoods.
AND I’m so excited to announce that my first book is now available! If you love flannel , then you will LOVE “Crafting with Flannel”! And yes, there’s even an entire chapter dedicated to Christmas projects!
Image credit: Sadie Seasongoods.
Craft on!
S
Want to be notified when I publish my next upcycling project tutorial?
Join me on Social Media:


PIN ME!

Image credit: Sadie Seasongoods.
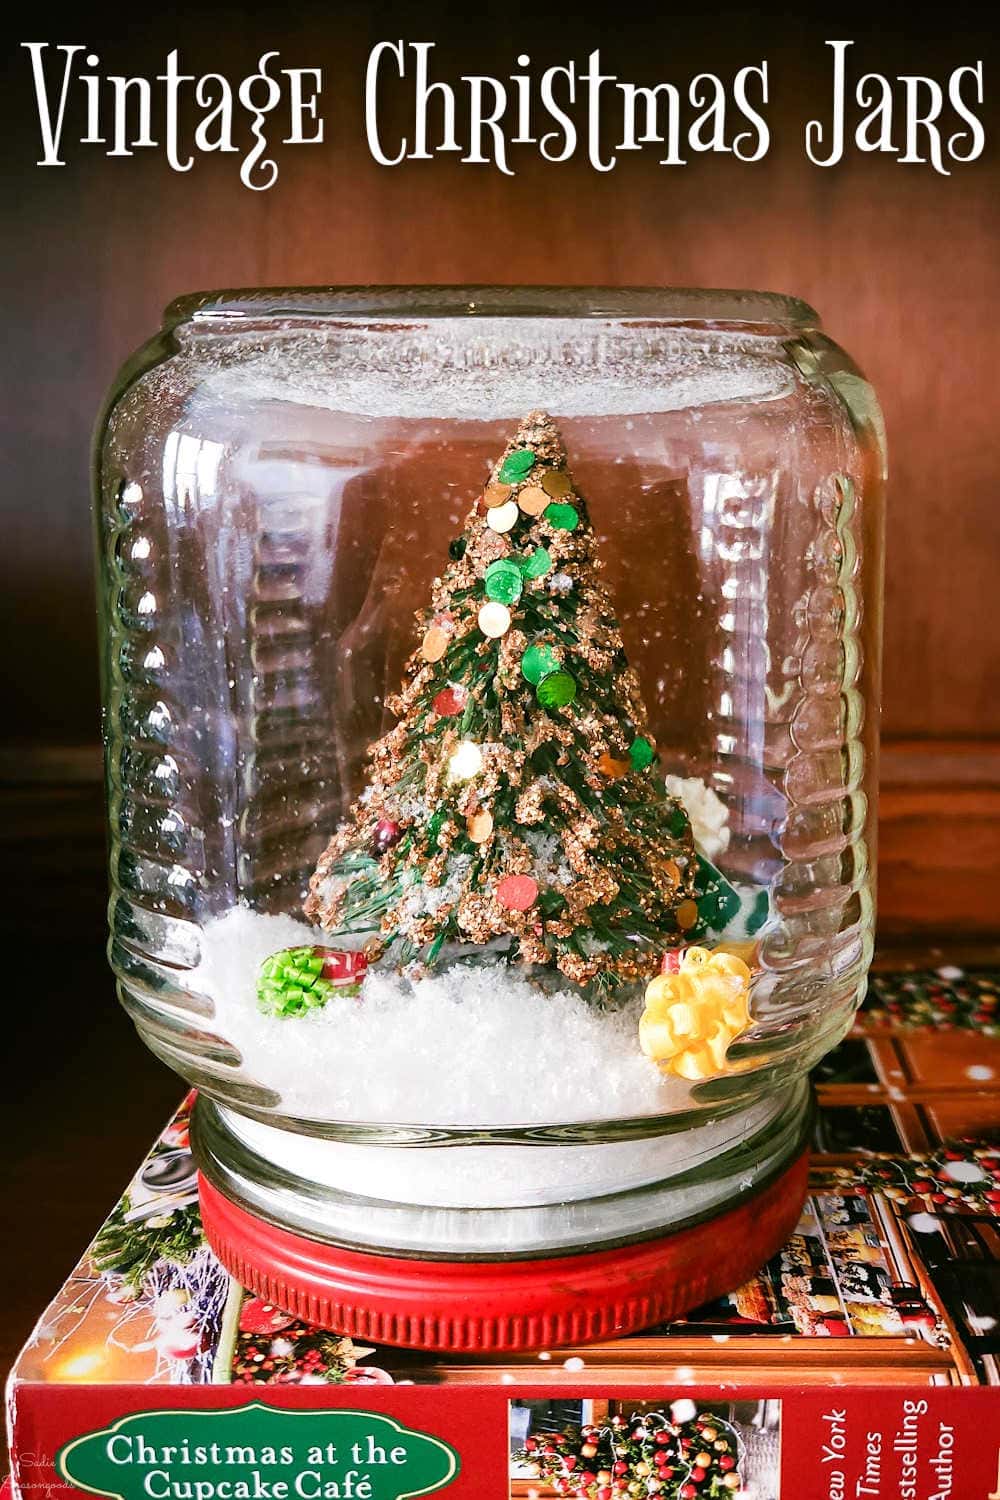
Image credit: Sadie Seasongoods.
Sarah Ramberg is the owner of Sadie Seasongoods, a website that celebrates all things secondhand. From upcycling ideas and thrifted decor to vintage-centric travel itineraries, Sadie Seasongoods is a one-stop shop for anyone who loves thrifting and approachable repurposing ideas. Sarah is also the author of “Crafting with Flannel” and has been featured in numerous media outlets and magazines.
- Sarah Ramberg
- Sarah Ramberg
- Sarah Ramberg
- Sarah Ramberg
- Sarah Ramberg
- Sarah Ramberg
- Sarah Ramberg
- Sarah Ramberg
- Sarah Ramberg
- Sarah Ramberg
- Sarah Ramberg
- Sarah Ramberg
- Sarah Ramberg
- Sarah Ramberg
- Sarah Ramberg
- Sarah Ramberg
- Sarah Ramberg
- Sarah Ramberg
- Sarah Ramberg
- Sarah Ramberg
- Sarah Ramberg
- Sarah Ramberg
- Sarah Ramberg
- Sarah Ramberg
- Sarah Ramberg
- Sarah Ramberg
- Sarah Ramberg
- Sarah Ramberg
- Sarah Ramberg
- Sarah Ramberg
- Sarah Ramberg
- Sarah Ramberg
- Sarah Ramberg
- Sarah Ramberg
- Sarah Ramberg
- Sarah Ramberg
- Sarah Ramberg
- Sarah Ramberg
- Sarah Ramberg
- Sarah Ramberg
- Sarah Ramberg
- Sarah Ramberg
- Sarah Ramberg
- Sarah Ramberg
- Sarah Ramberg
- Sarah Ramberg
- Sarah Ramberg
- Sarah Ramberg
- Sarah Ramberg
- Sarah Ramberg
- Sarah Ramberg
- Sarah Ramberg
- Sarah Ramberg
- Sarah Ramberg
- Sarah Ramberg
- Sarah Ramberg
- Sarah Ramberg
- Sarah Ramberg
- Sarah Ramberg
- Sarah Ramberg
- Sarah Ramberg
- Sarah Ramberg
- Sarah Ramberg
- Sarah Ramberg
- Sarah Ramberg
- Sarah Ramberg
- Sarah Ramberg
- Sarah Ramberg
- Sarah Ramberg
- Sarah Ramberg
- Sarah Ramberg
- Sarah Ramberg
- Sarah Ramberg
- Sarah Ramberg
- Sarah Ramberg
- Sarah Ramberg
- Sarah Ramberg
- Sarah Ramberg
- Sarah Ramberg
- Sarah Ramberg
- Sarah Ramberg
- Sarah Ramberg
- Sarah Ramberg
- Sarah Ramberg
- Sarah Ramberg
- Sarah Ramberg
- Sarah Ramberg
- Sarah Ramberg
- Sarah Ramberg
- Sarah Ramberg
- Sarah Ramberg
- Sarah Ramberg
- Sarah Ramberg
- Sarah Ramberg
- Sarah Ramberg
- Sarah Ramberg
- Sarah Ramberg
- Sarah Ramberg
- Sarah Ramberg
- Sarah Ramberg
- Sarah Ramberg
- Sarah Ramberg
- Sarah Ramberg
- Sarah Ramberg
- Sarah Ramberg
- Sarah Ramberg
- Sarah Ramberg
- Sarah Ramberg
- Sarah Ramberg
- Sarah Ramberg
- Sarah Ramberg
- Sarah Ramberg
- Sarah Ramberg
- Sarah Ramberg
- Sarah Ramberg
- Sarah Ramberg
- Sarah Ramberg
- Sarah Ramberg
- Sarah Ramberg
- Sarah Ramberg
- Sarah Ramberg
- Sarah Ramberg
- Sarah Ramberg
- Sarah Ramberg
- Sarah Ramberg
- Sarah Ramberg
- Sarah Ramberg
- Sarah Ramberg
- Sarah Ramberg
- Sarah Ramberg
- Sarah Ramberg
- Sarah Ramberg
- Sarah Ramberg
- Sarah Ramberg
- Sarah Ramberg
- Sarah Ramberg
- Sarah Ramberg
- Sarah Ramberg
- Sarah Ramberg
- Sarah Ramberg
- Sarah Ramberg
- Sarah Ramberg
- Sarah Ramberg
- Sarah Ramberg
- Sarah Ramberg
- Sarah Ramberg
- Sarah Ramberg
- Sarah Ramberg
- Sarah Ramberg
- Sarah Ramberg
- Sarah Ramberg
- Sarah Ramberg
- Sarah Ramberg
- Sarah Ramberg
- Sarah Ramberg
- Sarah Ramberg
- Sarah Ramberg
- Sarah Ramberg
- Sarah Ramberg
- Sarah Ramberg
- Sarah Ramberg
- Sarah Ramberg
- Sarah Ramberg
- Sarah Ramberg
- Sarah Ramberg
- Sarah Ramberg
- Sarah Ramberg
- Sarah Ramberg
- Sarah Ramberg
- Sarah Ramberg
- Sarah Ramberg
- Sarah Ramberg
- Sarah Ramberg
- Sarah Ramberg
- Sarah Ramberg
- Sarah Ramberg
- Sarah Ramberg
- Sarah Ramberg
- Sarah Ramberg
- Sarah Ramberg
- Sarah Ramberg
- Sarah Ramberg
- Sarah Ramberg
- Sarah Ramberg
- Sarah Ramberg
- Sarah Ramberg
- Sarah Ramberg
- Sarah Ramberg
- Sarah Ramberg
- Sarah Ramberg
- Sarah Ramberg
- Sarah Ramberg
- Sarah Ramberg
- Sarah Ramberg
- Sarah Ramberg
- Sarah Ramberg
- Sarah Ramberg
- Sarah Ramberg
- Sarah Ramberg
- Sarah Ramberg
- Sarah Ramberg
- Sarah Ramberg
- Sarah Ramberg
- Sarah Ramberg
- Sarah Ramberg
- Sarah Ramberg
- Sarah Ramberg
- Sarah Ramberg
- Sarah Ramberg
- Sarah Ramberg
- Sarah Ramberg
- Sarah Ramberg
- Sarah Ramberg
- Sarah Ramberg
- Sarah Ramberg
- Sarah Ramberg
- Sarah Ramberg
- Sarah Ramberg
- Sarah Ramberg
- Sarah Ramberg
- Sarah Ramberg
- Sarah Ramberg
- Sarah Ramberg
- Sarah Ramberg
- Sarah Ramberg
- Sarah Ramberg
- Sarah Ramberg
- Sarah Ramberg
- Sarah Ramberg
- Sarah Ramberg
- Sarah Ramberg
- Sarah Ramberg
- Sarah Ramberg
- Sarah Ramberg
- Sarah Ramberg
- Sarah Ramberg
- Sarah Ramberg
- Sarah Ramberg
- Sarah Ramberg
- Sarah Ramberg
- Sarah Ramberg
- Sarah Ramberg
- Sarah Ramberg
- Sarah Ramberg
- Sarah Ramberg
- Sarah Ramberg
- Sarah Ramberg
- Sarah Ramberg
- Sarah Ramberg
- Sarah Ramberg
- Sarah Ramberg
- Sarah Ramberg
- Sarah Ramberg
- Sarah Ramberg
- Sarah Ramberg
- Sarah Ramberg
- Sarah Ramberg
- Sarah Ramberg
- Sarah Ramberg
- Sarah Ramberg
- Sarah Ramberg
- Sarah Ramberg
- Sarah Ramberg
- Sarah Ramberg
- Sarah Ramberg
- Sarah Ramberg
- Sarah Ramberg
- Sarah Ramberg
- Sarah Ramberg
- Sarah Ramberg
- Sarah Ramberg
- Sarah Ramberg
- Sarah Ramberg
- Sarah Ramberg
- Sarah Ramberg
- Sarah Ramberg
- Sarah Ramberg
- Sarah Ramberg
- Sarah Ramberg
- Sarah Ramberg
- Sarah Ramberg
- Sarah Ramberg
- Sarah Ramberg
- Sarah Ramberg
- Sarah Ramberg
- Sarah Ramberg
- Sarah Ramberg
- Sarah Ramberg
- Sarah Ramberg
- Sarah Ramberg
- Sarah Ramberg
- Sarah Ramberg
- Sarah Ramberg
- Sarah Ramberg
- Sarah Ramberg
- Sarah Ramberg
- Sarah Ramberg
- Sarah Ramberg
- Sarah Ramberg
- Sarah Ramberg
- Sarah Ramberg
- Sarah Ramberg
- Sarah Ramberg
- Sarah Ramberg
- Sarah Ramberg
- Sarah Ramberg
- Sarah Ramberg
- Sarah Ramberg
- Sarah Ramberg
- Sarah Ramberg
- Sarah Ramberg
- Sarah Ramberg
- Sarah Ramberg
- Sarah Ramberg
- Sarah Ramberg
- Sarah Ramberg
- Sarah Ramberg
- Sarah Ramberg
- Sarah Ramberg
- Sarah Ramberg
- Sarah Ramberg
- Sarah Ramberg
- Sarah Ramberg
- Sarah Ramberg
- Sarah Ramberg
- Sarah Ramberg
- Sarah Ramberg
- Sarah Ramberg
- Sarah Ramberg
- Sarah Ramberg
- Sarah Ramberg
- Sarah Ramberg
- Sarah Ramberg
- Sarah Ramberg
- Sarah Ramberg
- Sarah Ramberg
- Sarah Ramberg
- Sarah Ramberg
- Sarah Ramberg
- Sarah Ramberg
- Sarah Ramberg
- Sarah Ramberg
- Sarah Ramberg
- Sarah Ramberg
- Sarah Ramberg
- Sarah Ramberg
- Sarah Ramberg
- Sarah Ramberg
- Sarah Ramberg
- Sarah Ramberg
- Sarah Ramberg
- Sarah Ramberg
- Sarah Ramberg
- Sarah Ramberg
- Sarah Ramberg
- Sarah Ramberg
- Sarah Ramberg
- Sarah Ramberg
- Sarah Ramberg
- Sarah Ramberg
- Sarah Ramberg
- Sarah Ramberg
- Sarah Ramberg
- Sarah Ramberg
- Sarah Ramberg
- Sarah Ramberg
- Sarah Ramberg
- Sarah Ramberg
- Sarah Ramberg
- Sarah Ramberg
- Sarah Ramberg
- Sarah Ramberg
- Sarah Ramberg
- Sarah Ramberg
- Sarah Ramberg
- Sarah Ramberg
- Sarah Ramberg
- Sarah Ramberg
- Sarah Ramberg
- Sarah Ramberg
- Sarah Ramberg
- Sarah Ramberg
- Sarah Ramberg
- Sarah Ramberg
- Sarah Ramberg
- Sarah Ramberg
- Sarah Ramberg
- Sarah Ramberg
- Sarah Ramberg
- Sarah Ramberg
- Sarah Ramberg
- Sarah Ramberg
- Sarah Ramberg
- Sarah Ramberg
- Sarah Ramberg
- Sarah Ramberg
- Sarah Ramberg
- Sarah Ramberg
- Sarah Ramberg
- Sarah Ramberg
- Sarah Ramberg
- Sarah Ramberg
- Sarah Ramberg
- Sarah Ramberg
- Sarah Ramberg
- Sarah Ramberg
- Sarah Ramberg
- Sarah Ramberg
- Sarah Ramberg
- Sarah Ramberg
- Sarah Ramberg
- Sarah Ramberg
- Sarah Ramberg
- Sarah Ramberg
- Sarah Ramberg
- Sarah Ramberg
- Sarah Ramberg
- Sarah Ramberg
- Sarah Ramberg
- Sarah Ramberg
- Sarah Ramberg
- Sarah Ramberg
- Sarah Ramberg
- Sarah Ramberg
- Sarah Ramberg
- Sarah Ramberg
- Sarah Ramberg
- Sarah Ramberg
- Sarah Ramberg
- Sarah Ramberg
- Sarah Ramberg
- Sarah Ramberg
- Sarah Ramberg
- Sarah Ramberg
- Sarah Ramberg
- Sarah Ramberg
- Sarah Ramberg
- Sarah Ramberg
- Sarah Ramberg
- Sarah Ramberg
- Sarah Ramberg
- Sarah Ramberg
- Sarah Ramberg
- Sarah Ramberg
- Sarah Ramberg
- Sarah Ramberg
- Sarah Ramberg
- Sarah Ramberg
- Sarah Ramberg
- Sarah Ramberg
- Sarah Ramberg
- Sarah Ramberg
- Sarah Ramberg
- Sarah Ramberg
- Sarah Ramberg
- Sarah Ramberg
- Sarah Ramberg
- Sarah Ramberg
- Sarah Ramberg
- Sarah Ramberg
- Sarah Ramberg
- Sarah Ramberg
- Sarah Ramberg
- Sarah Ramberg
- Sarah Ramberg
- Sarah Ramberg
- Sarah Ramberg
- Sarah Ramberg
- Sarah Ramberg
- Sarah Ramberg
- Sarah Ramberg
- Sarah Ramberg
- Sarah Ramberg
- Sarah Ramberg
- Sarah Ramberg
- Sarah Ramberg
- Sarah Ramberg
- Sarah Ramberg
- Sarah Ramberg
- Sarah Ramberg
- Sarah Ramberg
- Sarah Ramberg
- Sarah Ramberg
- Sarah Ramberg
- Sarah Ramberg
- Sarah Ramberg
- Sarah Ramberg
- Sarah Ramberg
- Sarah Ramberg
- Sarah Ramberg
- Sarah Ramberg
- Sarah Ramberg
- Sarah Ramberg
- Sarah Ramberg
- Sarah Ramberg
- Sarah Ramberg
- Sarah Ramberg
- Sarah Ramberg
- Sarah Ramberg
- Sarah Ramberg
- Sarah Ramberg
- Sarah Ramberg
- Sarah Ramberg
- Sarah Ramberg
- Sarah Ramberg
- Sarah Ramberg
- Sarah Ramberg
- Sarah Ramberg
- Sarah Ramberg
- Sarah Ramberg
- Sarah Ramberg
- Sarah Ramberg
- Sarah Ramberg
- Sarah Ramberg
- Sarah Ramberg
- Sarah Ramberg
- Sarah Ramberg
- Sarah Ramberg
- Sarah Ramberg
- Sarah Ramberg
- Sarah Ramberg
- Sarah Ramberg
- Sarah Ramberg
- Sarah Ramberg
- Sarah Ramberg
- Sarah Ramberg
- Sarah Ramberg
- Sarah Ramberg
- Sarah Ramberg
- Sarah Ramberg
- Sarah Ramberg
- Sarah Ramberg
- Sarah Ramberg
- Sarah Ramberg
- Sarah Ramberg
- Sarah Ramberg
- Sarah Ramberg
- Sarah Ramberg
- Sarah Ramberg
- Sarah Ramberg
- Sarah Ramberg
- Sarah Ramberg
- Sarah Ramberg
- Sarah Ramberg
- Sarah Ramberg
- Sarah Ramberg
- Sarah Ramberg
- Sarah Ramberg
- Sarah Ramberg
- Sarah Ramberg
- Sarah Ramberg
- Sarah Ramberg
- Sarah Ramberg
- Sarah Ramberg
- Sarah Ramberg
- Sarah Ramberg
- Sarah Ramberg
- Sarah Ramberg
- Sarah Ramberg
- Sarah Ramberg
- Sarah Ramberg
- Sarah Ramberg
- Sarah Ramberg
- Sarah Ramberg
- Sarah Ramberg
- Sarah Ramberg
- Sarah Ramberg
- Sarah Ramberg
- Sarah Ramberg
- Sarah Ramberg
- Sarah Ramberg
- Sarah Ramberg
- Sarah Ramberg
- Sarah Ramberg
- Sarah Ramberg
- Sarah Ramberg
- Sarah Ramberg
- Sarah Ramberg
- Sarah Ramberg
- Sarah Ramberg
- Sarah Ramberg
- Sarah Ramberg
- Sarah Ramberg
- Sarah Ramberg
- Sarah Ramberg
- Sarah Ramberg
- Sarah Ramberg
- Sarah Ramberg
- Sarah Ramberg
- Sarah Ramberg
- Sarah Ramberg
- Sarah Ramberg
- Sarah Ramberg
- Sarah Ramberg
- Sarah Ramberg
- Sarah Ramberg
- Sarah Ramberg
- Sarah Ramberg
- Sarah Ramberg
- Sarah Ramberg
- Sarah Ramberg
- Sarah Ramberg
- Sarah Ramberg
- Sarah Ramberg
- Sarah Ramberg
- Sarah Ramberg
- Sarah Ramberg
- Sarah Ramberg
- Sarah Ramberg
- Sarah Ramberg
- Sarah Ramberg
- Sarah Ramberg
- Sarah Ramberg
- Sarah Ramberg
- Sarah Ramberg
- Sarah Ramberg
- Sarah Ramberg
- Sarah Ramberg
- Sarah Ramberg
- Sarah Ramberg
- Sarah Ramberg
- Sarah Ramberg
- Sarah Ramberg
- Sarah Ramberg
- Sarah Ramberg
- Sarah Ramberg
- Sarah Ramberg
- Sarah Ramberg
- Sarah Ramberg
- Sarah Ramberg
- Sarah Ramberg
- Sarah Ramberg
- Sarah Ramberg
- Sarah Ramberg
- Sarah Ramberg
- Sarah Ramberg
- Sarah Ramberg
- Sarah Ramberg
- Sarah Ramberg
- Sarah Ramberg
- Sarah Ramberg
- Sarah Ramberg
- Sarah Ramberg
- Sarah Ramberg
- Sarah Ramberg
- Sarah Ramberg
- Sarah Ramberg
- Sarah Ramberg
- Sarah Ramberg
- Sarah Ramberg
- Sarah Ramberg
- Sarah Ramberg
- Sarah Ramberg
- Sarah Ramberg
- Sarah Ramberg
- Sarah Ramberg


Thanks for linking up to Wordless Wednesday! Pinned!
-Co-Host Coco
Thank you, Coco!
Adorable. I want to find some items to make some of these. Thank you!
Thank you for swinging by!!
Oh i love this idea! and you could make then for every holiday or special occasion or to suit a theme or just because you wanna! I need some accouterments!
Love these! Totally 100% charming 🙂 I just wish I could find bottle brush trees.. I looked at all the craft stores near me and nothing!
So adorable! Thanks so much for sharing at the Make it Monday Party! Hope to see you again next week.
I have a couple ginormous vintage Ball jars I inherited from my Grandma. They’d be perfect for a Christmas tree snow globe. Thanks for the inspiration!
Gosh, this brings back memories. Love Vintage Christmas!! Pinned and Stumbled. Thanks for sharing with us at #homematters. Please come back this Friday!
These are so cool Sadie!
I’m almost afraid to get started because I know I’ll become addicted. This is so darn cute! Thanks so much for sharing at Vintage Inspiration Party.
I’m having a hard time getting my snowman to come together your craft looks alot easier then my idea thanks for sharing following on bloglovin from party in your pj’s have a great day
love your new idea.
really great !
thanks.
Thanks, Pat!!
So cute!
Thank you so much!
This is so cute! I found you on Vintage Charm! I’ve been trying to think of a Christmas craft project that is easy and fairly quick for children to do. I have 5 grandkiddos from 2 – 14 and they will be here Thanksgiving. I wanted to take them all down to my craftroom in the basement so their mommies can have some alone time. And I found you! Thank you for the instructions. I’ll be doing this for sure with my grands!!!!
That would be perfect to do with them!!!
Love this craft – easy, cute, and vintagey!
Thanks, Emily!
Awesome idea, I love your jars!!
I swear, unusual vintage jars make all the difference in the world!!
You have some of the best ideas. These are darling! Thanks for posting to Throwback Thursday!
Awww, thank you so much. 🙂
Oh, I love these! They remind me of the snow globes from my childhood. I could spend hours just looking at them!
If you have time, I would love for you to share this post over at the
Holidays Celebration link party that is live right now! It’s such a neat idea, I’m sure our readers would love it too! (http://keepingitrreal.blogspot.com.es/2015/11/holidays-celebration-link-party-2-is.html)
Done and done- thanks for the invite, Teresa!
Thank you for linking up! Your post has been pinned to the party’s Pinterest board (https://www.pinterest.com/pinteresab/holidays-celebration-2015/). Feel free to link up other posts too, and stay tuned for the features on Friday!
Hi, just a quick note to let you know that I’ve featured this post today on the Holidays Celebration Link Party Features. Come and grab an “I was featured” button and browse around for the other features here: http://keepingitrreal.blogspot.com.es/2015/11/holidays-celebration-link-party-2.html
Congratulations!
Thank you so much, Teresa!
These are super adorable! You always come up with the best ideas. I really like how you used old jars to make these. Thank you for sharing at Merry Monday!
Thanks so much, Amanda- Happy Thanksgiving!
I recently made a mini waterless snow globe as a Christmas ornament exchange. It was fun to make and I plan to make more. Thank you for sharing at Vintage Charm.
Love it! such a cute idea.
Thank you so much, Izabel!
I LOVE snowglobes! 🙂 So fun!
Thanks for joining Cooking and Crafting with J & J. Happy Thanksgiving!
Lovely work! I bet your girls loved making these! Happy Thanksgiving! Blessings, Janet
I love these waterless snowglobes. I think they are better than ones with water. I need to make some of these. I even have a jar like your red one.
Hugs,
Bev
Thank you, Bev!!!
These are fabulous! LOVE them! Thanks for sharing them off at Vintage Inspiration Party.
Thank you, Betsy!! Happy Thanksgiving! 😀
I adoreee snowglobes and thank you for posting it. Something that my kids and I can happily venture at home..
Thank you so much!
What a fun idea! Thanks for sharing on the Pleasures of the NW’s DIY party! Would love to have you comment at the party!
These are so sweet and looks amazing. Thanks for sharing at Dishing it and Digging it.
Very cute! I will be making these with my kids and their cousins in a week! Thank you for the great idea. Sadie-Live, Laugh, & Craft
I think they’ll love them!!!
Sarah – these are beautiful!
Thank you so much, Jen!
I love this idea. They are so adorable.
Thank you so very much!! They’re my favorite Christmas decor item(s)…even more than a decorated tree!
Simply adorable & original too! Happy Holidays from Nettie in Spanish Fork, UT
Thank you so very much!
What an adorable idea! These snowglobes are so cute.
Thank you so much!
Absolutely Adorable. One thing I’m not short of is jars; miniature items…….yes. Oh, A Shop’n I will go. :}
From what I can tell; you didn’t secure the mini gift packages down; that you let them fall where they be right along with the faux snow.
Arrived here from ‘Life on Lakeshore Drive.’ and so glad I did.
Heading up to sign up for your email newsletter
Thank you so very much, Colleen!!!
Love these vintage, homemade snow globes! This will be a host pick on this week’s Funtastic Friday!
Thank you, Heidi- I’ll be there!!
I love waterless snow globes and plan to make a few with my grandkids this weekend. Thank you for sharing at Vintage Charm.
Thank you, Sharon!
Another fabulous project Sarah!! These are so lovely and I’m delighted to be featuring them at Shabbilicious Friday tomorrow and pinning.
Merry Christmas xx
Thank you so very much, Kerryanne! I will be there with bells on- Merry Christmas to you, too!
Oh no, NOW I have to keep on the lookout for old jars so I can do some. Maybe I can just dump out the old honey I have in a cute jar. I had been using all my current jars to put Epsom bath salts into! These are SOO cute. I have reindeer and bottle brush trees already waiting.Thank you!
I’m so glad you like them, Kathy!
These are all so beautiful!!! Love all of the vintage goodies you used!
Thank you so much for sharing your fabulous project with us for Waste Not Wednesday.
Thank you, Sam!!
I love these. Also like the varied heights using books. Wish I had a good collection of Christmas books–I keep mailing them to SO’s grands in MN! I HATE the prices on the old square jars–even the NEW ones are high. I have thrifted containers like large brandy snifters–which obviously have to be shaken gently. I want to do one with the tree and free falling presents! Loved that! I keep an eye out all year long for trees, critters, etc. Have even used small salt shaker figurines! This year I made “ornaments” from vintage punch cups, trees, and Dollar Tree horses (and deer, too).